請先看『使用說明』
NEX-001
From LEXWiKi
(New page: Category:AllowPages == Why to use EWF? == Enhanced Write Filter (EWF) provides the ability to write-protect a run-time image. By redirecting all write requests to either a separate di...) |
|||
| (20 intermediate revisions not shown.) | |||
| Line 1: | Line 1: | ||
[[Category:AllowPages]] | [[Category:AllowPages]] | ||
| - | + | == The Sample code source bin you can download from == | |
| - | + | ||
| - | + | ||
| - | + | ||
| - | + | ||
| - | + | ||
| - | + | ||
| - | + | ||
| - | + | ||
| - | + | ||
| - | + | ||
| - | + | ||
| - | + | ||
| - | + | ||
| - | + | ||
| - | + | ||
| - | + | ||
| - | + | ||
| - | + | ||
| - | + | ||
| - | + | ||
| - | + | ||
| - | == The Sample code source you can download | + | |
<Google Drive> | <Google Drive> | ||
| - | + | Binary file: [https://drive.google.com/file/d/1Aw60UwgPvXVGU8rfEZ1CFtRN401A4Q4A/view?usp=share_link NEX-001Y_v1.0_bin.zip] | |
| - | + | ||
| - | + | ||
<FTP> | <FTP> | ||
| - | + | Binary file: [ftp://ftp.lex.com.tw/Engineer/SoftSupport/AP_Module/NEX-001/NEX-001Y_v1.0_bin.zip NEX-001Y_v1.0_bin.zip] | |
| - | + | ||
| - | + | ||
| - | == How to use | + | == How to use NEX-001 test program? == |
| - | + | 1.Use make to compile the test file. After completion, you can enter the BIN folder and execute the test program. | |
| - | + | [[Image:NEX-001menu.jpg]] | |
| - | + | 2.Select the model or use the scanner to read the hardware information, if there is none, you can skip | |
| - | + | 3.Select the function to test | |
| - | + | '''Note: NEX-001 cannot use functions 4, 5, and 6''' | |
| - | + | == How to test NEX-001 COM? == | |
| - | + | 1. You need a device to receive the signal. We use RS485 to RS232 as a test tool | |
| - | + | [[Image:NEX-001com_cable.jpg]] | |
| - | + | 2. Check the CCA1 signal and connect it correctly | |
| - | + | [[Image:NEX-001com_CCA1.jpg]] | |
| - | + | 3.In the program, select ALL TEST to see that the COM option is correct when it is completed | |
| - | + | [[Image:NEX-001com_comport.jpg]] | |
| - | 13.You can restore the system when DISK mode. | ||
| - | + | == How to test NEX-001 CAN? == | |
| + | 1.A parallel line is needed to connect can0 and can1 with DuPont line | ||
| - | + | [[Image:NEX-001can_cable.jpg]] | |
| - | + | ||
| - | + | ||
| - | + | ||
| - | + | ||
| - | + | ||
| - | + | ||
| - | + | ||
| - | + | ||
| - | + | ||
| - | + | ||
| - | + | ||
| - | + | ||
| - | + | ||
| - | + | ||
| - | + | ||
| - | + | ||
| - | + | ||
| - | + | 2.Check the CCA1 signal and connect it correctly | |
| - | + | ||
| - | + | ||
| - | + | ||
| - | + | ||
| - | + | ||
| - | + | ||
| - | + | ||
| - | + | ||
| - | + | ||
| - | + | ||
| - | + | ||
| - | + | ||
| - | + | ||
| - | + | ||
| - | + | ||
| - | + | ||
| - | + | [[Image:NEX-001can_CCA1.jpg]] | |
| - | + | ||
| - | + | ||
| - | + | ||
| - | + | ||
| - | + | ||
| - | + | ||
| - | + | ||
| - | + | ||
| - | + | ||
| - | + | ||
| - | + | ||
| - | + | ||
| - | + | ||
| - | + | ||
| - | + | ||
| - | + | ||
| - | ===Do Set checkpoint=== | ||
| - | DWORD CEWF::DoEwfCheckPoint (LPCWSTR szProVolName, BOOL bReboot) | ||
| - | { | ||
| - | DWORD dwStatus = ERROR_SUCCESS; | ||
| - | HANDLE hProVol = INVALID_HANDLE_VALUE; | ||
| - | BOOL bResult = FALSE; | ||
| - | |||
| - | // Use the volume name to open a handle to this protected volume. | ||
| - | hProVol = EwfMgrOpenProtected(szProVolName); | ||
| - | |||
| - | EwfMgrCheckpoint(hProVol,L"Optional description"); | ||
| - | |||
| - | // This command requires a reboot to take effect. | ||
| - | if (bReboot) DoReboot(); | ||
| - | |||
| - | return dwStatus; | ||
| - | } | ||
| - | + | 3.In the program, select ALL TEST or Test Felxcan to see that the CAN option is correct when it is completed | |
| - | + | ||
| - | + | ||
| - | + | ||
| - | + | ||
| - | + | ||
| - | + | ||
| - | + | ||
| - | + | ||
| - | + | ||
| - | + | ||
| - | + | ||
| - | + | ||
| - | + | ||
| - | + | ||
| - | + | ||
| - | + | ||
| - | + | [[Image:NEX-001can_report.jpg]] | |
| - | + | ||
| - | + | ||
| - | + | ||
| - | + | ||
| - | + | ||
| - | + | ||
| - | + | ||
| - | + | ||
| - | + | ||
| - | + | ||
| - | + | ||
| - | + | ||
| - | + | ||
| - | + | ||
| - | + | ||
| - | + | ||
| - | + | ||
| - | + | ||
| - | + | ||
Current revision
Contents |
The Sample code source bin you can download from
<Google Drive>
Binary file: NEX-001Y_v1.0_bin.zip
<FTP>
Binary file: NEX-001Y_v1.0_bin.zip
How to use NEX-001 test program?
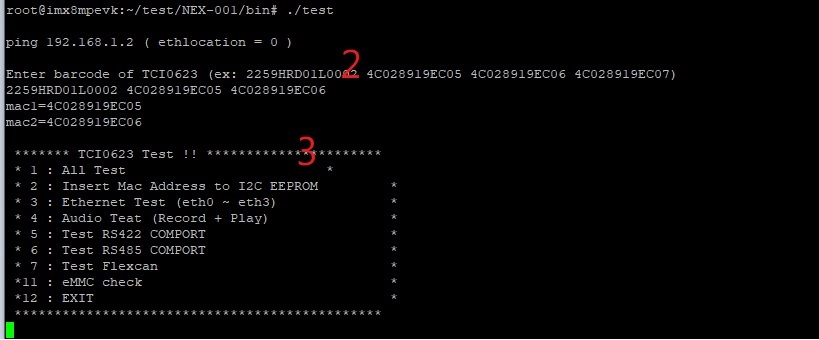
1.Use make to compile the test file. After completion, you can enter the BIN folder and execute the test program.
2.Select the model or use the scanner to read the hardware information, if there is none, you can skip
3.Select the function to test
Note: NEX-001 cannot use functions 4, 5, and 6
How to test NEX-001 COM?
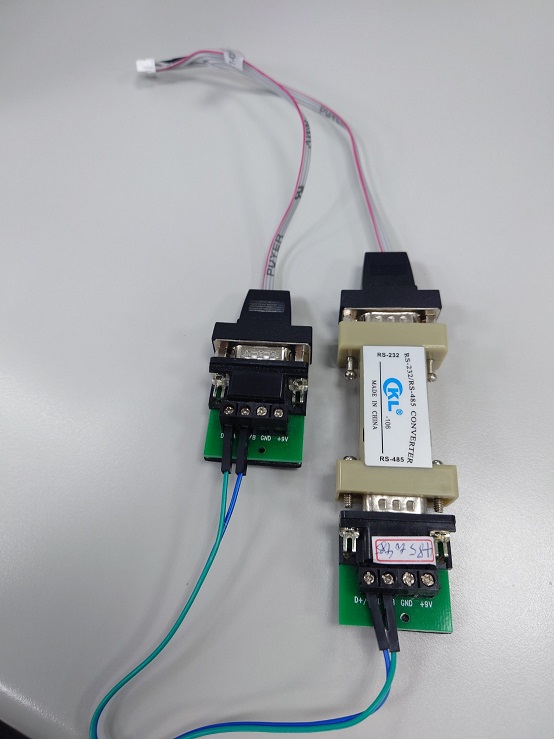
1. You need a device to receive the signal. We use RS485 to RS232 as a test tool
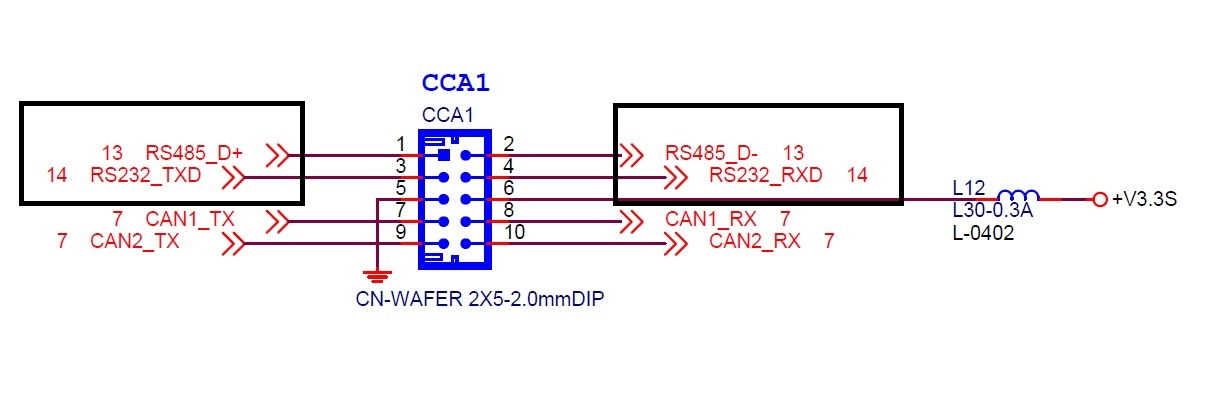
2. Check the CCA1 signal and connect it correctly
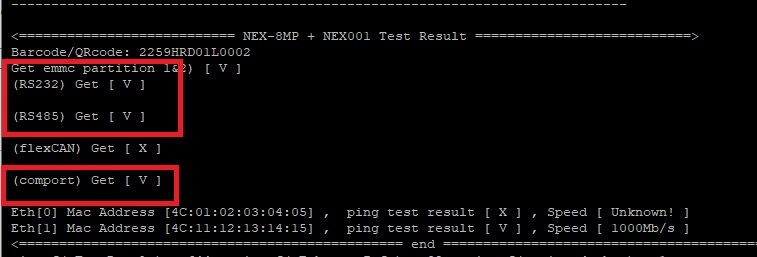
3.In the program, select ALL TEST to see that the COM option is correct when it is completed
How to test NEX-001 CAN?
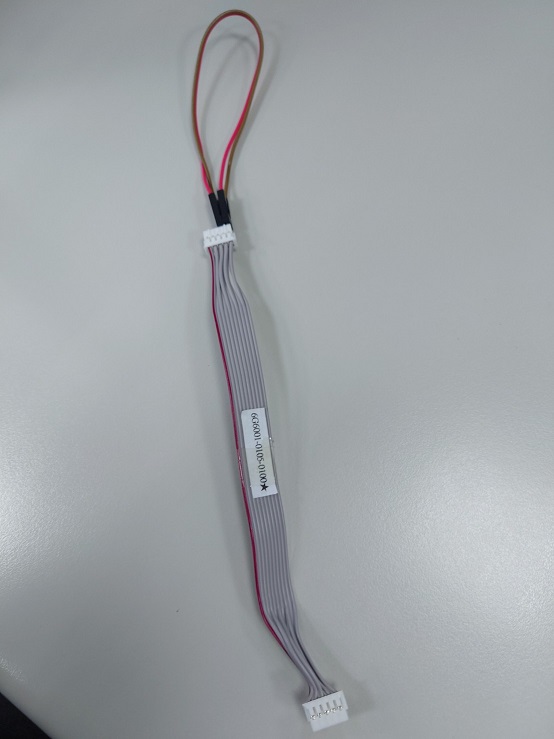
1.A parallel line is needed to connect can0 and can1 with DuPont line
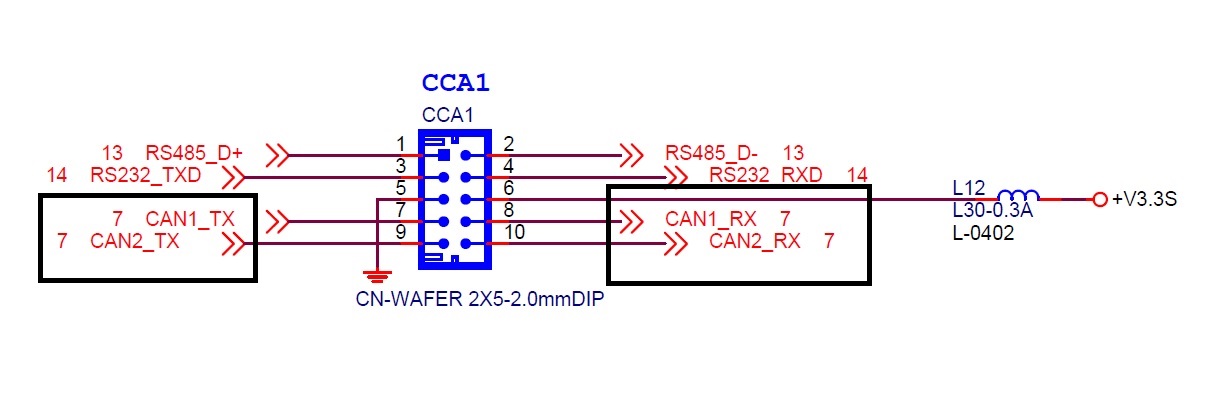
2.Check the CCA1 signal and connect it correctly
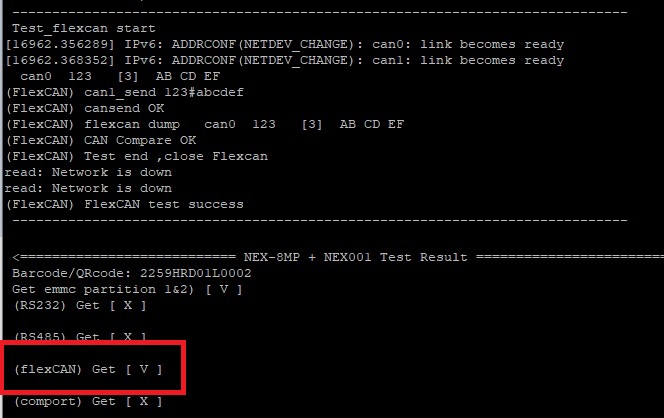
3.In the program, select ALL TEST or Test Felxcan to see that the CAN option is correct when it is completed
