請先看『使用說明』
MB Auto Tool
From LEXWiKi
(→The binary file you can download from) |
|||
| (22 intermediate revisions not shown.) | |||
| Line 10: | Line 10: | ||
(*)Windows must updated Redistributable latest supported [https://aka.ms/vs/17/release/vc_redist.x64.exe For X64] | (*)Windows must updated Redistributable latest supported [https://aka.ms/vs/17/release/vc_redist.x64.exe For X64] | ||
| - | + | <!-- | |
<Google Drive> | <Google Drive> | ||
| - | Binary file(64 bit): [https://drive.google.com/file/d/ | + | Binary file(64 bit): [https://drive.google.com/file/d/1mRH49i4FlOsjOFWaw34FnAd6Km_VQraw/view?usp=sharing MB Auto Tool_v3.4.13.25_x64] |
| - | + | ||
| + | Binary file(64 bit): [https://drive.google.com/file/d/1u8C7RoCq1KxUMN1uApiZzswgI54An252/view?usp=sharing MB AUTO REPORT TOOL_v2.1.2.3_x64] | ||
| + | |||
Simple Manuual Guide(Chinese): [https://docs.google.com/document/d/1hmx9X5MKppkAUcf1zpFZpoDxoOrS7zuF/edit?usp=share_link&ouid=111648310704855777934&rtpof=true&sd=true Simple Manuual Guide] | Simple Manuual Guide(Chinese): [https://docs.google.com/document/d/1hmx9X5MKppkAUcf1zpFZpoDxoOrS7zuF/edit?usp=share_link&ouid=111648310704855777934&rtpof=true&sd=true Simple Manuual Guide] | ||
--> | --> | ||
| - | + | ||
<FTP> | <FTP> | ||
| - | Binary file(64 bit): [ftp://ftp.lex.com.tw/Engineer/SoftSupport/AP_Module/MB_AUTO_TOOL/Windows/ | + | Binary file(64 bit): [ftp://ftp.lex.com.tw/Engineer/SoftSupport/AP_Module/MB_AUTO_TOOL/Windows/MB_AUTO_TOOL_v3.4.13.25.zip MB Auto Tool_v3.4.13.25_x64] |
| + | Binary file(64 bit): [ftp://ftp.lex.com.tw/Engineer/SoftSupport/AP_Module/MB_AUTO_TOOL/Windows/MB_AUTO_REPORT_TOOL_v2.1.2.3.zip MB_AUTO_REPORT_TOOL_v2.1.2.3_x64] | ||
| + | |||
| + | <!-- | ||
Simple Manuual Guide(Chinese): [ftp://ftp.lex.com.tw/Engineer/SoftSupport/AP_Module/MB_AUTO_TOOL/Windows/MB_Auto_Tool_FAQ.docx Simple Manuual Guide] | Simple Manuual Guide(Chinese): [ftp://ftp.lex.com.tw/Engineer/SoftSupport/AP_Module/MB_AUTO_TOOL/Windows/MB_Auto_Tool_FAQ.docx Simple Manuual Guide] | ||
--> | --> | ||
| + | |||
== MB Auto tool功能介紹 == | == MB Auto tool功能介紹 == | ||
| - | ''' | + | === 測試項目摘要 === |
| - | [[Image:MAT_AA00001.png]]<br /><br /> | + | '''軟體主介面,顯示選定的測試項目,可套用已製作的設定檔,套用設計好的測試規則'''<br /> |
| + | [[Image:MAT_AA00001-1.png]]<br /><br /> | ||
| + | === 硬體資訊 === | ||
'''軟體執行時,會自動掃描並列表主機板的BIOS及硬體訊息'''<br /> | '''軟體執行時,會自動掃描並列表主機板的BIOS及硬體訊息'''<br /> | ||
'''如果有安裝指定的mini card,軟體也會列出指定mini card的硬體訊息'''<br /> | '''如果有安裝指定的mini card,軟體也會列出指定mini card的硬體訊息'''<br /> | ||
| Line 44: | Line 52: | ||
*1-10. NTP校時<br /> | *1-10. NTP校時<br /> | ||
| - | === | + | === 生產資料 === |
| + | '''掃描製令編號、產品批號、測試人員工號的QR code條碼,作為產生報表的分類依據'''<br /> | ||
[[Image:MAT_AA00003.png]]<br /><br /> | [[Image:MAT_AA00003.png]]<br /><br /> | ||
| - | + | '''掃描主機板上的QR code條碼,可從 MB_BarCode.ini中獲得主機板的MAC位址及網卡、COM、DIO的配置資訊'''<br /> | |
[[Image:MAT_AA00004.png]]<br /><br /> | [[Image:MAT_AA00004.png]]<br /><br /> | ||
| - | === | + | === 網卡雙工/設定IP === |
| - | [[Image: | + | '''手動切換網卡雙工模式,以及批次修改網卡IP位址'''<br /> |
| + | [[Image:MAT_AA0005.png]][[Image:Mb_AA0005-2.png]]<br /><br /> | ||
| + | |||
| + | *2-1. 手動切換網卡的雙工模式<br /> | ||
| + | *2-2. 批次修改主機板的所有網路卡IP address<br /> | ||
| + | *2-3. NTP網路校時server位置<br /> | ||
| + | 選取狀態:預設連線位置為產線伺服器(192.168.1.1);<br /> | ||
| + | 非選取狀態:預設連線位置為GOOGLE NTP伺服器<br /> | ||
| + | *2-4. 指定IP address範圍,順序批次修改至網卡中<br /> | ||
| + | *2-5. 主機板網卡資訊: MAC位址、IP位址、目前為固定IP or 動態IP。如果網路有問題,顯示無效IP<br /> | ||
| + | *2-6. 主機板網卡資訊: MAC位址、IP位址、目前為固定IP or 動態IP。如果網路正常,顯示正確IP位址<br /> | ||
| + | |||
| + | === 網卡 === | ||
| + | '''網卡資訊、雙工網速及功能測試'''<br /> | ||
| + | [[Image:MAT_AA00006.png]]<br /><br /> | ||
| + | |||
| + | '''可指定特定網卡進行特定的雙工網速及功能測試'''<br /> | ||
| + | *3-1. 可指定此次網卡要測試的雙工模式<br /> | ||
| + | *3-2. 可指定是否檢查MAC位址的合法性。<br /> | ||
| + | 檢查OEM MAC:檢查是否符合LEX標準MAC or 客戶自定義MAC; <br /> | ||
| + | 檢查Barcode MAC:檢查是否符合主機板配置的MAC; <br /> | ||
| + | 檢查網卡驅動:檢查網卡驅動供應商是否符合INTEL <br /> | ||
| + | *3-3. 網卡狀態資訊,顯示該網卡晶片、驅動、MAC位址、雙工網速測試結果<br /> | ||
| - | ''' | + | === DIO === |
| - | + | '''GPIO晶片資訊,可測試指定CIO port DI/DO功能及WDT功能'''<br /> | |
| - | + | [[Image:MAT_AA00007-1.png]]<br /><br /> | |
| - | + | ||
| - | + | ||
| - | + | ||
| + | *4-1. GPIO晶片資訊,選擇主機板對應支援的CIO port類型<br /> | ||
| + | *4-2. 可指定是否測試WDT功能 及 測試指定的CIO port DI/DO功能<br /> | ||
| + | *4-3. 可指定是否測試時,依照CIO1~CIO4的順序,依次進行測試,每完成一個CIO測試,需測試者確認按下'下一步',才會進行下一個CIO測試<br /> | ||
| + | *4-4. 可指定是否測試時,長時間觸發CIO1~CIO4的測試,直到測試者確認按下'完成',才會結束測試<br /> | ||
| - | === | + | === COM === |
| - | [[Image: | + | '''COM port功能測試,可支援"RS232"、"RS422"、"RS485"、"M303"'''<br /> |
| + | [[Image:MAT_AA00008-1.png]]<br /><br /> | ||
| - | + | *5-1. COM測試結果,同時以圖形方式顯示狀態<br /> | |
| - | * | + | *5-2. 指定此COM port以何種協議去進行測試: 支援RS232、RS422、RS485<br /> |
| + | *5-3. 指定此COM port,是否以auto flow(RS232 to RS485)的方式去進行測試<br /> | ||
| - | === | + | === 測試完成結果(QR code) === |
| - | [[Image: | + | '''測試完成時,會產生各項目簡單測試結果視窗,並產生4個QR code,分別記載各項目的測試結果,'''<br /> |
| + | '''配合"Auto Report Tool"可生成EXCEL報表'''<br /> | ||
| + | [[Image:MAT_AA00009.png]]<br /> | ||
| - | '''You could test selected ether card expected speed value and reality speed value. And it detect WDT type.'''<br /> | ||
| - | *5-1. Select which duplex mode ready to test.<br /> | ||
| - | *5-2. Enter network connecting test server address. Tick the checkbox is connecting to LEX server('''192.168.1.2''').<br /> | ||
| - | [[Image:Mb_0005-2.png]]<br /> | ||
| - | *Untick the checkbox is connecting to google NTP server('''time.google.com''').<br /> | ||
| - | [[Image:Mb_0005-3.png]]<br /> | ||
| - | *5-3. Tick the checkbox. It could skip checking MAC address that is legal from LEX MAC address.<br /> | ||
| - | *If tick the checkbox and LEX MAC address to scanned, popup warning message.<br /> | ||
| - | [[Image:A0001.png]]<br /> | ||
| - | *5-4. Tick the checkbox. It could skip checking MAC address that is legal from barcode.<br /> | ||
| - | *5-5. Press button to switch next page or preve page about ether card testing result.<br /> | ||
| - | *5-6. Tick the checkbox. It could get WDT type on the motherboard.(Current support: '''F75111 SMBUS'''、'''F75113 SMBUS'''、'''F75113 LPC'''、'''F81966 LPC''')<br /> | ||
| - | *5-7. Press button to start testing selected ether card, WDT, and set system time from NTP.<br /> | ||
| - | === | + | === 測試完成結果(Log) === |
| - | [[Image: | + | '''測試完成時,會產生各項目簡單測試的Log文件,存放在特定目錄夾,可藉由工具將指定Log還原成QR code,'''<br /> |
| + | '''配合"Auto Report Tool"生成EXCEL報表'''<br /> | ||
| + | [[Image:MAT_AA000010.png]]<br /> | ||
| - | + | *6-1. 展開存放Log文件的目錄夾位置<br /> | |
| - | + | *6-2. 選取指定Log檔案,還原成QR code<br /> | |
| - | + | ||
| - | *6- | + | |
[[Image:MAT_00002-7.png]]<br /> | [[Image:MAT_00002-7.png]]<br /> | ||
Current revision
Contents |
軟體簡介
MB Auto tool 是一套可以幫助你簡單驗證LEX主機板功能的軟體.
The binary file you can download from
(*)Windows7 must updated KB2999226
(*)Windows must updated Redistributable latest supported For X64
<FTP>
Binary file(64 bit): MB Auto Tool_v3.4.13.25_x64
Binary file(64 bit): MB_AUTO_REPORT_TOOL_v2.1.2.3_x64
MB Auto tool功能介紹
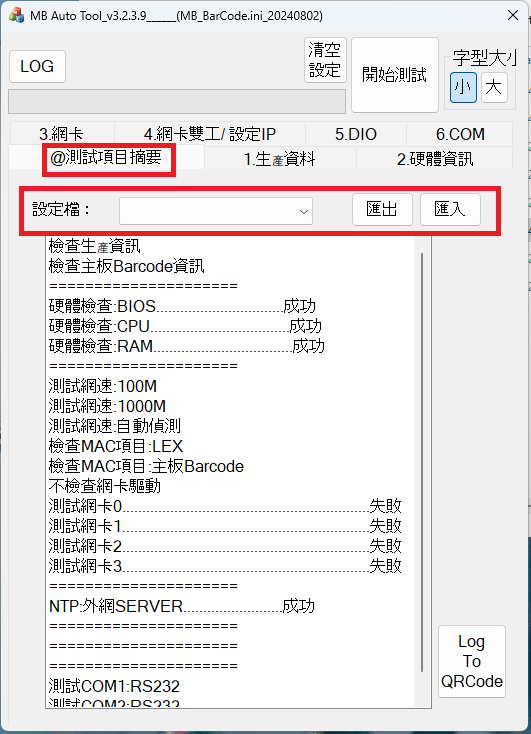
測試項目摘要
軟體主介面,顯示選定的測試項目,可套用已製作的設定檔,套用設計好的測試規則
硬體資訊
軟體執行時,會自動掃描並列表主機板的BIOS及硬體訊息
如果有安裝指定的mini card,軟體也會列出指定mini card的硬體訊息
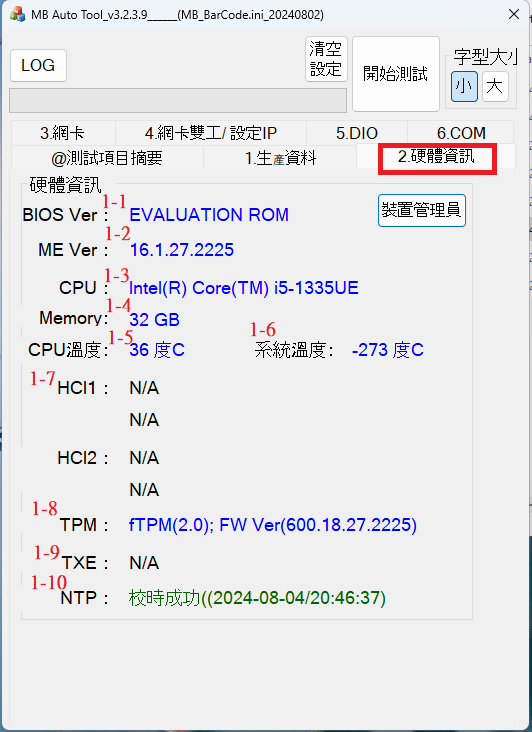
- 1-1. BIOS版本號
- 1-2. Intel Management Engine版本號
- 1-3. CPU型號
- 1-4. 記憶體大小
- 1-5. CPU溫度
- 1-6. 系統溫度
- 1-7. HCI主機控制介面
- 1-8. TPM
- 1-9. TXE
- 1-10. NTP校時
生產資料
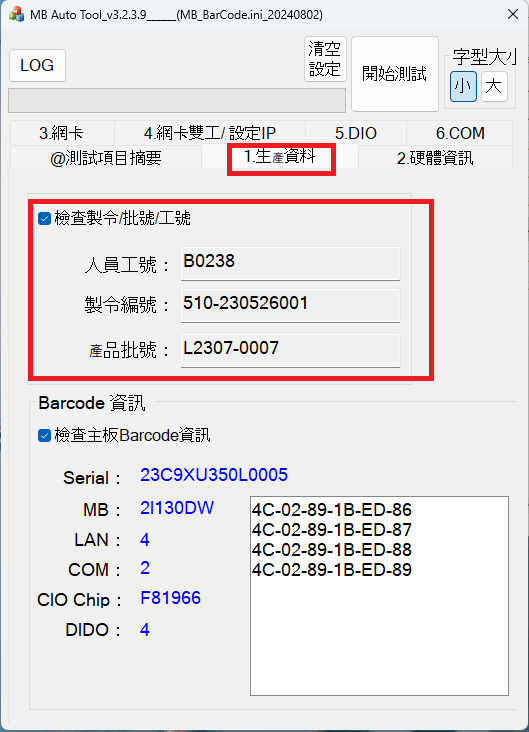
掃描製令編號、產品批號、測試人員工號的QR code條碼,作為產生報表的分類依據
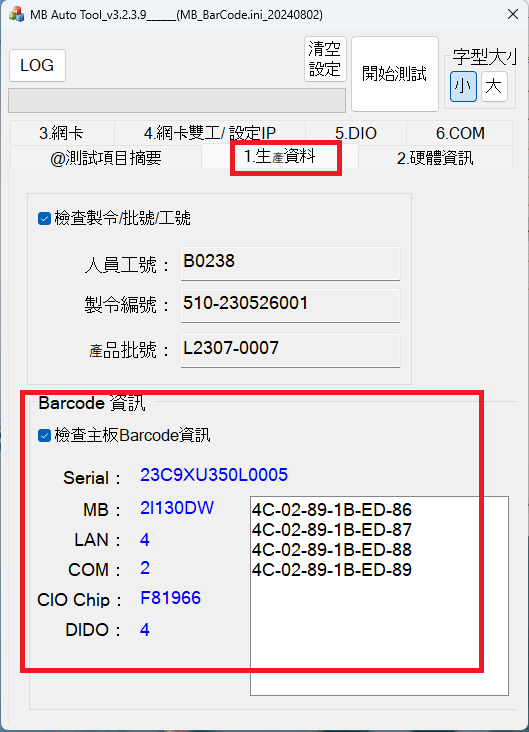
掃描主機板上的QR code條碼,可從 MB_BarCode.ini中獲得主機板的MAC位址及網卡、COM、DIO的配置資訊
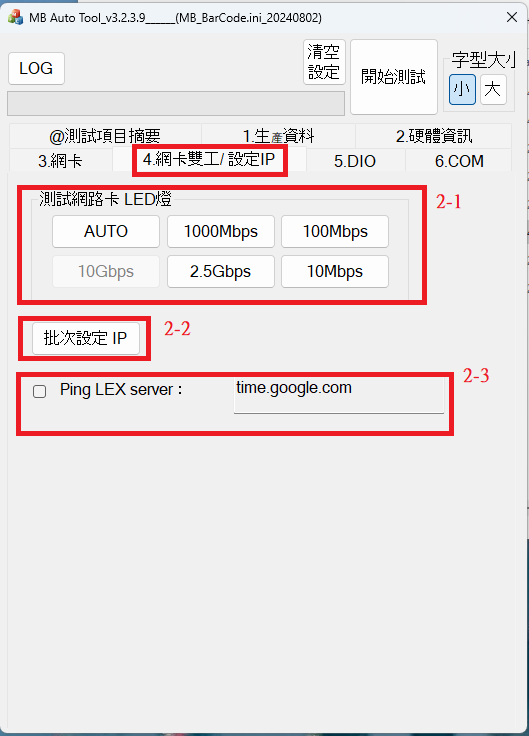
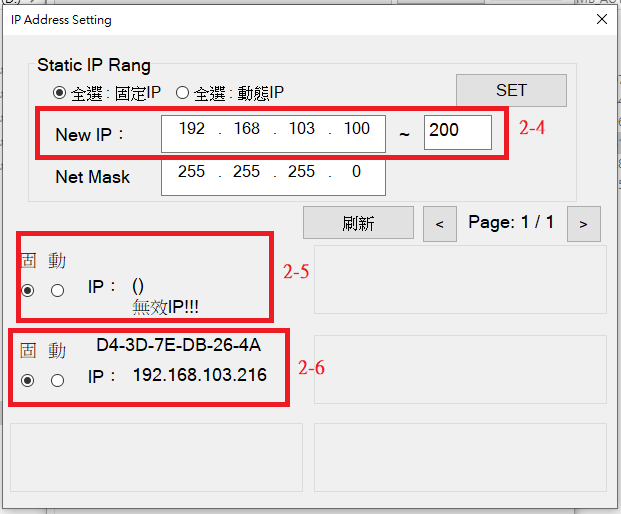
網卡雙工/設定IP
- 2-1. 手動切換網卡的雙工模式
- 2-2. 批次修改主機板的所有網路卡IP address
- 2-3. NTP網路校時server位置
選取狀態:預設連線位置為產線伺服器(192.168.1.1);
非選取狀態:預設連線位置為GOOGLE NTP伺服器
- 2-4. 指定IP address範圍,順序批次修改至網卡中
- 2-5. 主機板網卡資訊: MAC位址、IP位址、目前為固定IP or 動態IP。如果網路有問題,顯示無效IP
- 2-6. 主機板網卡資訊: MAC位址、IP位址、目前為固定IP or 動態IP。如果網路正常,顯示正確IP位址
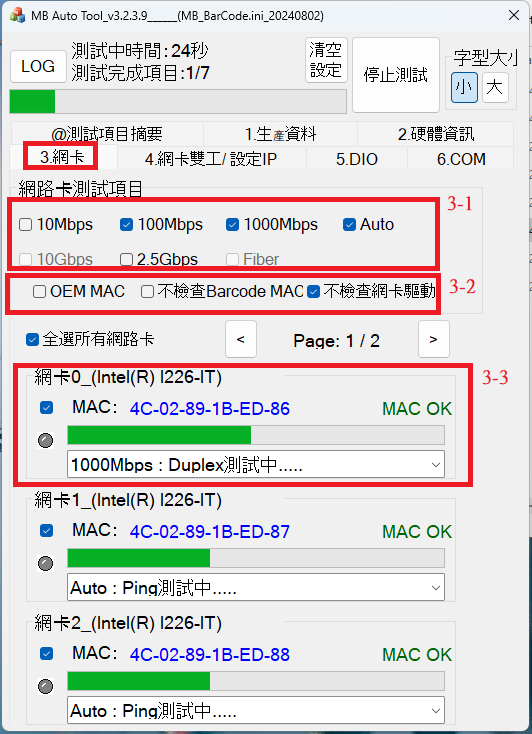
網卡
可指定特定網卡進行特定的雙工網速及功能測試
- 3-1. 可指定此次網卡要測試的雙工模式
- 3-2. 可指定是否檢查MAC位址的合法性。
檢查OEM MAC:檢查是否符合LEX標準MAC or 客戶自定義MAC;
檢查Barcode MAC:檢查是否符合主機板配置的MAC;
檢查網卡驅動:檢查網卡驅動供應商是否符合INTEL
- 3-3. 網卡狀態資訊,顯示該網卡晶片、驅動、MAC位址、雙工網速測試結果
DIO
GPIO晶片資訊,可測試指定CIO port DI/DO功能及WDT功能
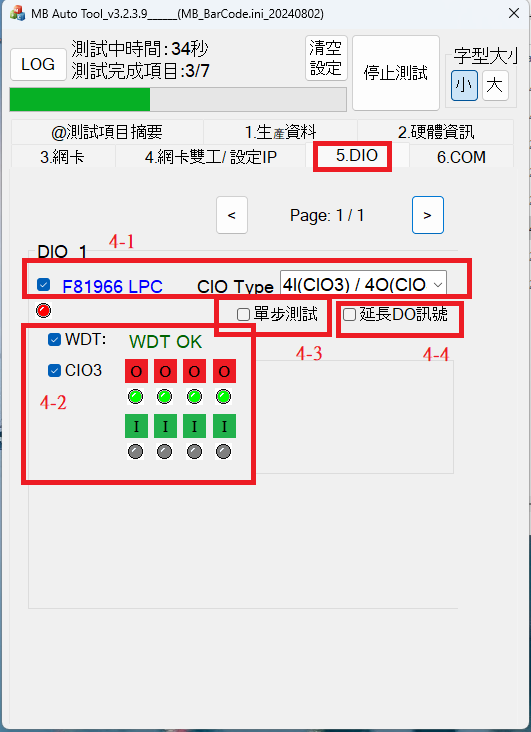
- 4-1. GPIO晶片資訊,選擇主機板對應支援的CIO port類型
- 4-2. 可指定是否測試WDT功能 及 測試指定的CIO port DI/DO功能
- 4-3. 可指定是否測試時,依照CIO1~CIO4的順序,依次進行測試,每完成一個CIO測試,需測試者確認按下'下一步',才會進行下一個CIO測試
- 4-4. 可指定是否測試時,長時間觸發CIO1~CIO4的測試,直到測試者確認按下'完成',才會結束測試
COM
COM port功能測試,可支援"RS232"、"RS422"、"RS485"、"M303"
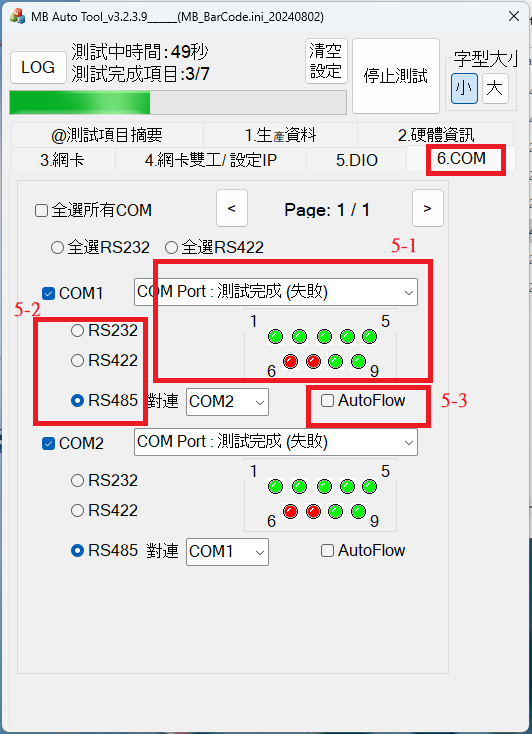
- 5-1. COM測試結果,同時以圖形方式顯示狀態
- 5-2. 指定此COM port以何種協議去進行測試: 支援RS232、RS422、RS485
- 5-3. 指定此COM port,是否以auto flow(RS232 to RS485)的方式去進行測試
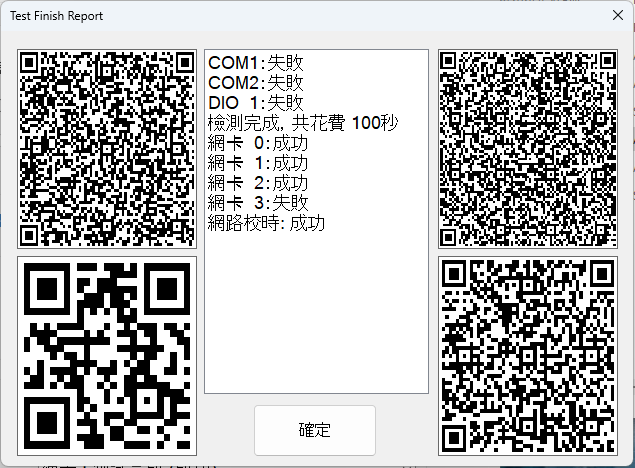
測試完成結果(QR code)
測試完成時,會產生各項目簡單測試結果視窗,並產生4個QR code,分別記載各項目的測試結果,
配合"Auto Report Tool"可生成EXCEL報表
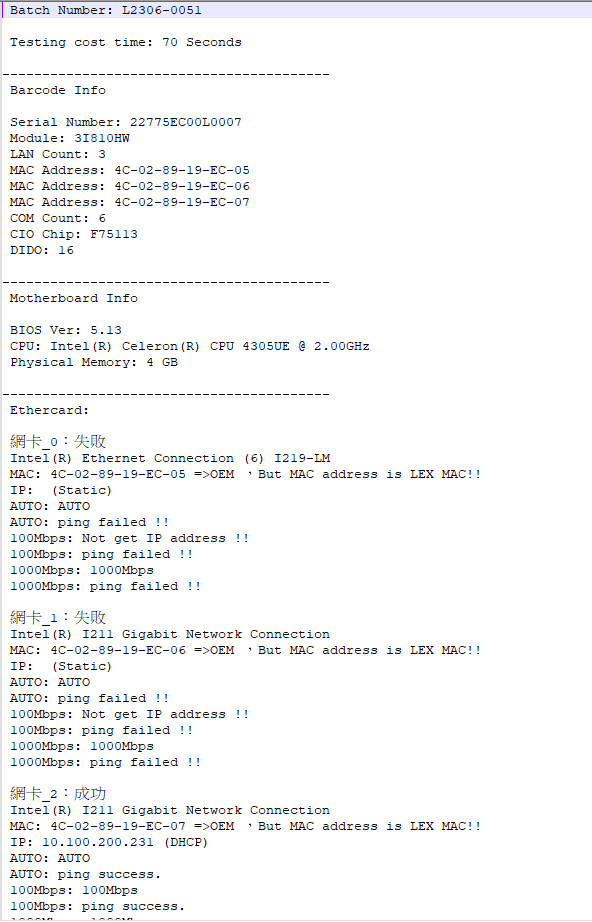
測試完成結果(Log)
測試完成時,會產生各項目簡單測試的Log文件,存放在特定目錄夾,可藉由工具將指定Log還原成QR code,
配合"Auto Report Tool"生成EXCEL報表
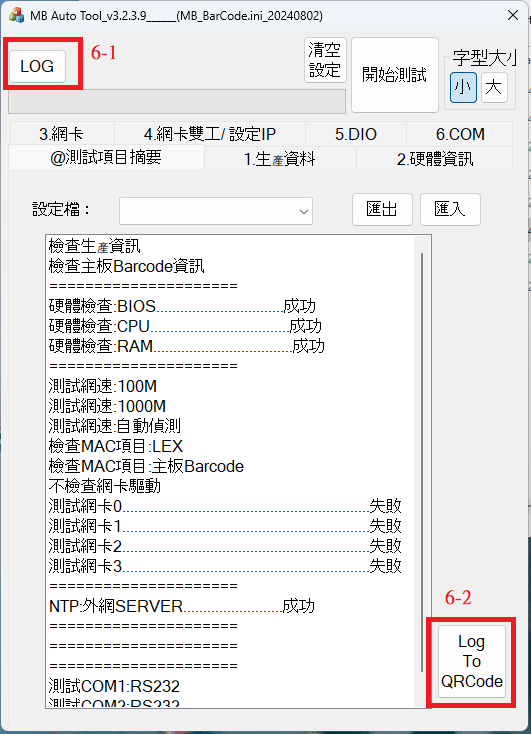
- 6-1. 展開存放Log文件的目錄夾位置
- 6-2. 選取指定Log檔案,還原成QR code
