請先看『使用說明』
MB:2N8MP
From LEXWiKi
(→Debug (UART, CC1)) |
(→Download Sample code) |
||
| (8 intermediate revisions not shown.) | |||
| Line 195: | Line 195: | ||
==Download Sample code == | ==Download Sample code == | ||
DIO.ZIP | DIO.ZIP | ||
| - | https://drive.google.com/file/d/ | + | https://drive.google.com/file/d/1sutMbcOLPwyf0MrDGCI1n5ch6DL7FcZk/view?usp=sharing |
==Note== | ==Note== | ||
| Line 422: | Line 422: | ||
[[Image:boot_switch.jpg]] | [[Image:boot_switch.jpg]] | ||
| + | |||
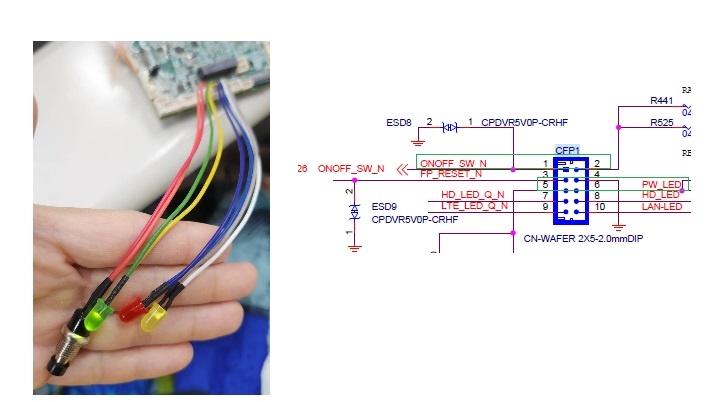
| + | If only have the motherboard, must plug in a cable like this on CFP1. The buttons and system LEDs correspond to pin1 and pin5. | ||
| + | |||
| + | [[Image:CFP1.jpg]] | ||
| + | |||
*How to Change Boot Mode | *How to Change Boot Mode | ||
| - | + | >> emmc :default (power on). | |
| - | + | ||
| - | #step1: Press and hold the button for about 8 seconds and motherboard LED off (power off). | + | |
| - | #step2: Release button ,and sys led off. | + | >> serial download |
| - | #step3: Press and hold the button about 3 seconds until see the sys led flashing slowly. | + | #step1: Press and hold the button for about 8 seconds and motherboard LED off (power off). |
| - | #step4: Insert usb type A cable into CU3 to connect to PC | + | #step2: Release button ,and sys led off. |
| - | #step5: Check Device (host) | + | #step3: Press and hold the button about 3 seconds until see the sys led flashing slowly. |
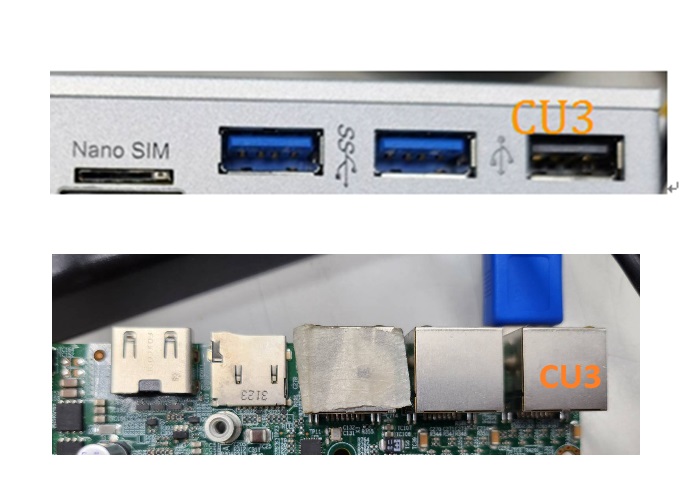
| + | #step4: Insert usb type A cable into CU3 to connect to PC | ||
| + | [[Image:CU3.jpg]] | ||
| + | |||
| + | #step5: Check Device (host) | ||
[[Image:host_nxp.jpg]] | [[Image:host_nxp.jpg]] | ||
| - | #step6: use UUU tool write yocto img to eMMC/ sd card | + | #step6: use UUU tool write yocto img to eMMC/ sd card |
| + | |||
| + | |||
| + | |||
| + | |||
| + | >> sd card | ||
| + | #step1: Press and hold the button for about 8 seconds and motherboard LED off (power off). | ||
| + | #step2: Release button ,and sys led off. | ||
| + | #step3: Press and hold the button about 6 seconds until see the sys led flashing fast. | ||
| + | |||
| + | |||
| + | ==If you want to burn Android OS correctly== | ||
| + | '''If you want to burn Android OS correctly, you must download the source, remove the tcpc settings(CONFIG_USB_TCPC=n) and then compile. | ||
| + | ''' | ||
| + | https://www.nxp.com/design/design-center/software/embedded-software/i-mx-software/android-os-for-i-mx-applications-processors:IMXANDROID | ||
| + | |||
| + | for example : Android 14.0.0_2.2.0 (L6.6.36_2.1.0 BSP) | ||
| + | |||
| + | '''Remove TCPC Setting''' | ||
| + | modify uboot-imx's "imx8mp_evk_android_uuu_defconfig " | ||
| + | CONFIG_USB_TCPC=n | ||
| + | |||
| + | (location :android_build/vendor/nxp-opensource/uboot-imx/configs/imx8mp_evk_android_uuu_defconfig ) | ||
| - | + | '''Flash eMMC''' | |
| - | + | sudo ./uuu_imx_android_flash.sh -f imx8mp -e -c 28 | |
| - | + | ||
| - | + | ||
Current revision
| O.S. | CPU | Rev | LVDS | HDMI | Dual output | M.2(B key) | nano SIM | USB2.0 | USB3.0 | PCIE | LAN | COM-422 | COM-485 | F75111N | WDT/DIO | TPM2.0 | CN059 | AU002 | Download | Patch |
|---|---|---|---|---|---|---|---|---|---|---|---|---|---|---|---|---|---|---|---|---|
|
zeus_yocto |
A53 |
0.3 |
Yes |
Yes |
Yes |
Yes |
Yes |
Yes |
Yes |
Yes |
Yes |
Yes |
Yes |
Yes |
Yes |
- |
Yes |
Yes |
kernel5.4.70 | |
|
kirkstone_yocto |
A53 |
0.3 |
Yes |
Yes |
Yes |
Yes |
Yes |
Yes |
Yes |
Yes |
Yes |
Yes |
Yes |
Yes |
Yes |
- |
Yes |
Yes |
kernel5.15.71 | |
|
kirkstone_desktop |
A53 |
0.3 |
Yes |
Yes |
Yes |
Yes |
Yes |
Yes |
Yes |
Yes |
Yes |
Yes |
Yes |
Yes |
Yes |
Yes |
- |
- |
kernel5.15.71 | |
|
kirkstone_yocto |
A53 |
0.4 |
Yes |
Yes |
Yes |
Yes |
Yes |
Yes |
Yes |
Yes |
Yes |
Yes |
Yes |
Yes |
Yes |
- |
- |
- |
Kernel5.15.71 TPM use Kirkstone_Desktop Test |
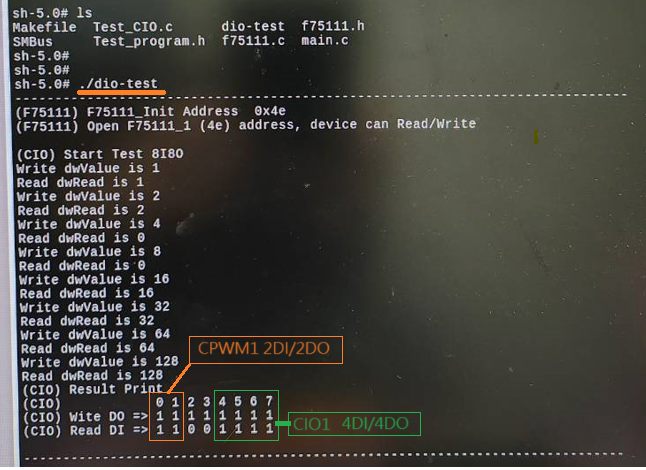
How to Test CIO/CPWM1
Download Sample code
DIO.ZIP https://drive.google.com/file/d/1sutMbcOLPwyf0MrDGCI1n5ch6DL7FcZk/view?usp=sharing
Note
TPM2.0 only kirkstone_desktop Test, because other kernel not support clevis tool
How to Test CN059/AU002
root@imx8mpevk:~# cat /proc/asound/cards
0 [Device         ]: USB-Audio - USB Audio Device
                     C-Media Electronics Inc. USB Audio Device at usb-xhci-hcd.1.auto-1.4.3, full sp
1 [audiohdmi      ]: audio-hdmi - audio-hdmi
                     audio-hdmi
1.Recored Test
CN059
root@imx8mpevk:~# arecord -Dhw:0,0 -d 10 -f cd -r 44100 -c 1 record.wav
AU002
root@imx8mpevk:~# arecord -Dhw:0,0 -d 5 -f cd -r 44100 test.wav
Recording WAVE 'test.wav' : Signed 16 bit Little Endian, Rate 44100 Hz, Stereo
2.Play Test
CN059/AU002
root@imx8mpevk:~# aplay -Dhw:0,0 -f cd -r 44100 test.wav
Playing WAVE 'test.wav' : Signed 16 bit Little Endian, Rate 44100 Hz, Stereo
3.CN059/AU002 Record+Play Test
3-1.check sound card
pactl list sinks
pactl list sources
3-2.assignation Sound Card source:(Microphone)
pacmd set-default-source 1
3-3.assignation Sound Card sink(C-Media)
pacmd set-default-sink 0
3-4. Line In / Mic In Test
Line In Test : First Modify source Active Port is analog-input-linein:
pacmd set-source-port alsa_input.usb-C-Media_Electronics_Inc._USB_Advanced_Audio_Device-00.analog-stereo analog-input-linein
Mic In Test:First Modify source Active Port = analog-input-mic(Default):
pacmd set-source-port alsa_input.usb-C-Media_Electronics_Inc._USB_Advanced_Audio_Device-00.analog-stereo analog-input-mic
3-5.Arecord + Play Command (only AU002)
arecord –Dhw:0,0 –d 5 –f cd –r 44100 | aplay –Dhw:0,0 –r44100
Support 4G/5G LTE Module
SIMCOM SIM7906G-M2,LTE CAT6 M.2 Type Module
SIMCOM SIM8200EA-M2
Support WIFI/BT Module
AzureWave AW-CM276MA SDIO-UART(zeus/kirkstone Test)
SparkLan WNFB-266AXI(BT)(only Kirkstone-yocto Test)
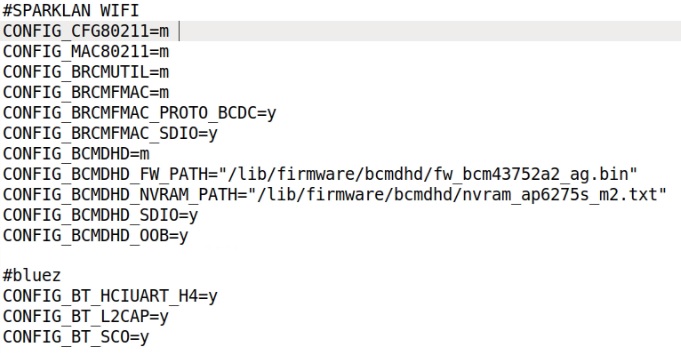
How to Test WIFI/BT(Sparklan WNFB-266AXI(BT) Modules
WNFB-266AXI(BT) firmware file https://drive.google.com/file/d/18ms4wlhH81pfqyqfQKgiZCtPfeLikIy3/view?usp=sharing
WIFI/BT source code https://drive.google.com/file/d/1r8nv0mBHGocV-4fwtleFyeN6l4Xq9dQD/view?usp=sharing
1.新增CONFIG到/kernel-source/arch/arm64/boot/configs/imx_v8_defconfig
2.bcmdhd.tar.gz extract to /kernel-source/drivers/net/wireless/
vi /kernel-source/drivers/net/wireless/Kconfig
++ source "drivers/net/wireless/bcmdhd/Kconfig"
vi /kernel-source/drivers/net/wireless/Makefile
++ obj-$(CONFIG_BCMDHD) += bcmdhd/
3.cp -r bcmdhd/include /kernel-source/include
4.build image(bitbake imx-image-multimedia)
5.into 2n8mp and create bcmdhd folder unzip sparklan_wnfb-266axi(bt)_fw.zip mkdir /lib/firmware/bcmdhd cd /fw/ cp -v *.* /lib/firmware/bcmdhd
6.reboot
7.ifconfig wlan0 up
8.Test WIFI Function vi /etc/wpa_supplicant.conf
ctrl_interface=/var/run/wpa_supplicant
ctrl_interface_group=0
update_config=1
network={
       ssid="you want to connect ssid name"
       psk="you want to connect ap password"
}
Start:
wpa_supplicant -c /etc/wpa_supplicant.conf -i wlan0 &
Get IP:
udhcpc -i wlan0
wlan0: flags=4163<UP,BROADCAST,RUNNING,MULTICAST> mtu 1500
       inet 10.100.100.39  netmask 255.255.255.0  broadcast 10.100.100.255
       inet6 fe80::20e:8eff:feb2:72da  prefixlen 64  scopeid 0x20<link>
       ether 00:0e:8e:b2:72:da  txqueuelen 1000  (Ethernet)
       RX packets 57  bytes 5737 (5.6 KiB)
       RX errors 0  dropped 0  overruns 0  frame 0
       TX packets 51  bytes 6626 (6.4 KiB)
       TX errors 0  dropped 0 overruns 0  carrier 0  collisions 0
root@imx8mpevk:/lib/firmware/bcmdhd# ping 8.8.8.8
PING 8.8.8.8 (8.8.8.8) 56(84) bytes of data.
64 bytes from 8.8.8.8: icmp_seq=1 ttl=58 time=13.0 ms
64 bytes from 8.8.8.8: icmp_seq=2 ttl=58 time=12.9 ms
64 bytes from 8.8.8.8: icmp_seq=3 ttl=58 time=12.2 ms
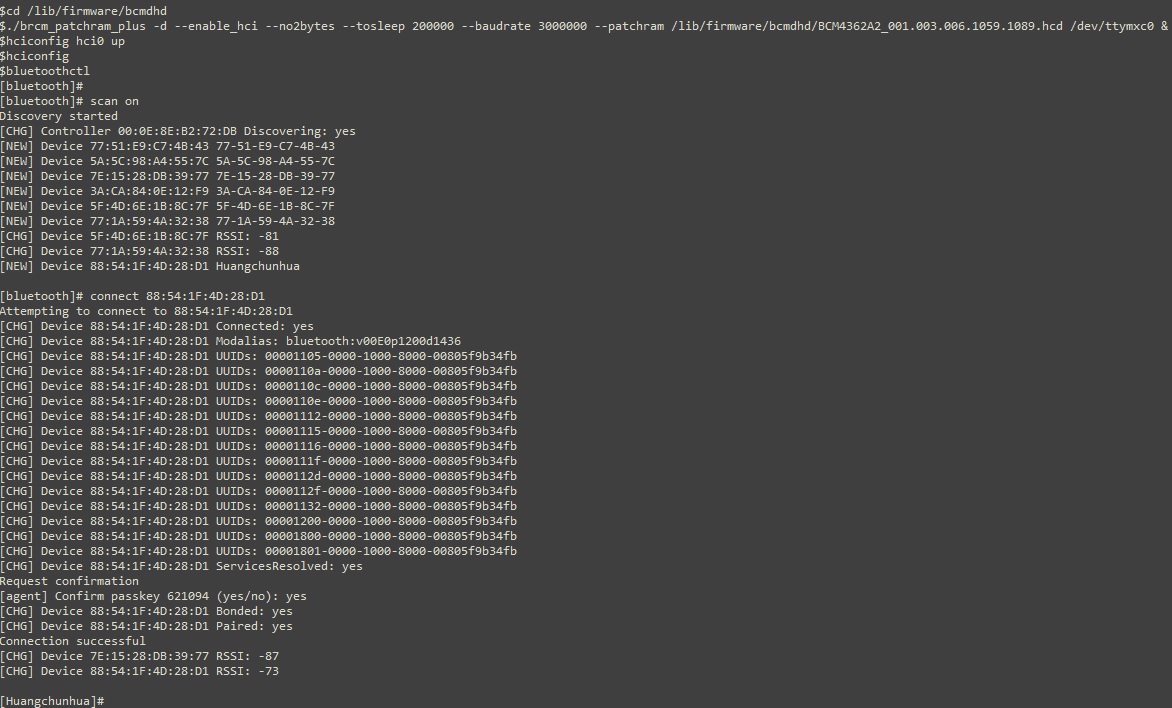
9.Enable BT
How to test CC007
f81534.ko file https://drive.google.com/file/d/1Zf8XqoBUP5xyAqIkXiklP2whlfeIrBzp/view?usp=sharing
set_mode.zip https://drive.google.com/file/d/1mRkgomMLdaDiIpJEz3MUp74gE2yVS0P2/view?usp=sharing
1. insmod f81534.ko
2. cd set_mode
3. make
4. ./set_mode ttyUSB0 1
5. ./set_gpio ttyUSB0 1
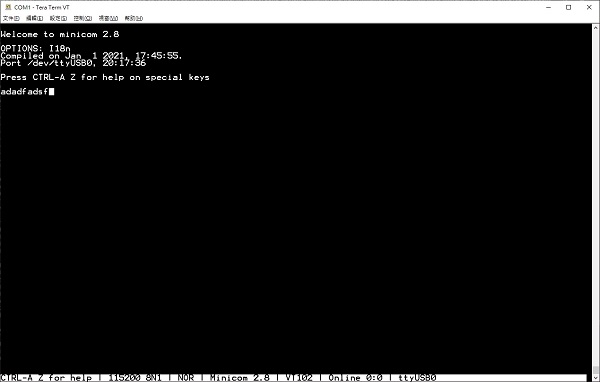
6. minicom -s
6-1. Serial port setup-> Serial Device: /dev/ttyUSB0
6-2. Exit
How to use basler camera dAa2500-60mc (only kirkstone-5.15.71,imx-image-full)
Follow basler github
https://github.com/BaslerTwSupport/nxp-imx
How to test 2D/3D Graphics (only kirkstone-5.15.71,imx-image-full)
glmark2-es2-wayland -s 640x480
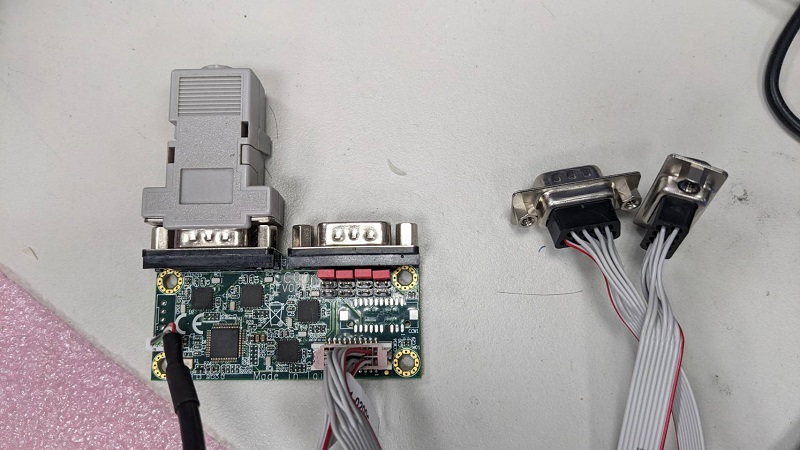
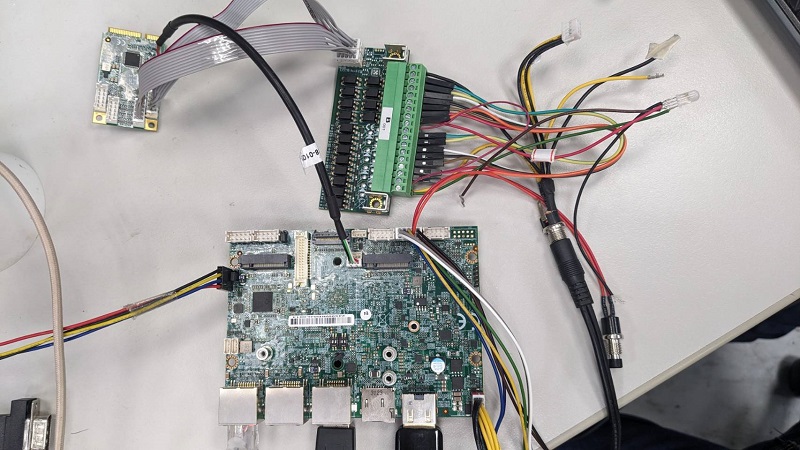
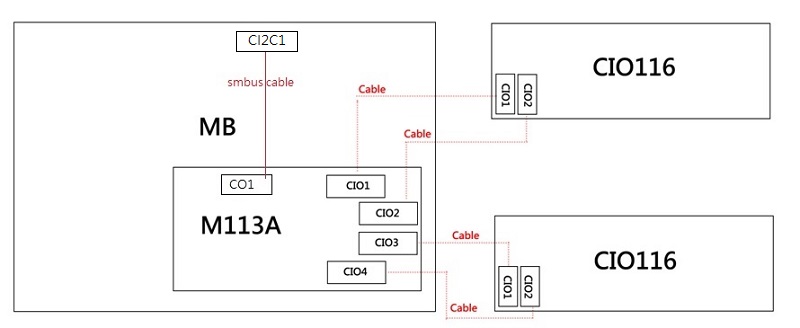
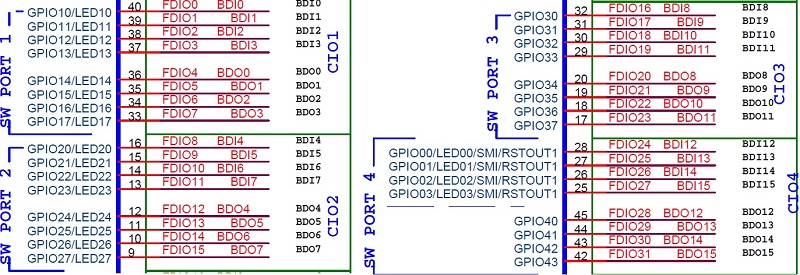
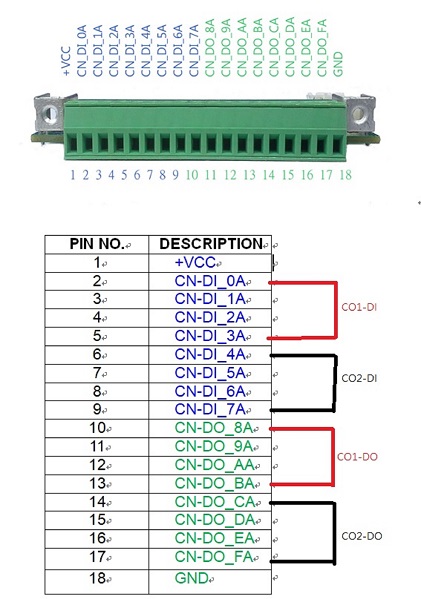
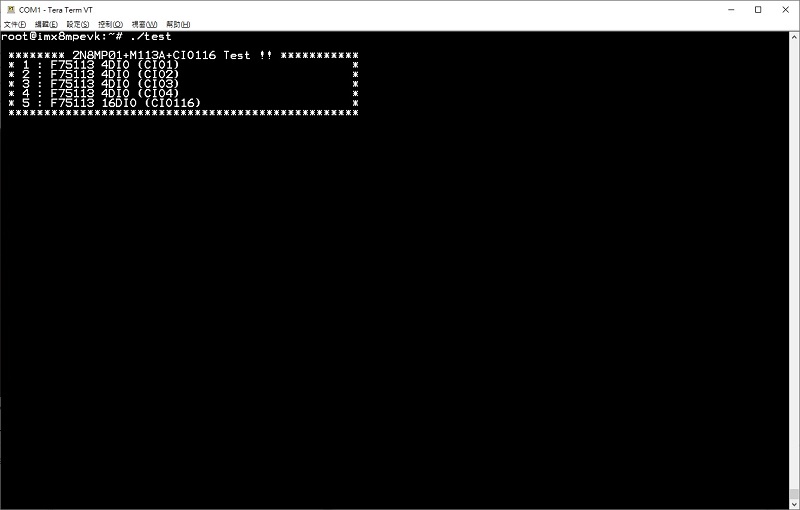
How to Test M113A(SMBUS)+CIO116B(kirkstone5.15.71)
Real connect Module
- M113A+CIO116B Sample code download:https://drive.google.com/file/d/1tz-25Q4DW8CGjNjedY9hIH4bntAnyU3g/view?usp=sharing
M113A M113A Sample TestUtility
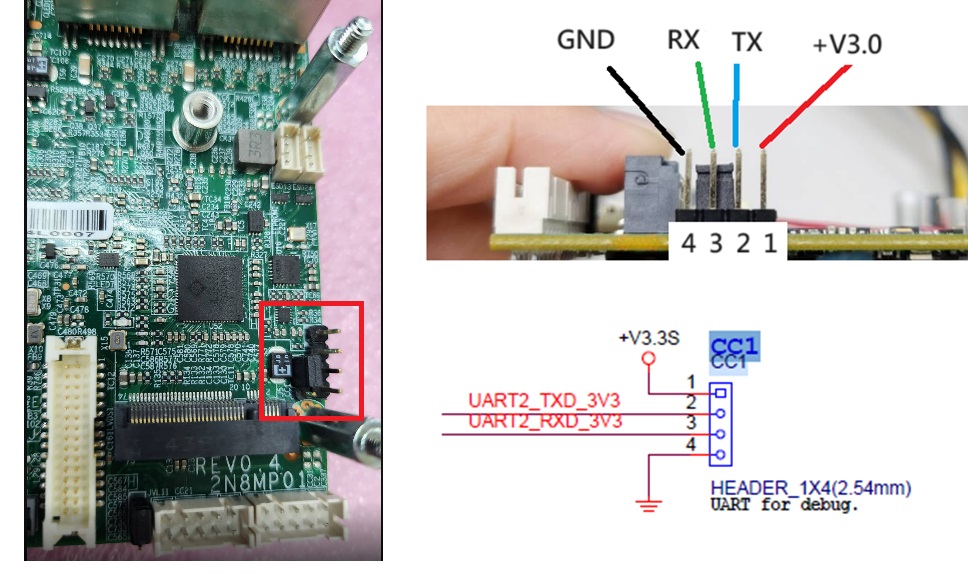
Debug (UART, CC1)
Open the terminal window (i.e., Hyper Terminal or Tera Term),choose the COM port number and apply the following configuration.
Baud rate: 115200
Data bit: 8
Parity: None
Stop bits: 1
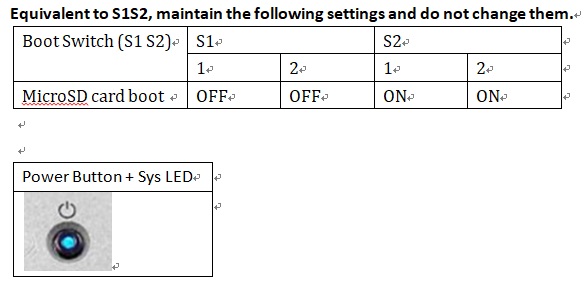
Boot Mode and Boot Device configurations
If only have the motherboard, must plug in a cable like this on CFP1. The buttons and system LEDs correspond to pin1 and pin5.
- How to Change Boot Mode
>> emmc :default (power on).
>> serial download
#step1:  Press and hold the button for about 8 seconds and motherboard LED off (power off).
#step2:  Release button ,and sys led off.
#step3:  Press and hold the button about 3 seconds until see the sys led flashing slowly.
#step4:  Insert usb type A cable into CU3 to connect to PC
#step5: Check Device (host)
#step6: use UUU tool write yocto img to eMMC/ sd card
>> sd card
#step1:  Press and hold the button for about 8 seconds and motherboard LED off (power off).
#step2:  Release button ,and sys led off.
#step3:  Press and hold the button about 6 seconds until see the sys led flashing fast.
If you want to burn Android OS correctly
If you want to burn Android OS correctly, you must download the source, remove the tcpc settings(CONFIG_USB_TCPC=n) and then compile. https://www.nxp.com/design/design-center/software/embedded-software/i-mx-software/android-os-for-i-mx-applications-processors:IMXANDROID
for example : Android 14.0.0_2.2.0 (L6.6.36_2.1.0 BSP)
Remove TCPC Setting modify uboot-imx's "imx8mp_evk_android_uuu_defconfig " CONFIG_USB_TCPC=n
(location :android_build/vendor/nxp-opensource/uboot-imx/configs/imx8mp_evk_android_uuu_defconfig )
Flash eMMC sudo ./uuu_imx_android_flash.sh -f imx8mp -e -c 28
