請先看『使用說明』
LAN By Pass Utility under Linux
From LEXWiKi
(Difference between revisions)
(→How to compile source code) |
(→The Sample code source you can download from) |
||
| (23 intermediate revisions not shown.) | |||
| Line 1: | Line 1: | ||
[[Category:AllowPages]] | [[Category:AllowPages]] | ||
| + | |||
== The Sample code source you can download from == | == The Sample code source you can download from == | ||
| - | + | <!-- | |
| - | + | <Google Drive> | |
| + | Source file: [https://drive.google.com/file/d/1x4Hwi-gkbcSgS1ObnVwOlwY54jUpcnJf/view?usp=sharing LANByPass_v1.1_Src] | ||
| + | |||
| + | Binary file: [https://drive.google.com/file/d/1TDTRP2v3eVi69dmDdxfElTUgwdX0egB1/view?usp=sharing LANByPass_v1.1_Bin] | ||
| + | --> | ||
| + | |||
| + | <FTP> | ||
| + | |||
| + | Source file: [ftp://ftp.lex.com.tw/Engineer\SoftSupport\AP_Module\LanByPass_Utility\LINUX\LANByPass_V1.1_SRC.tar.gz LANByPass_v1.1_Src] | ||
| + | |||
| + | Binary file: [ftp://ftp.lex.com.tw/Engineer\SoftSupport\AP_Module\LanByPass_Utility\LINUX\LANByPass_V1.1_BIN.tar.gz LANByPass_v1.1_Bin] | ||
== How to compile source code == | == How to compile source code == | ||
| - | 1. Compile source code with Code::Blocks<br> | + | 1. '''Compile source code with Code::Blocks'''<br> |
| - | download and install the Code::Block with command "apt-get install codeblocks libgtk2.0-dev"<br> | + | #download and install the Code::Block and libgtk2.0-dev with command "apt-get install codeblocks libgtk2.0-dev"<br> |
| - | Open an exist project(lanbypass.cbp) in Code::Blocks | + | #Open an exist project(lanbypass.cbp) in Code::Blocks<br> |
| - | + | # add an option '''`pkg-config gtk+-2.0 --cflags`-std=gnu99''' in "Project->Build Option->compiler setting->Other option"<br> | |
| - | 2.Compile source code with "make" | + | # add an option '''`pkg-config gtk+-2.0 --libs`''' in "Project->Build Option->Linker Setting->Other linker option"<br> |
| + | #click the compile button<br> | ||
| + | 2.'''Compile source code with "make"'''<br> | ||
| + | #download and install the libgtk2.0-dev with command "apt-get install libgtk2.0-dev"<br> | ||
# cd lanbypass | # cd lanbypass | ||
| + | # ./configure | ||
# make | # make | ||
| - | # cd src/ | + | # cd src/lanbypass // execute the binary file() |
| - | How to Use The LAN By Pass Utility | + | |
| + | ==How to Use The LAN By Pass Utility== | ||
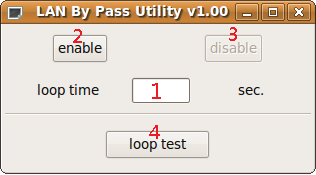
[[Image:lanbypass.png]] | [[Image:lanbypass.png]] | ||
#Loop Time: Loop time is means "the time of delay before LAN by pass be enabled". | #Loop Time: Loop time is means "the time of delay before LAN by pass be enabled". | ||
| Line 77: | Line 93: | ||
writesmbusbyte(F75111_address,WDT_Ctrl,STS_WD_TMOUT_Clear|WDTimer_Enable); | writesmbusbyte(F75111_address,WDT_Ctrl,STS_WD_TMOUT_Clear|WDTimer_Enable); | ||
} | } | ||
| - | |||
} | } | ||
| - | |||
| - | |||
} | } | ||
Current revision
Contents |
The Sample code source you can download from
<FTP>
Source file: LANByPass_v1.1_Src
Binary file: LANByPass_v1.1_Bin
How to compile source code
1. Compile source code with Code::Blocks
- download and install the Code::Block and libgtk2.0-dev with command "apt-get install codeblocks libgtk2.0-dev"
- Open an exist project(lanbypass.cbp) in Code::Blocks
- add an option `pkg-config gtk+-2.0 --cflags`-std=gnu99 in "Project->Build Option->compiler setting->Other option"
- add an option `pkg-config gtk+-2.0 --libs` in "Project->Build Option->Linker Setting->Other linker option"
- click the compile button
2.Compile source code with "make"
- download and install the libgtk2.0-dev with command "apt-get install libgtk2.0-dev"
- cd lanbypass
- ./configure
- make
- cd src/lanbypass // execute the binary file()
How to Use The LAN By Pass Utility
- Loop Time: Loop time is means "the time of delay before LAN by pass be enabled".
- Enable: Enable LAN by pass function.
- Disable: Disable LAN by pass function.
- Loop Test: Do LAN by pass loop test as below picture.
Introduction
parameters define
#--------F75111 Controller-------
#define Config              0x03
#define WDT_Ctrl            0x36
#define WDTimer             0x37
#define F75111_address      0x9c
#--------WDT controller----------
#define set_pin10           0x03
#define WDTimer_Enable      0x20
#define STS_WD_TMOUT_Clear  0x40
Enable Funtion
void enable()
{
    writesmbusbyte(F75111_address,Config,set_pin10);
    writesmbusbyte(F75111_address,WDTimer,timer);
    writesmbusbyte(F75111_address,WDT_Ctrl,STS_WD_TMOUT_Clear|WDTimer_Enable);
}
Disable Funtion
void disable()
{
    disable_flags=1;
    writesmbusbyte(F75111_address,Config,set_pin10);
    writesmbusbyte(F75111_address,WDT_Ctrl,STS_WD_TMOUT_Clear);
}
Loop test Funtion
void loop_test()
{
    if(chack_time()==1)
    {
        gtk_widget_set_sensitive(enable_button,FALSE);
        gtk_widget_set_sensitive(disable_button,TRUE);
        gtk_widget_set_sensitive(loop_test_button,FALSE);
        g_thread_create((void*)loop_test_thread,timer,FALSE,NULL);
    }
}
loop_test_thread
void loop_test_thread(int timer)
{
       BYTE timeout=0;
       disable_flags=0;
       writesmbusbyte(F75111_address,Config,set_pin10);
       writesmbusbyte(F75111_address,WDTimer,timer);
       writesmbusbyte(F75111_address,WDT_Ctrl,STS_WD_TMOUT_Clear|WDTimer_Enable);
       while(disable_flags==0)
       {
           usleep(10000);
           SMBus_ReadByte(F75111_address,WDTimer,&timeout);
           if(timeout<=1)
           {
               writesmbusbyte(F75111_address,SMBHSTCMD,set_pin10);
               writesmbusbyte(F75111_address,WDTimer,timer);
               writesmbusbyte(F75111_address,WDT_Ctrl,STS_WD_TMOUT_Clear|WDTimer_Enable);
           }
       }
}


