請先看『使用說明』
DPC Module:DPC under Windows
From LEXWiKi
(→How to use the DPC utility) |
(→How to use the DPC utility) |
||
| Line 15: | Line 15: | ||
2. When click the "LightOff" button, the panel will become darkness. | 2. When click the "LightOff" button, the panel will become darkness. | ||
| - | + | #Hot key and touch position to light on panel must set first. | |
3. Brightness control scrollbar, you can adjust volume of brightness. | 3. Brightness control scrollbar, you can adjust volume of brightness. | ||
| Line 23: | Line 23: | ||
5. Advanced config settings. | 5. Advanced config settings. | ||
| - | + | #When DPC utility minimum, it will hide in the notification area (like below picture),<br /> | |
and double click the tray icon (shown as the red square below), 'DPC Utility', it will show. | and double click the tray icon (shown as the red square below), 'DPC Utility', it will show. | ||
Revision as of 18:12, 19 April 2021
Contents |
The Sample code source you can download form
Binary file:
DPCv4.4.1W_bin_x64.zip
DPCv4.4.1W_bin_x86.zip
DPC_LightSensor_4.4.1W_bin_x64.zip
DPC_LightSensor_4.4.1W_bin_x86.zip
How to use the DPC utility
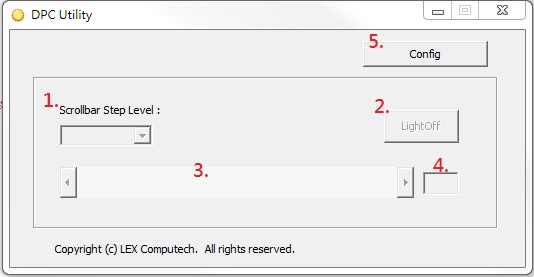
1. Set step add / subtract brightness level.
2. When click the "LightOff" button, the panel will become darkness.
- Hot key and touch position to light on panel must set first.
3. Brightness control scrollbar, you can adjust volume of brightness.
4. Show the brightness value which you adjust. Value from 1 to 100.
5. Advanced config settings.
- When DPC utility minimum, it will hide in the notification area (like below picture),
and double click the tray icon (shown as the red square below), 'DPC Utility', it will show.
How to set advanced settings of the DPC utility
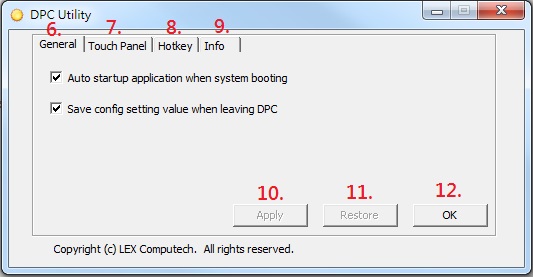
6. General settings tab page.
7. About touch panel settings tab page.
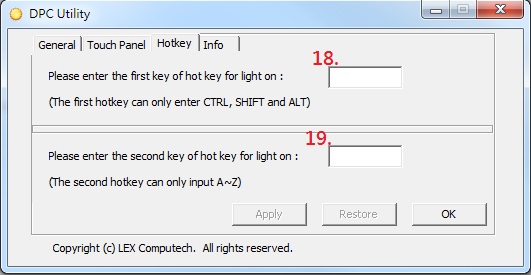
8. About Hotkey panel settings tab page. User can set the hotkey. When push hot key, the panel will be light on from darkness.
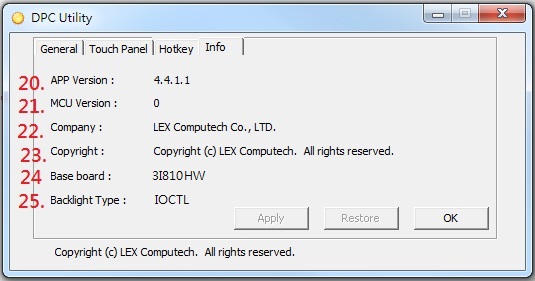
9. About DPC software and hardware information.
10. Save the setting value but without leaving the window.
11. Restore the setting value before user modifying.
12. Save the setting value and close the window.
General settings tab page
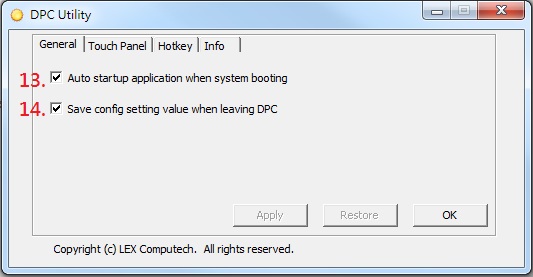
13. If user checked, utility will auto startup when system booting.
14. If checked to save DPC setting , the setting of frequency and duty cycle will be reserved.
Touch panel settings tab page
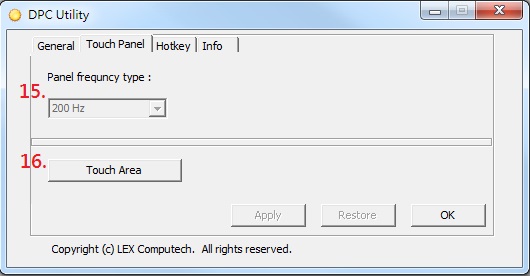
15. Frequency of panel.
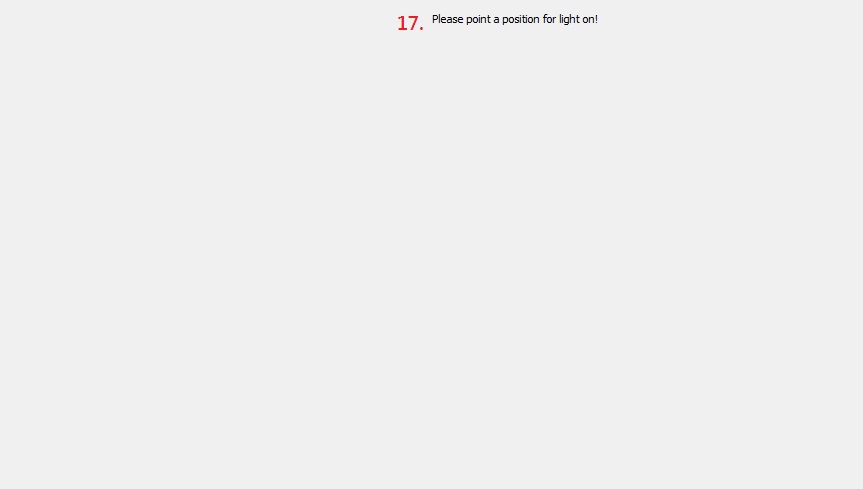
16. Click the button. User can pick up the area from object 13. When clicking area, the panel will be light on from darkness.
17. Pick up the area from panel. After clicking area, the panel will be light on from darkness.
Hotkey settings tab page
18. First key of hotkey. Only enter Ctrl, SHIFT, or ALT.
19. Second key of hotkey. Only enter key: 'A' to 'Z'.
Information tab page
20. It will show the DPC utility version.
21. It will show the MCU version.
22. It will show the DPC utility company.
23. It will show the DPC utility copyright.
24. It will show the base board model name.
25. It will show utility supported backlight type.
How to use the DPC(Light sensor module) utility
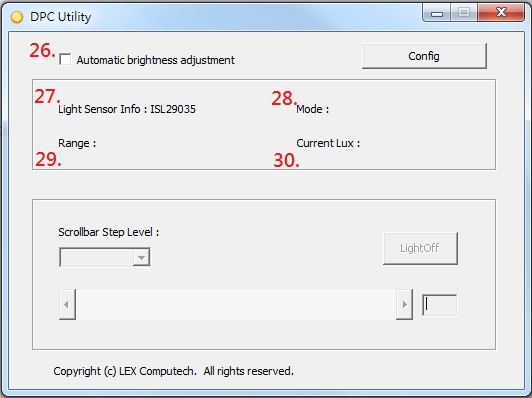
26. If checked it. utility will adjust the volume of brightness automatically.
27. Light sensor device name.
28. The mode of light sensor in used.
29. The range of light sensor in used.
30. Calculated LUX values.
Lightsensor settings tab page
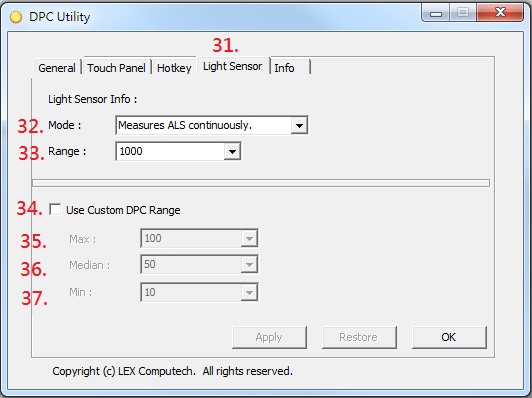
31. About light sensor settings tab page.
32. Choose which mode of light sensor to use.
33. Choose which range of light sensor to use.
34. If checked it. Light sensor automatically modify brightness volume in custom limit range.
35. Custom limit: light sensor maximum volume of brightness.
36. Custom limit: light sensor median volume of brightness.
37. Custom limit: light sensor minimum volume of brightness.
Sample code Introduction
Define SMBus register
#define SMBUSPORT		0x0500
#define	HST_STS			SMBUSPORT+0x00
#define	HST_CNT			SMBUSPORT+0x02
#define	HST_CMD			SMBUSPORT+0x03
#define	XMIT_SLVA		SMBUSPORT+0x04
#define	HST_D0			SMBUSPORT+0x05
#define bSize			1
#define SADD			0xb0
#define PWMFeq			0x01
#define PWMDuty			0x02
Set Frequency data
DWORD dwPortVal;
bool bResult;
bResult = InitializeWinIo();

if (bResult){
     SetPortVal(HST_STS, 0xFE, bSize); //start
     Sleep(20);
     SetPortVal(XMIT_SLVA, SADD, bSize); //set
     Sleep(20);
     SetPortVal(HST_CMD, PWMFeq, bSize); //set frequency
     Sleep(20);
     GetPortVal(HST_STS, &dwPortVal, bSize);
     Sleep(20);
     dwPortVal = dwPortVal & 0x01;
     if (dwPortVal == 0){
          SetPortVal(HST_D0, fvalue, bSize); //write data into frequency
          Sleep(20);
          SetPortVal(HST_CNT, 0x48, bSize); //stop
          Sleep(20);
          ShutdownWinIo();
     }
     else
          ShutdownWinIo();
}
ShutdownWinIo();
Set Duty data
UpdateData(TRUE);
DWORD dwPortVal;
bool bResult;
bResult = InitializeWinIo();

if (bResult){
     SetPortVal(HST_STS, 0xFE, bSize); //start
     Sleep(20);
     SetPortVal(XMIT_SLVA, SADD, bSize); //set
     Sleep(20);
     SetPortVal(HST_CMD, PWMDuty, bSize); //set duty
     Sleep(20);
     GetPortVal(HST_STS, &dwPortVal, bSize);
     Sleep(20);
     dwPortVal = dwPortVal & 0x01;
     if (dwPortVal == 0){
          if (inverter == false)
               SetPortVal(HST_D0, dvalue * 10 , bSize); //write data into data
          else if (inverter == true)
               SetPortVal(HST_D0, (10 - dvalue) * 10 , bSize);
          Sleep(20);
   	   SetPortVal(HST_CNT, 0x48, bSize); //stop
          Sleep(20);
          ShutdownWinIo();
     }
     else
          ShutdownWinIo();
}
ShutdownWinIo();
