請先看『使用說明』
CPC Utility under Linux
From LEXWiKi
(Difference between revisions)
| Line 8: | Line 8: | ||
Binary file(32 bit): [https://drive.google.com/file/d/1-bJEDKK5dSMFEYsVxDiTDBhEnOYTe3GO/view?usp=sharing CPC_Utility_Bin_v1.7_x86] | Binary file(32 bit): [https://drive.google.com/file/d/1-bJEDKK5dSMFEYsVxDiTDBhEnOYTe3GO/view?usp=sharing CPC_Utility_Bin_v1.7_x86] | ||
| - | Binary file(64 bit): [https://drive.google.com/file/d/ | + | Binary file(64 bit): [https://drive.google.com/file/d/1DLR0tyrWZiVqwKG8h9JkBlc_bPY-qnT2/view?usp=sharing CPC_Utility_Bin_v2.1.0_x64] |
Revision as of 12:09, 8 October 2024
Contents |
CPC Utility Download
<Google Drive>
Source file: CPC_Utility_Src_v2.0.0
Binary file(32 bit): CPC_Utility_Bin_v1.7_x86
Binary file(64 bit): CPC_Utility_Bin_v2.1.0_x64
<FTP>
Source file: CPC_Utility_Src_v1.7
Binary file(32 bit): CPC_Utility_Bin_v1.7_x86
Binary file(64 bit): CPC_Utility_Bin_v1.7_x64
How to compile source code
1. Compile source code with Code::Blocks
- download and install the Code::Block and libgtk2.0-dev with command "apt-get install codeblocks libgtk2.0-dev"
- Open an exist project(CPC_Utility.cbp) in Code::Blocks
- add an option `pkg-config gtk+-2.0 --cflags`-std=gnu99 in "Project->Build Option->compiler setting->Other option"
- add an option `pkg-config gtk+-2.0 --libs` in "Project->Build Option->Linker Setting->Other linker option"
- click the compile button
2.Compile source code with "make"
- download and install the libgtk2.0-dev with command "apt-get install libgtk2.0-dev"
- cd CPC_Utility
- ./configure
- make
- cd src/cpc_utility // execute the binary file()
How to Use The Utility
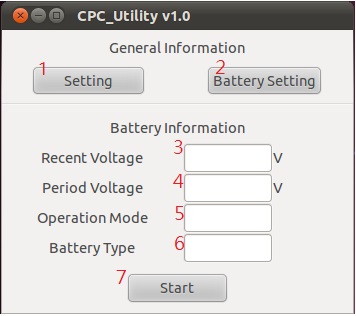
- 1. Setting Button
- Open "Setting Window".
- 2. Battery Setting Button
- Open "Battery Setting Window".
- * Kindly notice that you have to set I2C Address in setting window before open battery setting window.
- 3. Recently Voltage Value
- Utility will detect the recent voltage value and show in the edit box when start to monitor.
- 4. Period Voltage Value
- Utility will detect and show the period voltage value when start "under low voltage detect". If "under low voltage detect" doesn't execute, period voltage value will be hidden.
- 5. Operation Mode
- 6. Battery Type
- Show the battery type you set.
- * If disable "under low voltage detect", battery type will be hidden.
- 7. Start Button
- Press this button will start to monitor and show battery information on utility main window.
- * Kindly notice that you have to set I2C Address in setting window before starting to monitor.
CPC Utility Setting Window
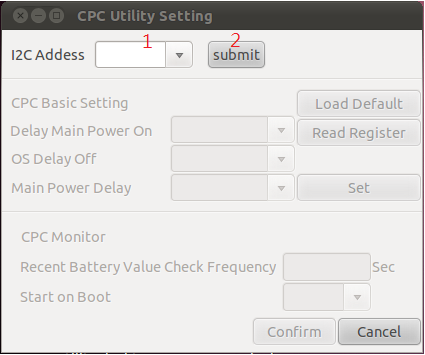
- 1. I2C Address
- Default is "B6".
- 2. Submit Button
- Press this button when finish selecting I2C address, then CPC Basic Setting section and CPC Monitor Setting section will be enable to set(like the picture below).
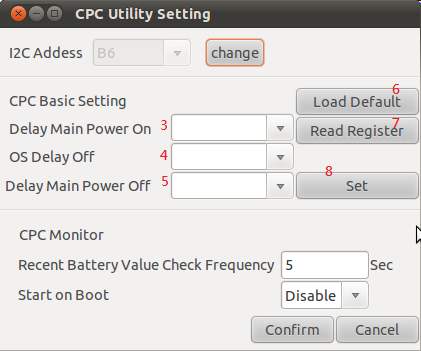
- 3. Delay Main Power On
- Set delay time which CPC turn on computer .
- 4. OS Delay Off
- Set delay time which CPC turn off computer.
- 5. Main Power Delay
- Set delay time of power supply after computer is turned off.
- 6. Load Default Button
- Press thie button will load default value of CPC basic setting section.
- * In CPC basic setting section, the initial value are read from registers.
- 7. Read Register Button
- Press this button will read the value from register.
- 8. Set Button
- Press this button to set when finish selecting what you want to set in CPC basic setting section. After press the button, CPC basic setting section will be disable.
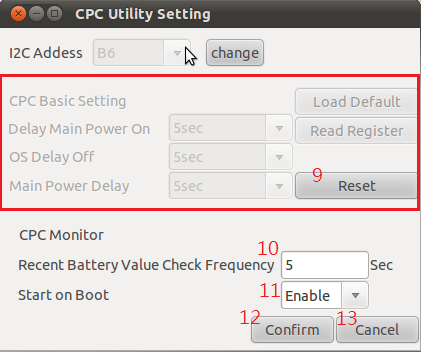
- 9. Reset Button
- Press the button to enable CPC basic setting section and set again.
- 10. Recent Battery Value Check Frequency
- The value is check frequency when starting to monitor.
- * The range of check frequency is between 5 to 60 seconds.
- 11. Start on Boot
- If enable this function, the utility will execute when the OS boot.
- 12. Confirm Button
- If finish to set CPC Monitor Setting section, press this button and the information will be set.
- 13. Cancel Button
Introdution(Part of Define macro)
//Battery Type
#define Battery_12V		0x11
#define Battery_24V		0x22
#define Battery_None	        0xFF

//ACC Status
#define ACC_Low			0x11
#define ACC_High		0x22

//General
#define OptionToASCII(x)        x+65
#define ASCIIToOption(x)        x-65
Introdution(Part of Setting)
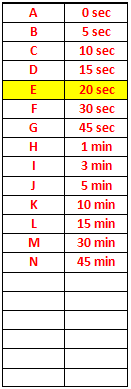
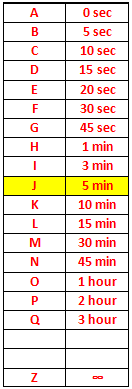
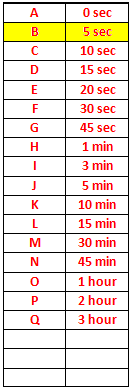
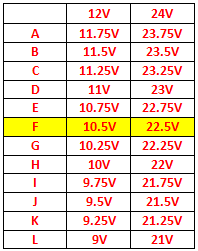
- Parts of yellow block in below tables are registers' default value.
Setting Main Power On
void SettingPowerOn(BYTE SlavAddr,BYTE bValue)
{
	bValue=OptionToASCII(bValue);
	WriteI2CByte(SlavAddr,0x12,bValue);
}
Setting OS Delay Off
void SettingOSDelayOff(BYTE SlavAddr,BYTE bValue)
{
	if(bValue==17)
		bValue=90;   //option of "infinite", have to write ascii code "Z" to register
	else
		bValue=OptionToASCII(bValue);
	WriteI2CByte(SlavAddr,0x15,bValue);
}
Setting Power Off
void SettingPowerOff(BYTE SlavAddr,BYTE bValue)
{
	bValue=OptionToASCII(bValue);
	WriteI2CByte(SlavAddr,0x17,bValue);
}
Setting Low Voltage Level
void SettingLowVoltage(BYTE SlavAddr,BYTE bValue)
{
	bValue=OptionToASCII(bValue);
	WriteI2CByte(SlavAddr,0x19,bValue);
}
Setting Battery Type
void SettingBatteryType(BYTE SlavAddr,BYTE bBatteryType)
{
	bBatteryType=(bBatteryType)?Battery_24V:Battery_12V;
	WriteI2CByte(SlavAddr,0x1A,bBatteryType);
}
Setting Low Voltage Detect
void SettingLowVoltDetect(BYTE SlavAddr,BYTE bAccStatus)
{
	bAccStatus=(bAccStatus)?ACC_High:ACC_Low;
	WriteI2CByte(SlavAddr,0x1B,bAccStatus);
}
Introdution(Part of Read)
Read Power On
int ReadPowerOn(BYTE SlavAddr)
{
	int Data;

	Data=ReadI2CByte(SlavAddr,0x12);
	Data=ASCIIToOption(Data);

	return Data;
}
Read OS Delay Off
int ReadOSDelayOff(BYTE SlavAddr)
{
	int Data;

	Data=ReadI2CByte(SlavAddr,0x15);
	Data=ASCIIToOption(Data);

	return Data;
}
Read Power Off
int ReadPowerOff(BYTE SlavAddr)
{
	int Data;

	Data=ReadI2CByte(SlavAddr,0x17);
	Data=ASCIIToOption(Data)-1;   //remove the option of A

	return Data;
}
Read Low Voltage
int ReadLowVoltage(BYTE SlavAddr)
{
	int Data;

	Data=ReadI2CByte(SlavAddr,0x19);
	Data=ASCIIToOption(Data);

	return Data;
}
Read Battery Type
int ReadBatteryType(BYTE SlavAddr)
{
	int iBatteryType;

	iBatteryType=ReadI2CByte(SlavAddr,0x1A);
	switch(iBatteryType)
	{
		case Battery_12V:
		{
			iBatteryType=0;
			break;
		}
		case Battery_24V:
		{
			iBatteryType=1;
			break;
		}
		default:
		{
			iBatteryType=-1;
			break;
		}
	}

	return iBatteryType;
}
ReadLowVoltDetectTiming
int ReadLowVoltDetectTiming(BYTE SlavAddr)
{
	int iAccStatus;

	iAccStatus=ReadI2CByte(SlavAddr,0x1B);
	iAccStatus=(iAccStatus==ACC_Low)?0:1;

	return iAccStatus;
}
Convert Voltage
void VoltageConvert(float &Voltage)
{
	Voltage=Voltage*4/1023*3.3*10;
}
Read Instant AD Value
float ReadInstantADValue(BYTE SlavAddr)
{
	float Data;

	Data=(float)ReadI2CByte(SlavAddr,0x30);
	VoltageConvert(Data);

	return Data;
}
Read Period AD Value
float ReadPeriodADValue(BYTE SlavAddr)
{
	float Data;

	Data=(float)ReadI2CByte(SlavAddr,0x31);
	VoltageConvert(Data);

	return Data;
}
ReadOperationMode
BYTE ReadOperationMode(BYTE SlavAddr)   //ReadDIP_SWSetting bit1
{
	BYTE Data;

	Data=ReadI2CByte(SlavAddr,0x32);
	Data=(Data>>1) & 0x01;             //Auto mode: 0x0. Manual mode:0x1

	return Data;
}
Read ACC Status
BYTE ReadAccStatus(BYTE SlavAddr)   //ReadDIP_SWSetting bit4
{
	BYTE Data;

	Data=ReadI2CByte(SlavAddr,0x32);
	Data=(Data>>4) & 0x01;            //ACC Low: 0x0. ACC High: 0x1

	return Data;
}
