請先看『使用說明』
VT1211(VIA CX700/VIA CN700) Hardware Monitor under Linux
From LEXWiKi
(Difference between revisions)
(→Sample code Introduction) |
(→The Sample code source you can download from) |
||
| Line 1: | Line 1: | ||
== The Sample code source you can download from == | == The Sample code source you can download from == | ||
| - | Source file: [ftp://ftp.lex.com.tw/Engineer/SoftSupport/AP_Module/ | + | Source file: [ftp://ftp.lex.com.tw/Engineer/SoftSupport/AP_Module/HardwareMonitor/vt1211hw_src.tar.gz vt1211hw_src.tar.gz] |
About source code. | About source code. | ||
| - | 1.We suggest using Code::Blocks as an IDE in Linux. | + | 1.Install libgtk2.0-dev first |
| + | |||
| + | 2.We suggest using Code::Blocks as an IDE in Linux. | ||
| - | + | 3.Or you can just use "make" to compile the source code in the vt1211hw_src/ folder or vt1211hw_src/src/ folder. | |
| - | And you can excute "vt1211hw" file in the | + | And you can excute "vt1211hw" file in the vt1211hw_src/src/ folder |
| + | |||
| - | $cd vt1211hw | + | $cd vt1211hw |
| + | $configure | ||
$make | $make | ||
| - | $ | + | $/src/vt1211hw |
| - | Binary file: [ftp://ftp.lex.com.tw/Engineer/SoftSupport/AP_Module/ | + | Binary file: [ftp://ftp.lex.com.tw/Engineer/SoftSupport/AP_Module/HardwareMonitor/vt1211hw_bin.tar.gz vt1211hw_bin.tar.gz] |
== How to use the DEMO application == | == How to use the DEMO application == | ||
Revision as of 18:59, 6 July 2011
Contents |
The Sample code source you can download from
Source file: vt1211hw_src.tar.gz
About source code.

1.Install libgtk2.0-dev first
2.We suggest using Code::Blocks as an IDE in Linux.

3.Or you can just use "make" to compile the source code in the vt1211hw_src/ folder or vt1211hw_src/src/ folder.
  And you can excute "vt1211hw" file in the vt1211hw_src/src/ folder


 $cd vt1211hw
 $configure
 $make
 $/src/vt1211hw
Binary file: vt1211hw_bin.tar.gz
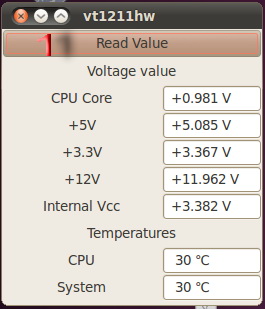
How to use the DEMO application
- Press the "Read Value" button , and then you can find the values in the below text boxes.
Sample code Introduction
Define Registry
#define VT1211A_CONFIGURATIN_INDEX_REGISTER	0x2E
#define VT1211A_CONFIGURATIN_INDEX_DATA		0x2F
#define VT1211A_CHIPSET_DEFAULT_DEVICEID	0x3C
#define VT1211A_CHIPSET_DEVICE_ID		0x20
#define VT1211A_CHIPSET_REVISION		0x21
#define	VT1211A_HARDWAREMONTIOR_LDN		0x0B
#define VT1211A_HARDWAREMONTIOR_IOBASE          0x60
#define VT1211A_VOLTAGE_CORE		        0x24
#define VT1211A_VOLTAGE_3V		        0x23
#define VT1211A_VOLTAGE_12V		        0x21
#define VT1211A_VOLTAGE_5V		        0x22
#define VT1211A_VOLTAGE_VCC		        0x26
#define VT1211A_TEMPERATURE_SYSTEM	        0x25
#define VT1211A_TEMPERATURE_CPU		        0x1F
Open VT1211
outb(0x87,VT1211A_CONFIGURATIN_INDEX_REGISTER);
outb(0x87,VT1211A_CONFIGURATIN_INDEX_REGISTER);

if ((VT1211_Read(VT1211A_CHIPSET_DEVICE_ID) == VT1211A_CHIPSET_DEFAULT_DEVICEID) )
{
    VT1211_Write(0x07,VT1211_HARDWAREMONTIOR_LDN);
    m_HardwareMonitor_IOBase = ( VT1211_Read (VT1211A_HARDWAREMONTIOR_IOBASE) << 8 ) | VT1211_Read (VT1211A_HARDWAREMONTIOR_IOBASE+1);
    return TRUE;
}
else
    return FALSE;
return FALSE;
}
Read Data
DWORD dwPortVal;
dwPortVal = inb((WORD)(m_HardwareMonitor_IOBase + dwOffset));
return ( dwPortVal & 0x00FF);
GetTemperature
switch (dwOffset)
{
    case VT1211A_TEMPERATURE_SYSTEM:
        return VT1211A_TempTable[VT1211_ReadData(VT1211A_TEMPERATURE_SYSTEM)];
    case VT1211A_TEMPERATURE_CPU:
        return (VT1211_ReadData(VT1211A_TEMPERATURE_CPU)-73.869)/0.9528;
}
GetVoltage
float value ;
switch (dwOffset)
{
    case VT1211_VOLTAGE_CORE:
        value = (float)VT1211_ReadData(VT1211A_VOLTAGE_CORE) -3 ;
        return  (float)(value / 95.8);
    case VT1211A_VOLTAGE_5V:
        value = (float)VT1211_ReadData(VT1211A_VOLTAGE_5V) -3 ;
        return  (float)(value / 95.8 /0.4167 );
    case VT1211_VOLTAGE_3V:
        value = (float)VT1211_ReadData(VT1211A_VOLTAGE_3V) -3 ;
        return  (float)(value / 95.8 /0.5952 );
    case VT1211_VOLTAGE_12V:
        value = (float)VT1211_ReadData(VT1211A_VOLTAGE_12V) -3 ;
        return  (float)(value / 95.8 / 0.1754 );
    case VT1211_VOLTAGE_VCC:
        value = (float)VT1211_ReadData(VT1211A_VOLTAGE_VCC) -3 ;
        return  (float)(value / 95.8 / 0.6296 );
}

