請先看『使用說明』
Module:FAQ
From LEXWiKi
FAQ by BIOS
Why can't poweroff when using touch panel ?
| Ans: |
Touch panel needs 5V+ to turn on. 5V+ makes "power on by ring" estimate to "TRUE", so system will be restart . |
|---|---|
| Patch File: |
N/A |
| Defect: |
N/A |
| Asker: |
Denny 10/12/06 |
| Provider: |
Denny 10/12/06 |
FAQ by Linux
Usb conexant modem didn't work on gentoo linux with kernel 2.4.26 ?
| Ans: |
maybe something wrong with their gentoo setting ,gentoo Linux is a varied Linux .due to the option they choose makes different varied linux ,so we download standard 2.4.26 kernel and compiled with redhat 9 .. and load optimized defaults in bios. After driver installed , usb conexant modem work normally. |
|---|---|
| Patch File: |
|
| Defect: |
Driver 安裝之後, 系統會hang住. 需要重新開機以後方可正常使用 |
| Asker: |
Robert 09/26/06 |
| Provider: |
Denny 09/26/06 |
Usb conexant modem 速度上限 ?
| Ans: |
以往的 Driver Version 由於 charge 的問題, 有限速 (14400 Bytes) . 這次所更新的版本已經移除掉這個問題, 傳輸的速度可達 38 KB左右(視網路品質而定) |
|---|---|
| Patch File: |
|
| Defect: |
Driver 安裝之後, 系統會hang住. 需要重新開機以後方可正常使用 |
| Asker: |
Denny 12/11/06 |
| Provider: |
Denny 12/11/06 |
如何使用版卡類BT878上面的WDT&DI/DO 功能 ?
| Ans: |
最早之前創益有推薦一個IO.DLL的元件,但是靈活度不足,目前已經擱置不用。
(*該函式庫亦有版權問題,請勿在提供給客戶開發) |
|---|---|
| Patch File: | |
| Defect: |
BT878SDK 使用時,請先安裝BT878的WDM驅動。 |
| Asker: |
Athors 12/11/06 |
| Provider: |
Athors 12/11/06 |
各Module分別在哪些版子上有測試過?
| Ans: |
USB-Modem USB-ADSL USB-ISDN USB-Wireless MiniPCI-Wireless TESTED M/B: TESTED M/B: TESTED M/B: TESTED M/B: TESTED M/B: 1. CV860A 1. CV860A 1. CV860A 1. CV860A 1. CV763 2. MV823A 2. MV823A 2. MV823A 3. CI852A 3. CI852A 4. CV700x |
|---|---|
| Patch File: |
N/A |
| Defect: |
N/A |
| Asker: |
Denny 01/24/07 |
| Provider: |
Denny 01/24/07 |
Cologne USD-ISDN 該如何在Kernel 2.6.x環境下使用? 我們的USB-ISDN不是128K 怎麼會只有64K?
| Ans: |
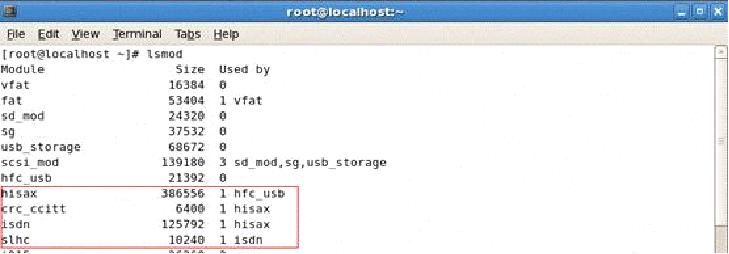
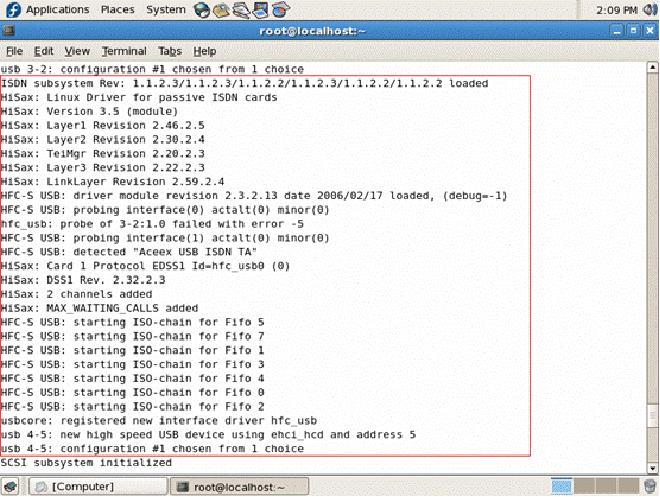
1. Cologne USD-ISDN 該如何在Kernel 2.6.x環境下使用? USB-ISDN 我們將不再提供特定Driver給客戶,因為目前Kernel 2.6.x幾乎都整合了ISDN4Linux module,而客戶在Kernel 2.6.x環境下看不到ISDN設備是因為Kernel default 將HFC-S這個模組關閉, 只要將模組載入即可使用. 請在Kernel 2.6.x環境下 注意是否以載入 HFS –S 模組 如下圖: 請使用lsmod 指令 在確認硬體裝置狀態 請始用dmesg指令 若沒有發現上述內容,請選擇step1 or step2 完成ISDN 安裝
Step1. Recompile Kernel 將HFC-S 模組打開 並載入.
        請使用make menuconfig 選擇需要模組
        開啟
        Device Drivers ->ISDN subsystem ->old ISDN4Linux ->Passive Cards ->HFC usb base modem.
        再重新載入新編譯的kernel即可.
Step2. 請安裝ISDN4Linux模組,詳細請參照patch file
        Dial-up 方式
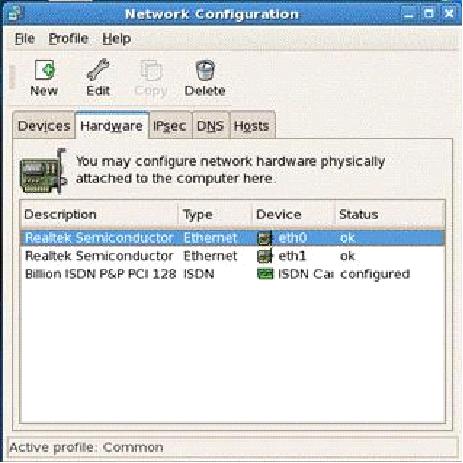
        可使用ISDN4Linux Tools 或是 使用xwindows 網路工具
        1. X windows dial-up
            請選擇 “Billion ISDN”or “Cologne USB ISDN”即可使用.
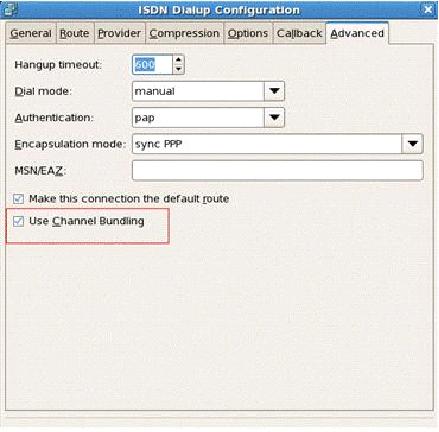
2. 我們的USB-ISDN不是128K 怎麼會只有64K? Cologne USB-ISDN 為2 Channel ISDN(實體層獨立通道),單一Channel各為64K,要使用128K雙通道, 請於撥接時 如下圖設定. 使用Channel Bundling 可自動Dial-up 雙通道,並依流量需求自動調整64K or 128K. |
|---|---|
| Patch File: |
ISDN4Linux http://www.isdn4linux.de/ |
| Defect: |
N/A |
| Asker: |
Robert 05/22/07 |
| Provider: |
Leon 05/23/07 |
由CV860轉移至CV700 Linux客戶,注意事項
| Ans: |
先前使用CV860開發客戶,若是使用較舊版本的Linux 如:Trustix Linux2.0或Kernel 2.4.x, 將有可能發現IDE裝置無法辨識的問題,產生現象會有
建議客戶轉移至CV700時不要使用舊版Kernel 2.4.x,此問題可藉由update kernel至Kernel 2.6.x解決,如 Trustix linux3.0 版本已解決 CV700 IDE裝置無法辨識的問題!! |
|---|---|
| Patch File: |
Kernel update can download form http://kernel.org/ |
| Defect: |
N/A |
| Asker: |
LeonHsu 2007/10/28 |
| Provider: |
LeonHou 2008/02/13 |
以GF4 為主顯示卡、CN700為副顯示卡:GF4 4000、可以正常運作、CN700不能正常運作 (顯示V_BIOS read error)
| Ans: |
使用 via 針對此一情況所修改的 driver 便可以正常的運作 |
|---|---|
| Patch File: |
Driver: CN700XOrg40079_MAMM_FC3_Lex.tgz |
| Defect: |
N/A |
| Asker: |
Denny 04/30/07 |
| Provider: |
Denny 04/30/07 |
FAQ by Windows
匯流排的頻寬不足造成畫面破裂的現象
| Ans: |
一般PCI匯流排total的速度為133MB/sec(這是固定的), 計算方式是這樣當你開啟一個PORT的時候所佔用的頻寬量是這樣計算的, ( ( 640 * 480 ) * 16 bit * 30 fps ) / 8 (換算成bytes) = 18.432 MB / s 當我們插兩張卡的時候,如開啟5個Port,那所佔用的頻寬就為: 18.432 MB/s * 5 = 92.16MB / sec 這時候有兩個地方要注意, (1)雖然還沒到達133MB/s,但133MB/s是理論值,實際速度並無法達到會略低一點. (2)影像在傳輸時除了影像部分的資料量,還有一些GPIO和COMMAND的指令項會佔用頻寬狀態,因此5 PORT對640*480的878來說已經算是很吃力. 嘗試開到 6 PORT且調降每一Channel Frame/sec的速度,但開啟第六port的架構圖後,頻寬速度在graphedit這套軟體上就被保留了,所以即使降低速度仍然會有破裂問題. 目前實際硬體匯流排的限制狀態是如此,當878擷取的影像資料透過PCI匯流排的資料丟到Memory之前,是無法被壓縮的,所以總資料量就是會這麼大, 這個部分請讓客人清楚,不然就請客人不要用這麼高的解析度,用320*240看看 |
|---|---|
| Patch File: |
N/A |
| Defect: |
N/A |
| Asker: |
Benny 12/25/06 |
| Provider: |
Benny 12/25/06 |
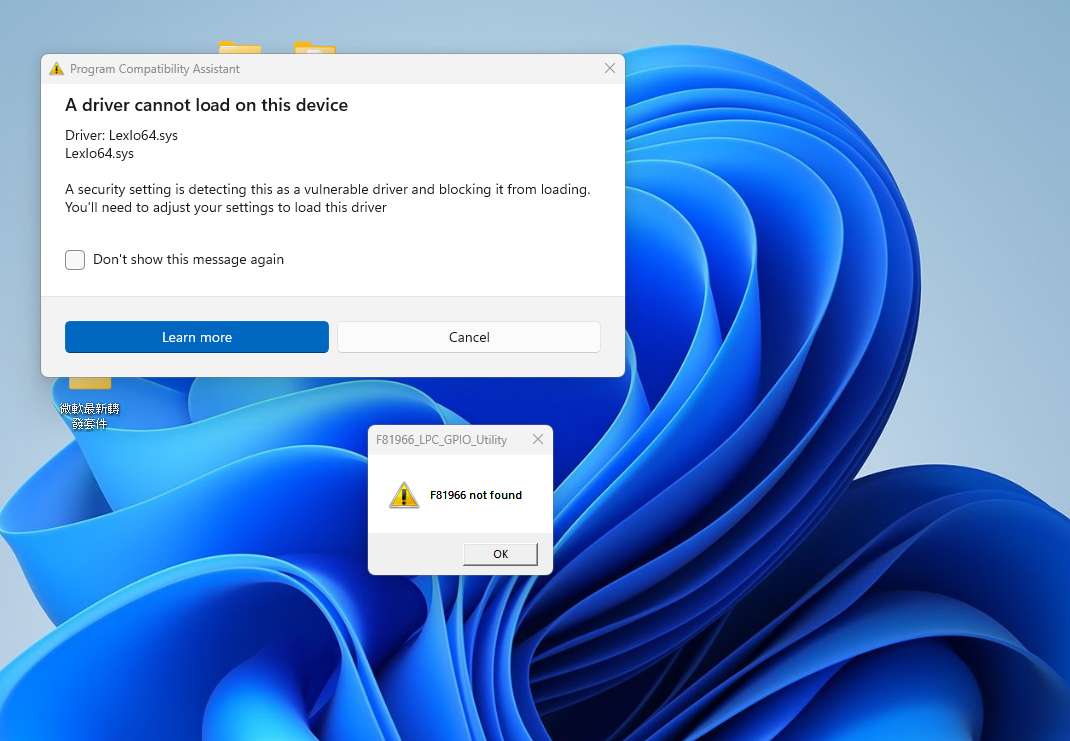
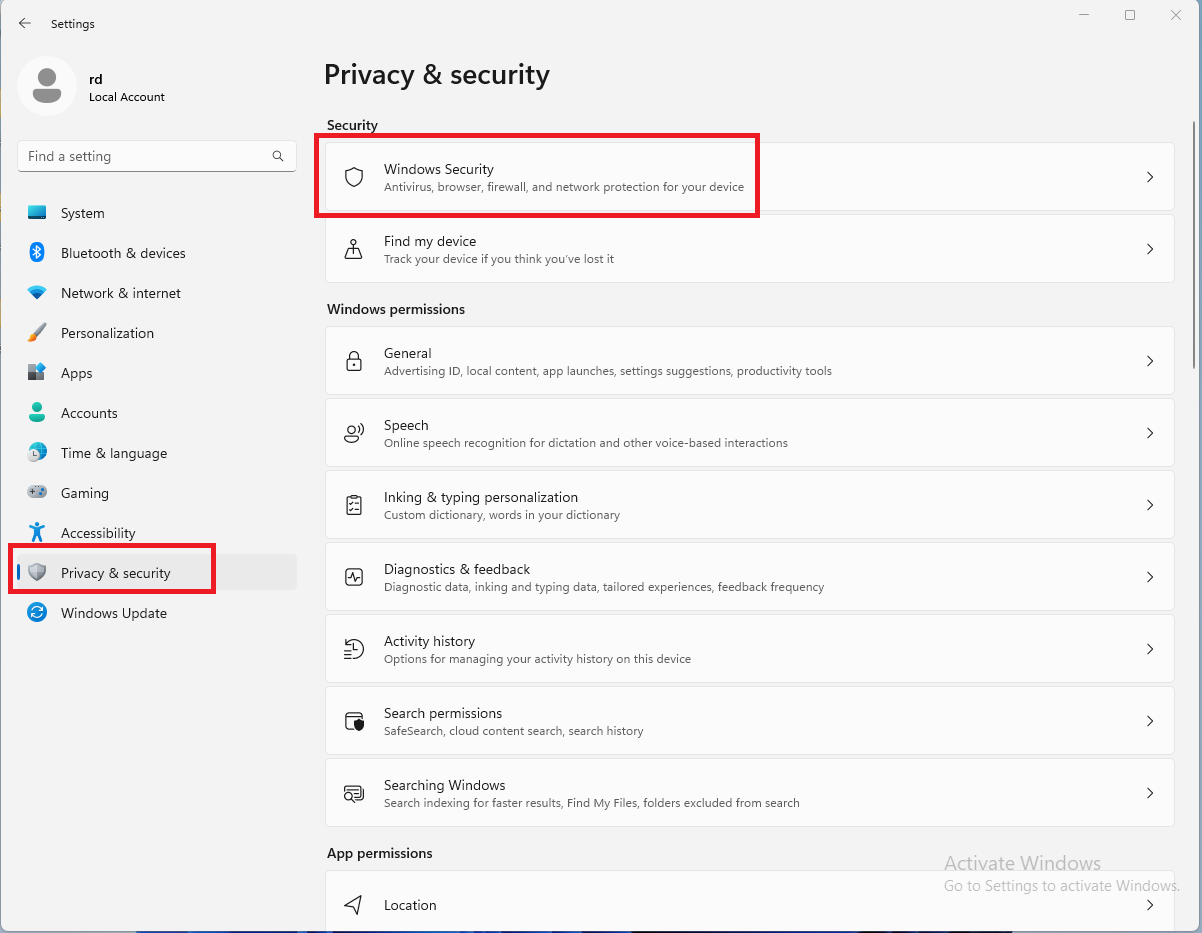
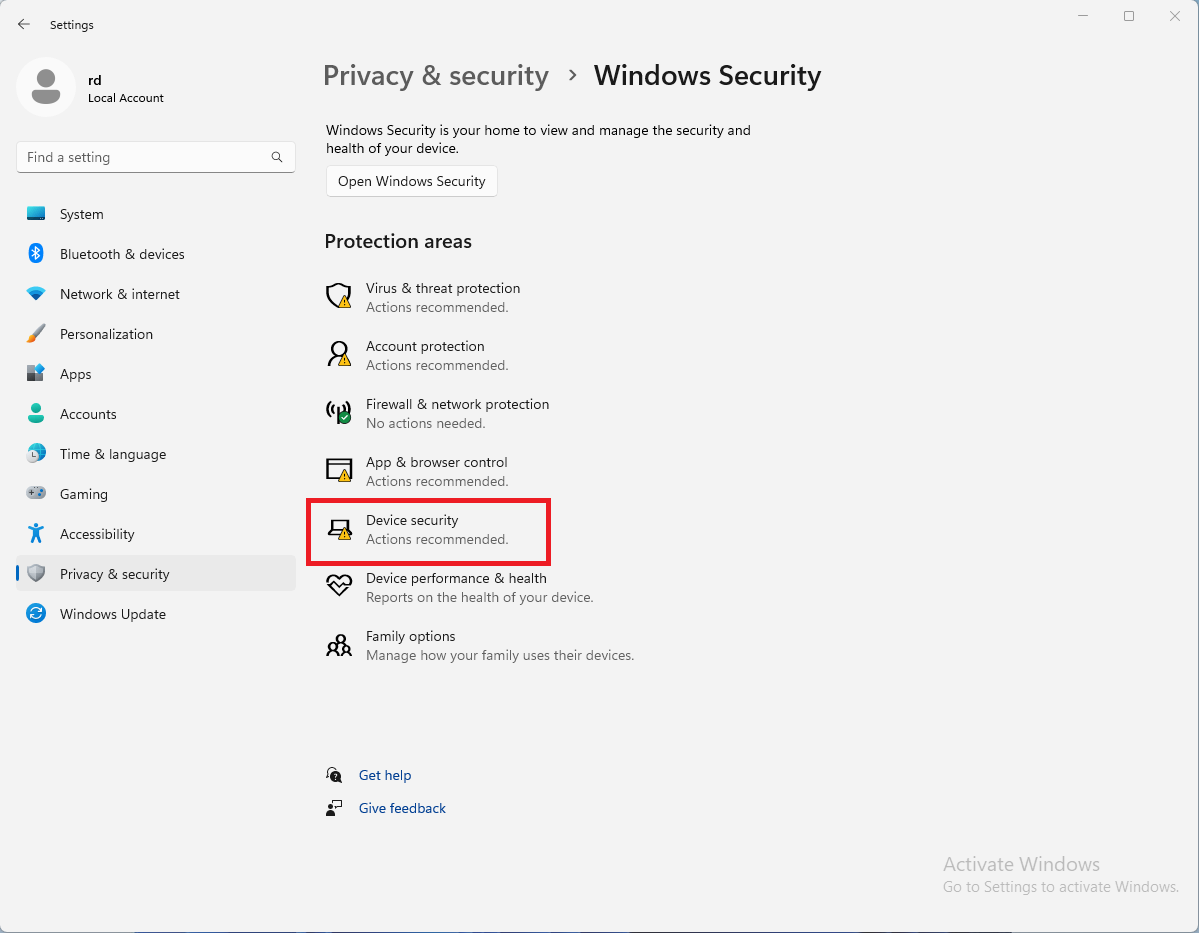
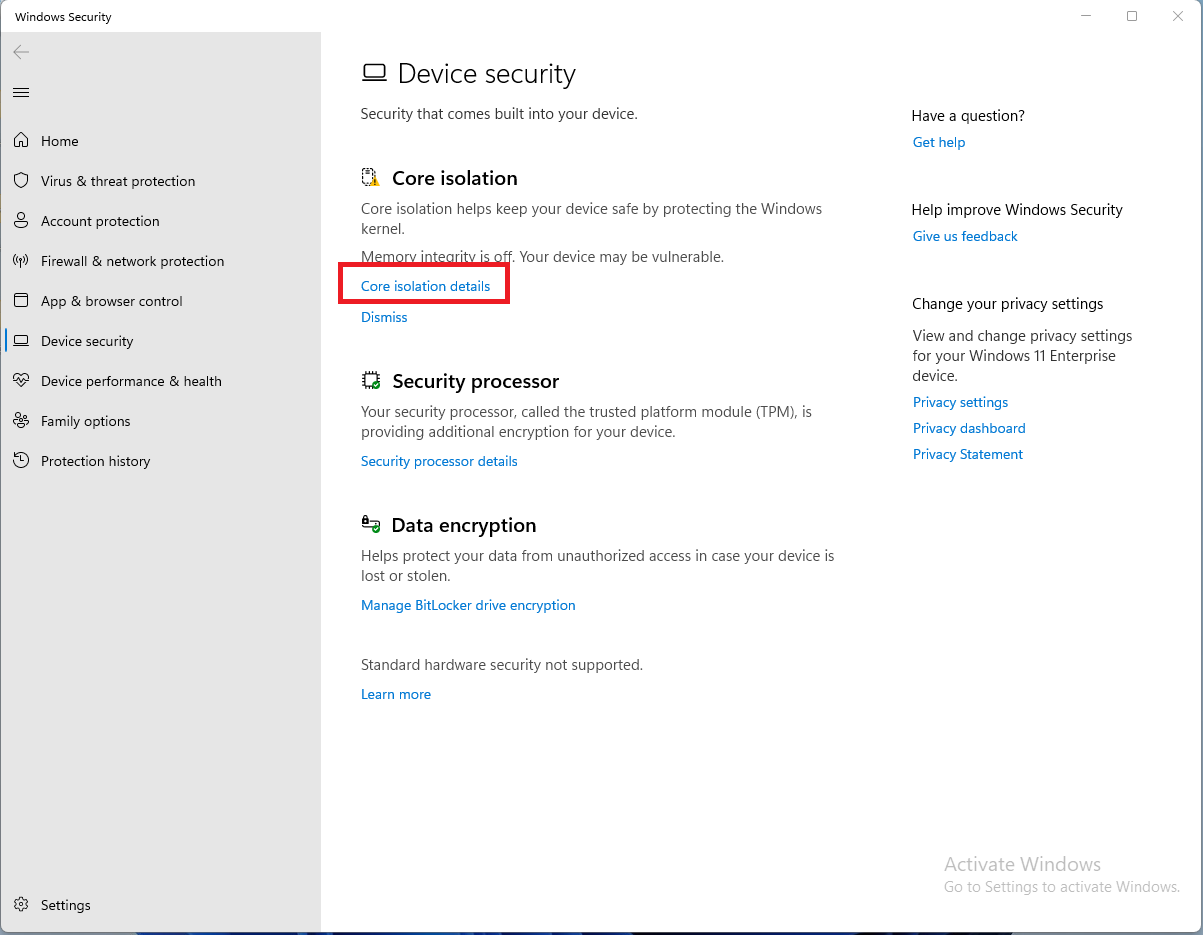
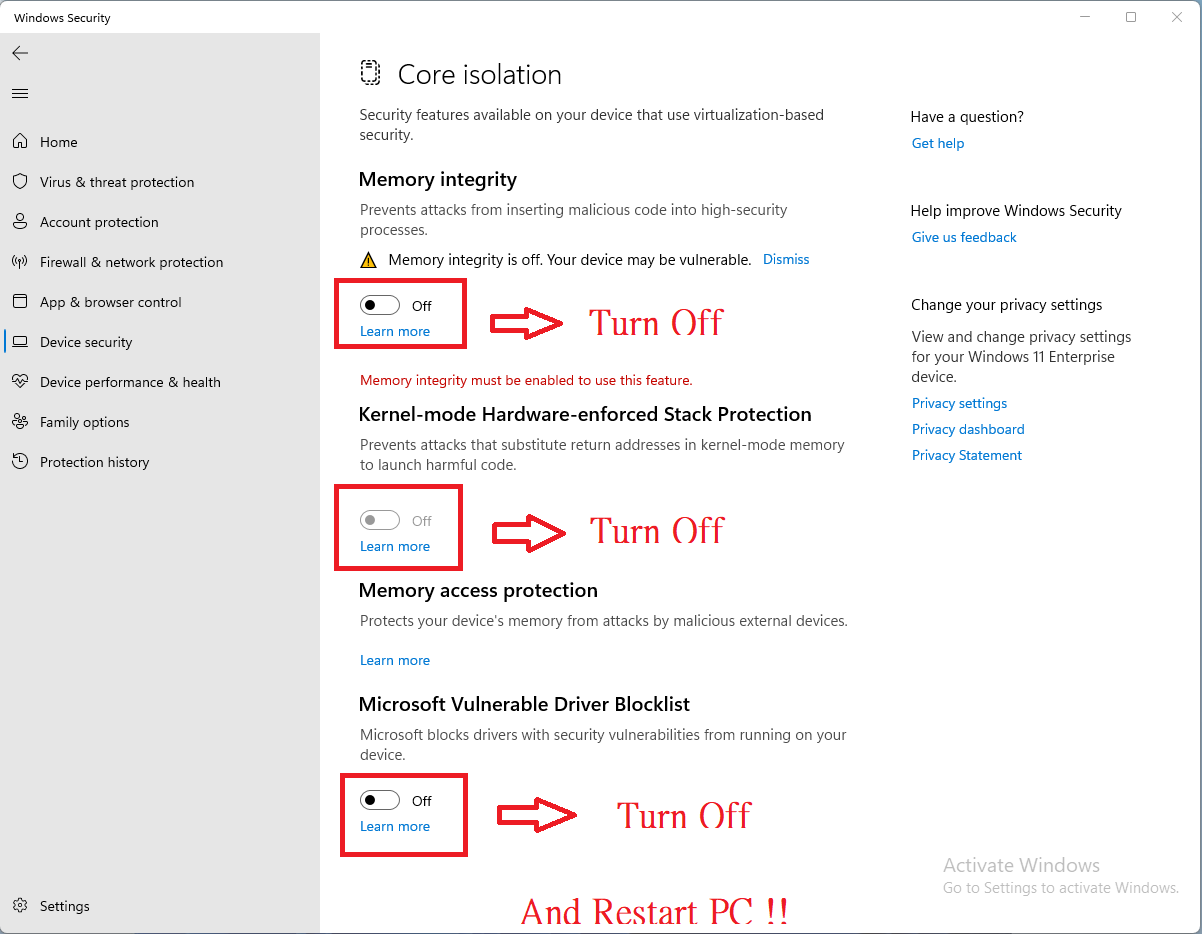
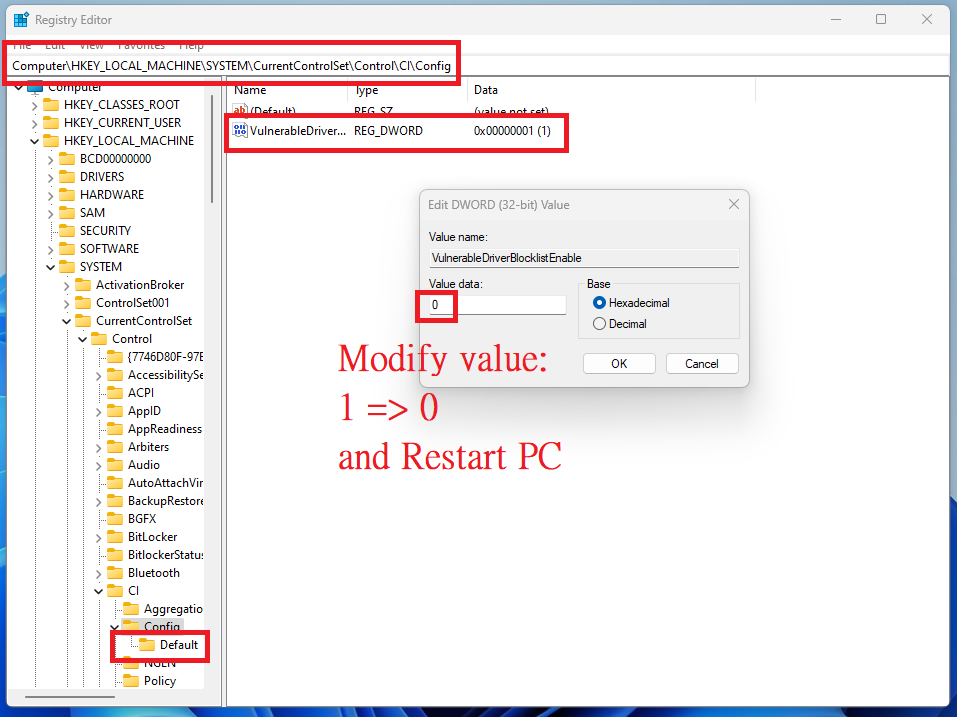
Blocklist of vulnerable drivers to block “F81966_LPC_GPIO_Utility" with Win11 23H2
| Ans: |
After Microsoft Win11 22H2 patch KB50207795. Microsoft’s official instructions are as follows: There are currently two solutions: We use solution2. Steps as follow: Set the status of ”Memory integrity”, ”Memory access protection”, and ”Microsoft Vulnerable Driver Blocklist” to Off. Step2. Disable using “the Microsoft Offensive Driver Blocking List” from registry. Complete two step. Excute “F81966_LPC_GPIO_Utility.exe”. |
|---|---|
| Patch File: |
N/A |
| Defect: |
N/A |
| Asker: |
Robert 02/27/24 |
| Provider: |
Eric 02/29/24 |
FAQ by BOTH
目前 Communication Module 所支援的 OS list
| Ans: | |
|---|---|
| Patch File: |
file: vt6655-ndiswrapper_bin_06282007.run.tgz (binary for fc7 only)
      ndiswrapper-1.47.tar.gz  (src for fc5,6,7)
ftp:\\192.168.1.2\ftp\Engineer\SoftSupport\Driver\Module\Wireless\VT6655 |
| Defect: |
N/A |
| Asker: |
Denny 07/02/07 |
| Provider: |
Denny 07/02/07 |
Touch Panel Driver 該如何去區別, 使用?
| Ans: |
Touch Panel Driver 可以從 1. OS 2. Chipset 來做判斷
視乎其 Xorg 版本, 由於 Touch panel 由本質上來看可以當作是一個滑鼠, 所以對 Kernel version 來說,沒有太多關係.但是原廠(PenMount)為了 end-user 可能不是每個人都那麼了解 xorg 所以出了各個distribution的Driver像是 Fedora 2,3,4,5 之類的, 但其實他們之間的 xorg 版本都沒什麼差異 Chipset 目前我們所使用的 chipset 分為兩種: 1. dmc9000(RS232) 2. dmc6000(USB) 如何使用這兩種不一樣的driver只有差別在 xorg 中的設定 1. dmc9000(RS232): Option "Device" "/dev/ttyS0" #ttys0=COM1,ttys1=COM2 <= 藉由 rs232去控制 2. dmc6000(USB): Option "Device" "/dev/input/event0" <= 將 usb 視為 event Driver Supported: 1.dmc9000: Redhat9, Fedora Core3, 4, 5 2.dmc6000: Fedora Core 4, 5, 6 Xorg6.8
無論是 4.2 或是 5.0 都是把 driver 透過 CEC Editor 把driver 載到 Platform Builder 裡面再加到所要編譯的 image 就可以使用了 ( 須注意一點, WinCE 中 COM1 預設是 WincCE 用來做 Debug 的埠口, 所以要從 COM2 算起 ) Driver Supported: 1.dmc9000: WinCE4.2, WinCE5.0 2.dmc6000: WinCE4.2, WinCE5.0 |
|---|---|
| Patch File: |
N/A |
| Defect: |
N/A |
| Asker: |
Denny 05/03/07 |
| Provider: |
Denny 05/03/07 |
