請先看『使用說明』
MB:2NOR01
From LEXWiKi
(→How to use TN MIPI Camera(FOR JP5.1.2)) |
(→FAQ) |
||
| (26 intermediate revisions not shown.) | |||
| Line 9: | Line 9: | ||
{|class = 'sortable' border="2" cellpadding="4" cellspacing="0" style="margin: 1em 1em 1em 0; border: 1px #aaa solid; border-collapse: collapse;" id='605' | {|class = 'sortable' border="2" cellpadding="4" cellspacing="0" style="margin: 1em 1em 1em 0; border: 1px #aaa solid; border-collapse: collapse;" id='605' | ||
|- bgcolor = #ccccff | |- bgcolor = #ccccff | ||
| - | !OS!!JP!!CPU!!Rev!!HDMI0!!HDMI1!!Dual output!!NGFF1!!NGFF2!!NGFF3!!nano SIM!!USB2.0!!USB3.0!!PCIE!! | + | !OS!!JP!!CPU!!Rev!!HDMI0!!HDMI1!!Dual output!!NGFF1!!NGFF2!!NGFF3!!nano SIM!!USB2.0!!USB3.0!!PCIE!!LAN1(RTL8111)!!LAN2(I226IT)!!LAN3(I226IT)!!COM-232!!COM-422!!COM-485!!F75111N!!WDT/DIO!!TPM2.0!!CANBUS!!CC007!!MIPI_CAM1(4Lanes)!!MIPI_CAM2(4Lanes)!!CALR1(AMP OUT) !!CA1(MIC IN) !!CA1(LINE OUT) !!Download |
|- | |- | ||
| | | | ||
| Line 44: | Line 44: | ||
Yes | Yes | ||
| | | | ||
| - | + | Yes | |
| | | | ||
| - | + | Yes | |
| | | | ||
Yes | Yes | ||
| | | | ||
| - | + | Yes | |
| | | | ||
Yes | Yes | ||
| + | | | ||
| + | - | ||
| | | | ||
Yes | Yes | ||
| | | | ||
Yes | Yes | ||
| + | | | ||
| + | - | ||
| | | | ||
No | No | ||
| Line 62: | Line 66: | ||
No | No | ||
| | | | ||
| - | + | Yes | |
| + | | | ||
| + | Yes | ||
| + | | | ||
| + | Yes | ||
| + | | | ||
| + | kernel 5.10.120-tegra | ||
|- | |- | ||
| | | | ||
| Line 97: | Line 107: | ||
Yes | Yes | ||
| | | | ||
| - | + | Yes | |
| | | | ||
| - | + | Yes | |
| + | | | ||
| + | Yes | ||
| + | | | ||
| + | Yes | ||
| | | | ||
Yes | Yes | ||
| Line 108: | Line 122: | ||
| | | | ||
Yes | Yes | ||
| + | | | ||
| + | Yes | ||
| + | | | ||
| + | IMX219 | ||
| + | | | ||
| + | IMX219 | ||
| | | | ||
Yes | Yes | ||
| Line 115: | Line 135: | ||
Yes | Yes | ||
| | | | ||
| - | + | kernel5.10.120-tegra | |
| - | + | ||
|- | |- | ||
| | | | ||
| Line 151: | Line 170: | ||
Yes | Yes | ||
| | | | ||
| - | + | Yes | |
| | | | ||
| - | + | Yes | |
| + | | | ||
| + | Yes | ||
| + | | | ||
| + | Yes | ||
| | | | ||
Yes | Yes | ||
| Line 168: | Line 191: | ||
| | | | ||
IMX219 | IMX219 | ||
| + | | | ||
| + | Yes | ||
| + | | | ||
| + | Yes | ||
| + | | | ||
| + | Yes | ||
| | | | ||
kernel5.15.148-tegra | kernel5.15.148-tegra | ||
| Line 404: | Line 433: | ||
F75113_Sample_code download:https://drive.google.com/file/d/1NNjm9ttKM6k6iiaotK0VbjoZnzesR1g-/view?usp=sharing | F75113_Sample_code download:https://drive.google.com/file/d/1NNjm9ttKM6k6iiaotK0VbjoZnzesR1g-/view?usp=sharing | ||
| - | == Support 4G/5G LTE Module== | + | == How to Test CIO108 + Warning Light(LTE-1101J/LTA-505-3WJ)== |
| + | |||
| + | LTE-1101J | ||
| + | |||
| + | [[Image:CIO108_LTE1101J.jpg]] | ||
| + | |||
| + | |||
| + | LTA-505-3WJ | ||
| + | |||
| + | [[Image:CIO108_LTA-505-3WJ-接線圖.jpg]] | ||
| + | |||
| + | == How to Test CIO208 + Warning Light(LTE-1101J/LTA-505-3WJ)== | ||
| + | |||
| + | LTE-1101J | ||
| + | |||
| + | [[Image:CIO208_LTE-1101J.jpg]] | ||
| + | |||
| + | |||
| + | LTA-505-3WJ | ||
| + | |||
| + | [[Image:CIO208_LTA-505-3WJ.jpg]] | ||
| + | |||
| + | == Support 4G/5G LTE Module == | ||
Support 4G/5G LTE Module: | Support 4G/5G LTE Module: | ||
| Line 412: | Line 463: | ||
3.SIMCOM7906G(M.2) | 3.SIMCOM7906G(M.2) | ||
| + | |||
| + | NGFF3 | ||
[[Image:sim7600sa.jpg]] | [[Image:sim7600sa.jpg]] | ||
| + | |||
| + | JP5.1.2 | ||
[[Image:m.2-sim7600.jpg]] | [[Image:m.2-sim7600.jpg]] | ||
| + | |||
| + | JP6.1 | ||
| + | |||
| + | [[Image:m.2_simcom7906.jpg]] | ||
== How to use IMX MIPI Camera (FOR JP5.1.2)== | == How to use IMX MIPI Camera (FOR JP5.1.2)== | ||
| Line 436: | Line 495: | ||
4.cam1-imx477,cam2-imx219 dtb download: | 4.cam1-imx477,cam2-imx219 dtb download: | ||
| - | nano https://drive.google.com/ | + | nano https://drive.google.com/file/d/1WSQ6V3PuwsEhiWRE74kYvgUJbKvsI88P/view?usp=sharing |
| - | nx https://drive.google.com/file/d/ | + | nx https://drive.google.com/file/d/1cJspLv7UaFX8GWodilcpoao8HhotZe9_/view?usp=sharing |
5.use gst-launch1.0 Command play | 5.use gst-launch1.0 Command play | ||
| Line 527: | Line 586: | ||
[[Image:tn_camera.jpg]] | [[Image:tn_camera.jpg]] | ||
| - | ==How to use | + | ==How to use MIPI Camera(FOR JP6.1)== |
| + | |||
| + | Example 1: | ||
| + | |||
| + | '''CAM1:IMX219 / CAM2:IMX219 ''' | ||
| + | |||
| + | Example 2: | ||
'''CAM1:TEVS-AR0821-C / CAM2:TEVS-AR0821-C ''' | '''CAM1:TEVS-AR0821-C / CAM2:TEVS-AR0821-C ''' | ||
| + | |||
| + | 1.dtbo file download:https://drive.google.com/drive/folders/1OdP8jL4E9zss8qkpitzohnXUVaNWYx_i?usp=sharing | ||
| + | |||
| + | 2.copy dtbo to 2NOR01 boot folder | ||
| + | |||
| + | 3.modify /boot/extlinu/extlinux.conf | ||
| + | |||
| + | 3-1.Set DEFAULT customer name | ||
| + | |||
| + | 3-2.New add FDT file ex:(FDT /boot/tegra234-p3768-0000-p3767-00003-nv.dtb) | ||
| + | |||
| + | 3-3.New add OVERLAYS file ex:(OVERLAYS /boot/tegra234-p3767-camera-p3768-imx219-dual.dtbo) | ||
| + | |||
| + | [[Image:mipi_extlinuxconf.jpg]] | ||
==WIFI/BT Module (only JP5.1.2 kernel:5.10.120-tegra) == | ==WIFI/BT Module (only JP5.1.2 kernel:5.10.120-tegra) == | ||
| Line 616: | Line 695: | ||
[[Image:GPS_m.2.png]] | [[Image:GPS_m.2.png]] | ||
| + | |||
| + | ==How to test COM1/COM2 == | ||
| + | |||
| + | [[Image:2nor01-com.jpg]] | ||
| + | |||
| + | JP5.1.2 | ||
| + | CC1 => ttyTHS1 | ||
| + | CC2 => ttyTHS0 | ||
| + | |||
| + | [[Image:2nor01-ttythsx-jp5.1.2.jpg]] | ||
| + | |||
| + | JP6.1 | ||
| + | CC1 => ttyTHS0 | ||
| + | CC2 => ttyTHS1 | ||
| + | |||
| + | [[Image:2nor01-ttythsx-jp6.1.jpg]] | ||
| + | |||
| + | Tool RS232 Loopback | ||
| + | |||
| + | [[Image:rs232_loopback.jpg]] | ||
| + | |||
| + | Test software(cutecom) | ||
| + | |||
| + | JP5.1.2 | ||
| + | |||
| + | baud rate 115200 | ||
| + | |||
| + | [[Image:2nor01-cutecom-1-2-jp5.1.2.jpg]] | ||
| + | |||
| + | JP6.1 | ||
| + | |||
| + | baud rate 115200 | ||
| + | |||
| + | [[Image:2nor01-cutecom-1-2-jp6.1.jpg]] | ||
Current revision
| OS | JP | CPU | Rev | HDMI0 | HDMI1 | Dual output | NGFF1 | NGFF2 | NGFF3 | nano SIM | USB2.0 | USB3.0 | PCIE | LAN1(RTL8111) | LAN2(I226IT) | LAN3(I226IT) | COM-232 | COM-422 | COM-485 | F75111N | WDT/DIO | TPM2.0 | CANBUS | CC007 | MIPI_CAM1(4Lanes) | MIPI_CAM2(4Lanes) | CALR1(AMP OUT) | CA1(MIC IN) | CA1(LINE OUT) | Download |
|---|---|---|---|---|---|---|---|---|---|---|---|---|---|---|---|---|---|---|---|---|---|---|---|---|---|---|---|---|---|---|
|
Ubuntu20.04.6 |
5.1.2 |
Orin Nano/Nx |
0.1 |
Yes |
Yes |
Yes |
Yes |
Yes |
Yes |
Yes |
Yes |
Yes |
Yes |
Yes |
Yes |
Yes |
Yes |
Yes |
Yes |
Yes |
- |
Yes |
Yes |
- |
No |
No |
Yes |
Yes |
Yes |
kernel 5.10.120-tegra |
|
Ubuntu20.04.6 |
5.1.2 |
Orin Nano/Nx |
0.2 |
Yes |
Yes |
Yes |
Yes |
Yes |
Yes |
Yes |
Yes |
Yes |
Yes |
Yes |
Yes |
Yes |
Yes |
Yes |
Yes |
Yes |
- |
Yes |
Yes |
Yes |
IMX219 |
IMX219 |
Yes |
Yes |
Yes |
kernel5.10.120-tegra |
|
Ubuntu22.04 |
6.1 |
Orin Nano/Nx |
0.2 |
Yes |
Yes |
Yes |
Yes |
Yes |
Yes |
Yes |
Yes |
Yes |
Yes |
Yes |
Yes |
Yes |
Yes |
Yes |
Yes |
Yes |
- |
Yes |
Yes |
- |
IMX219 |
IMX219 |
Yes |
Yes |
Yes |
kernel5.15.148-tegra |
How to use Dual HDMI
Please use two HDMI screens with a different resolution or frequency.
Example :
Screen 1 :Dell P2417H
Resolution :1920x1200
Frequency :59.95Hz
Screen 2 :Dell P2423-4Y
Resolution :1920x1080
Frequency :60Hz
Dual screen only support "extend" , not support mirror
2NOR01 DTB data for JetPack5.1.2
It is recommended to reserve 50 GB of hard disk space.
Quick Start (for JetPack5.1.2)
2nor01-nano file download(p3767.conf.common/tegra234-p3767-0003-p3768-0000-a0.dtb)
https://drive.google.com/drive/folders/11B_8g3cc1sqWTJT7Rx_kC-WNkDOvqwBZ?usp=sharing
2nor01-nx file download(p3767.conf.common/tegra234-p3767-0001-p3768-0000-a0.dtb)
https://drive.google.com/drive/folders/1N_QOgFsEVmDd39aNNy9crbIlekcK_gf3?usp=sharing
2nor01-nx16g file download(p3767.conf.common/tegra234-p3767-0000-p3768-0000-a0.dtb)
https://drive.google.com/drive/folders/1xnMpNAa9YBhsCHFvaot9UuLLpiwwEj6p?usp=sharing
How to build compile env(for JetPack5.1.2)
file download:https://drive.google.com/file/d/1bj-TZlXXSc68EoAhCZCzoU6hK6Psz_Y9/view?usp=sharing
reference: https://www.lex.com.tw/en/download/download-hide?cid1=73&cid2=203#topDownload
tpm_driver: https://drive.google.com/drive/folders/1VSraBo_PAXxNF-J0yOjXE1tZRjBSMHfw?usp=sharing
2NOR01 DTB data for JetPack6.1
Quick Start (for JetPack6.1)
2NOR01 Orin NANO8G p3767.conf.common/tegra234-p3768-0000+p3767-0003-nv.dtb
https://drive.google.com/drive/folders/15cDonyXOVnYp3MLH7UmKw_kLrPxTY2t1?usp=sharing
2NOR01 Orin NX8G p3767.conf.common/tegra234-p3768-0000+p3767-0001-nv.dtb
https://drive.google.com/drive/folders/1LMtvf__yBSIpklVe_G7xMRwb0-DiC3jn?usp=sharing
2NOR01 Orin NX16G p3767.conf.common/tegra234-p3768-0000+p3767-0000-nv.dtb
https://drive.google.com/drive/folders/1cZ7IzEpMvfpiKK_vv1oJ-77-C4VEsR34?usp=sharing
How to Build compile env(for JetPack 6.1)
file download:https://drive.google.com/file/d/1loE4fnnqhuOw24ct-07ePd2f4Ri22K1d/view?usp=sharing
tpm_driver:https://drive.google.com/drive/folders/197v8IJbLZQ6Ro6XDxzBDeDN9B3JgJacD?usp=sharing
Lan_driver(Only JetPack 6.1):https://drive.google.com/file/d/1b5bltLcWKvuSYweTDl7XkQDFPp_lmW49/view?usp=sharing
imx219 dtbo:https://drive.google.com/drive/folders/1tLlD6uMHvMp2_gSo9QlmMcdjPdartSXI?usp=sharing
How to Test DIO F75111
F75111 sample code download: https://drive.google.com/file/d/1dBFoBvD00uLZrkP6nBshvOc0aX8Nxn6k/view?usp=drive_link
How to use this Demo Application
Step1. Unzip "F75111_sample_code.zip" and change user permission
The program must control I/O device. You must change user permission to "root". You could use this command "sudo su"
Step2. build program
- cd sample_code
- make
Step3. Execute program
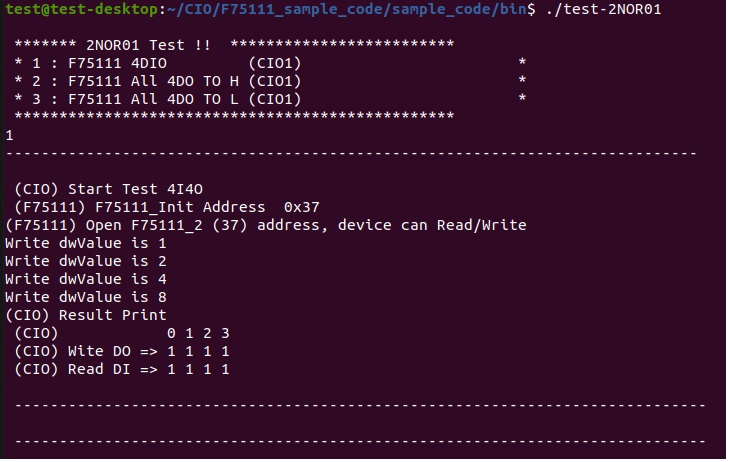
Example: "./test-2NOR01 " and entry 1
API function
bool F75111_Init();
BYTE F75111_GetDigitalInput ();
void F75111_SetDigitalOutput(BYTE byteValue);

BYTE F75111_GetWDTMode();
void F75111_SetWDTMode(BYTE dwvalue);

void F75111_SetWDTEnable    (BYTE byteTimer);
void F75111_SetWDTDisable   ();

void F75111_SetWDT11Enable ();
void F75111_SetWDT11Disable ();
void F75111_GetWDTTimer ();
How to add static MAC address
1.sudo gedit /etc/systemd/nv.sh
2.add eth0~eth2 Mac Address to nv.sh,MAC address patch for network interfaces
ifconfig eth0 down
ifconfig eth0 hw ether xx:xx:xx:xx:xx:xx
ifconfig eth0 up
ifconfig eth1 down
ifconfig eth1 hw ether xx:xx:xx:xx:xx:xx
ifconfig eth1 up
ifconfig eth2 down
ifconfig eth2 hw ether xx:xx:xx:xx:xx:xx
ifconfig eth2 up
3.reboot
into Force Recovery Mode
1.Download Jetson Linux release package and sample file system for your 2NOR01 from https://developer.nvidia.com/linux-tegra
2. Connect your Linux host computer to the appropriate USB port on your 2NOR01 (USB typeC)
For 2NOR01:
1.Ensure that your 2NOR01 is powered off, and a 32GB or larger NVME card is inserted .
2.Enable Force Recovery Mode by placing a jumper across SWP1 , located on the edge of the carrier board up the Jetson module.
3.Connect the 2NOR01’s power adapter . The 2NOR01 powers on automatically and enters Force Recovery mode.
4.Remove the jumper from SWP1
For other 2NOR01 that have hardware buttons:
1. Ensure that the developer kit is powered off.
2. Press and hold down the Force Recovery button.
3. Press, then release the Power button.
4. Release the Force Recovery button.
Reference link https://docs.nvidia.com/jetson/archives/r34.1/DeveloperGuide/text/IN/QuickStart.html#to-flash-jetson-developer-kit-operating-software
Flash image Command
JP5.1.2
1.cd nvidia_sdk/JetPack_5.1.2_Linux_JETSON_ORIN_NANO_TARGETS/Linux_for_Tegra/
2.sudo ./tools/kernel_flash/l4t_initrd_flash.sh --external-device nvme0n1p1 -c tools/kernel_flash/flash_l4t_external.xml -p "-c bootloader/t186ref/cfg/flash_t234_qspi.xml" --showlogs --network usb0 jetson-orin-nano-devkit internal
JP6.1
1.cd nvidia_sdk/JetPack_6.1_Linux_JETSON_ORIN_NANO_TARGETS/Linux_for_Tegra/
2.sudo ./tools/kernel_flash/l4t_initrd_flash.sh --external-device nvme0n1p1 -c tools/kernel_flash/flash_l4t_t234_nvme.xml -p " -c bootloader/generic/cfg/flash_t234_qspi.xml" --showlogs --network usb0 jetson-orin-nano-devkit internal
example use SDK Manager flash image
1.sdkmanager_install_os_step https://docs.google.com/document/d/17ltF9jBYfqkiY13jMH4NmmbzWXO9CNl5/edit?usp=sharing&ouid=117874123764077481080&rtpof=true&sd=true
2.Orin_nano_use_sdkmanager_install https://docs.google.com/document/d/1WGnmm570h11iQ8dlh2wArswSYJu7du3N/edit?usp=sharing&ouid=117874123764077481080&rtpof=true&sd=true
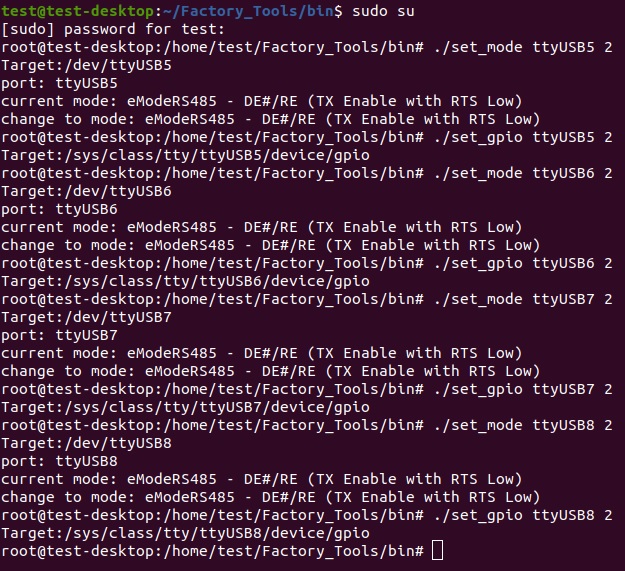
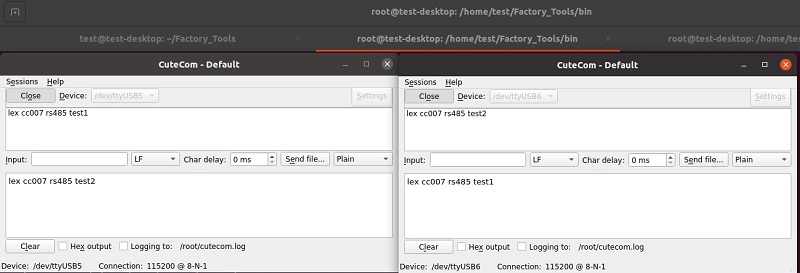
How to test CC007
1.use set_mode and set_gpio change node to RS485
Driver and Tool source code Download:https://drive.google.com/file/d/1nXuwNhjI4RQufPNIBXs6qoBHPQN5_3QI/view?usp=sharing
2.example ./set_mode ttyUSB0 2 ./set_gpio ttyUSB0 2
3.use cutecom test
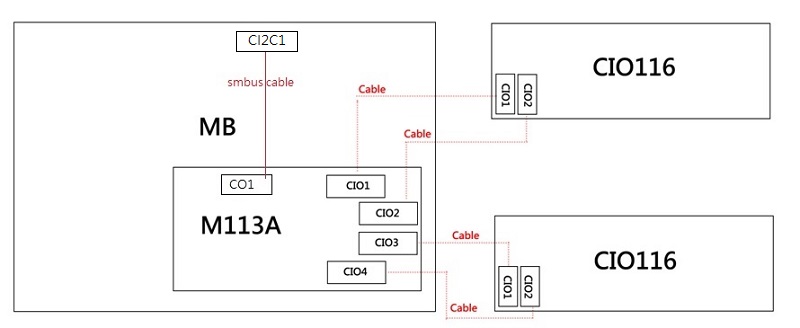
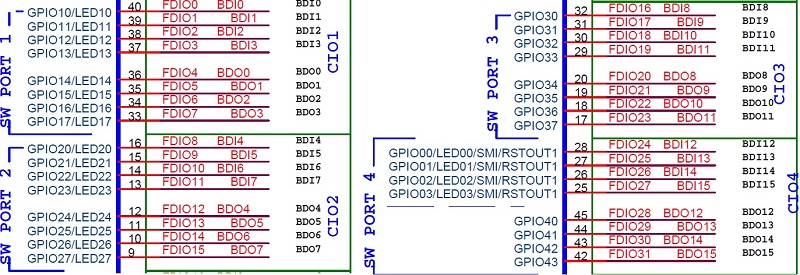
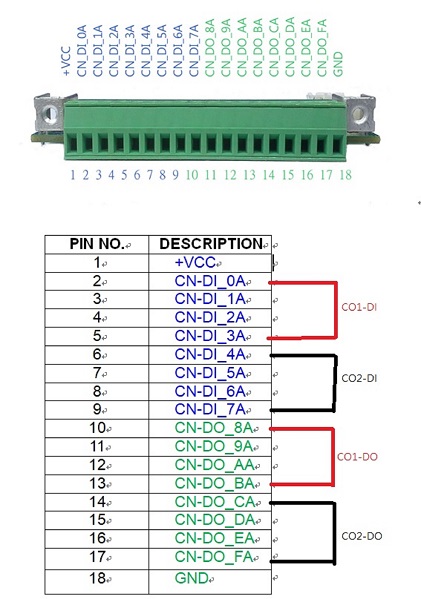
How to Test M113A(SMBUS)+CIO116(B version)
Real Connect Module
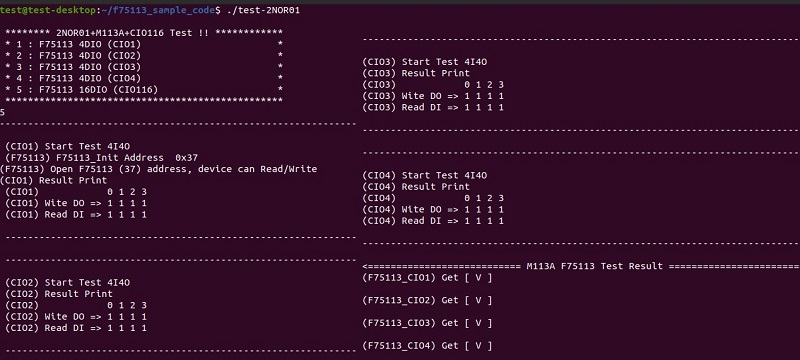
Test Utility
F75113_Sample_code download:https://drive.google.com/file/d/1NNjm9ttKM6k6iiaotK0VbjoZnzesR1g-/view?usp=sharing
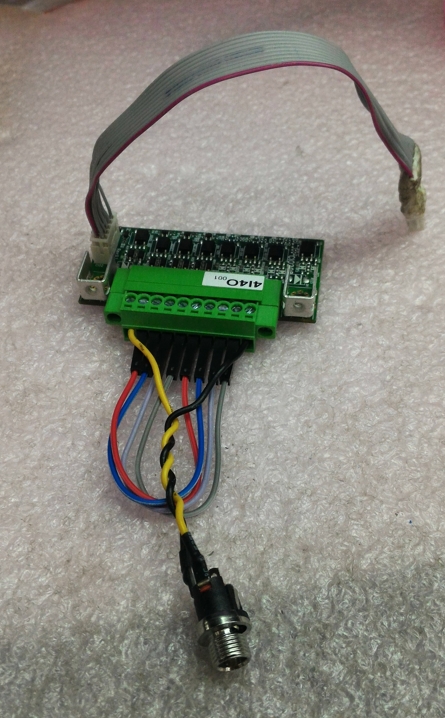
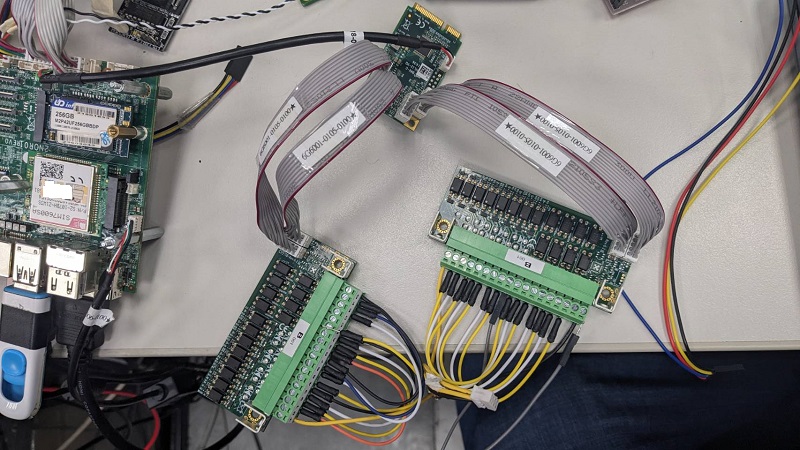
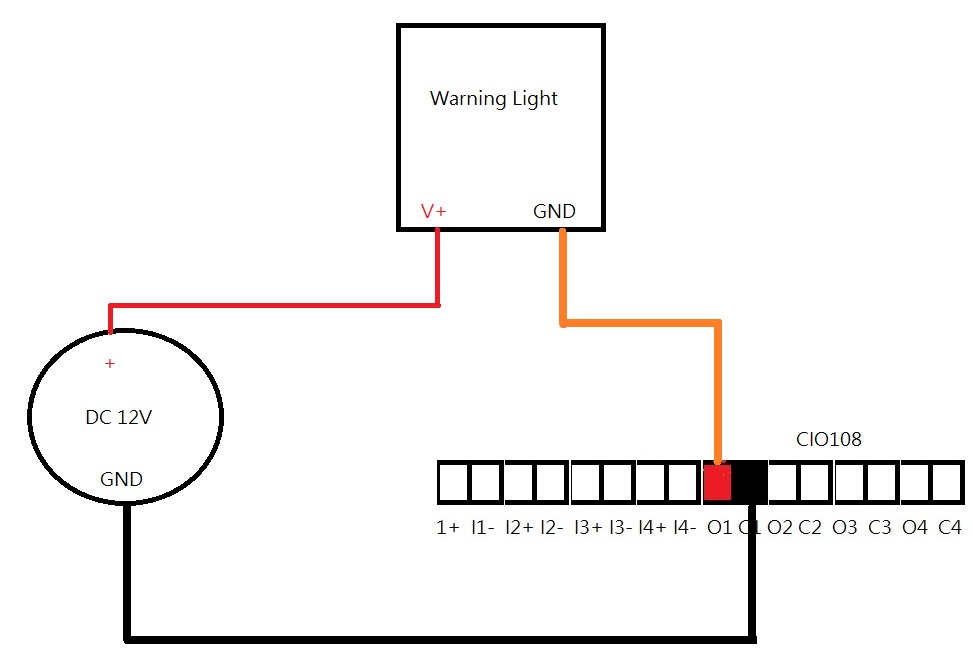
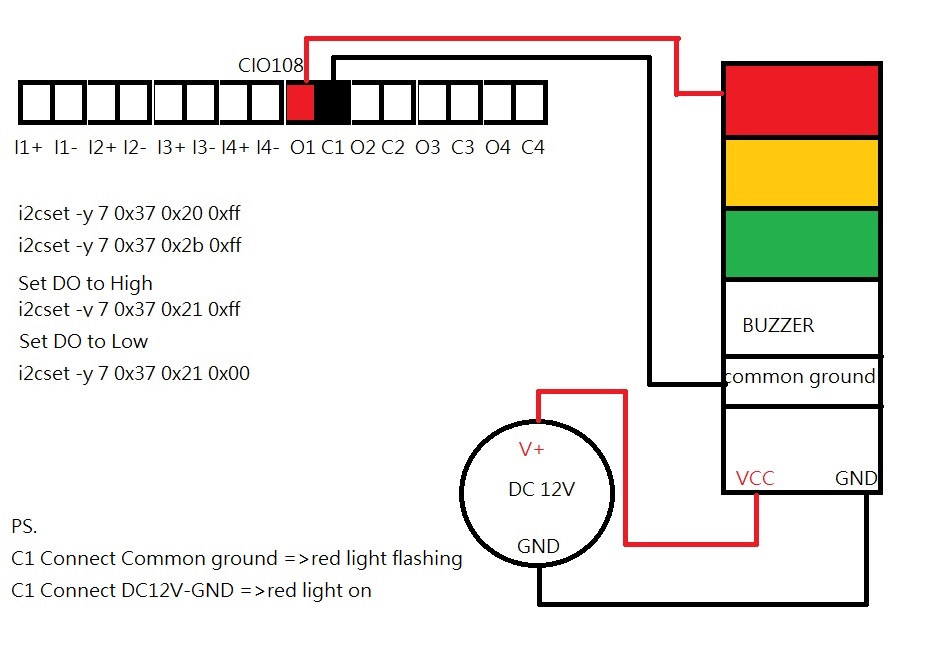
How to Test CIO108 + Warning Light(LTE-1101J/LTA-505-3WJ)
LTE-1101J
LTA-505-3WJ
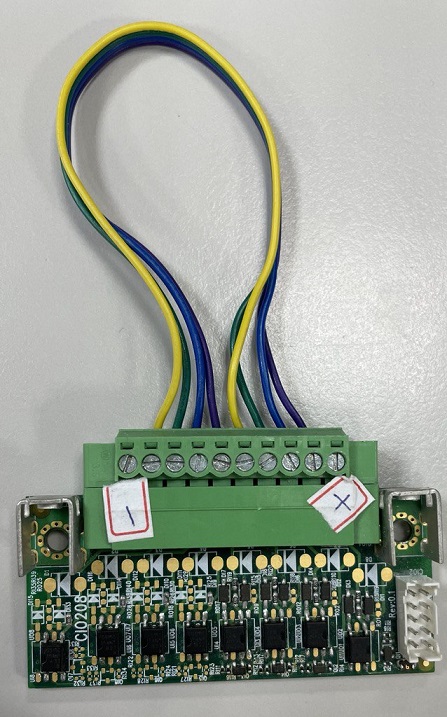
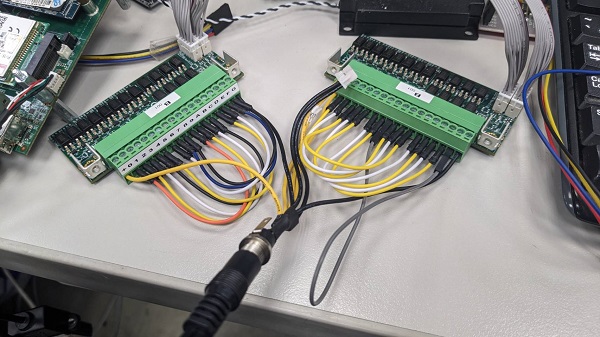
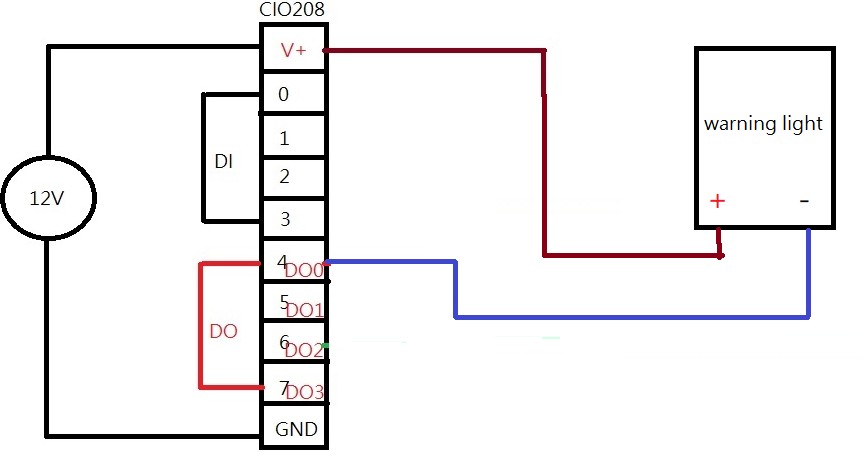
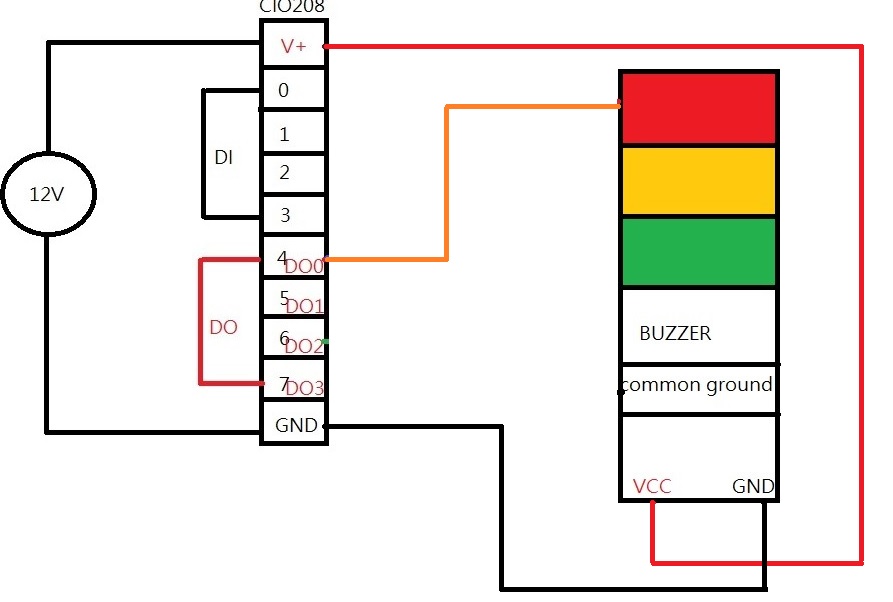
How to Test CIO208 + Warning Light(LTE-1101J/LTA-505-3WJ)
LTE-1101J
LTA-505-3WJ
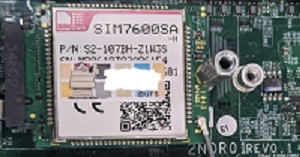
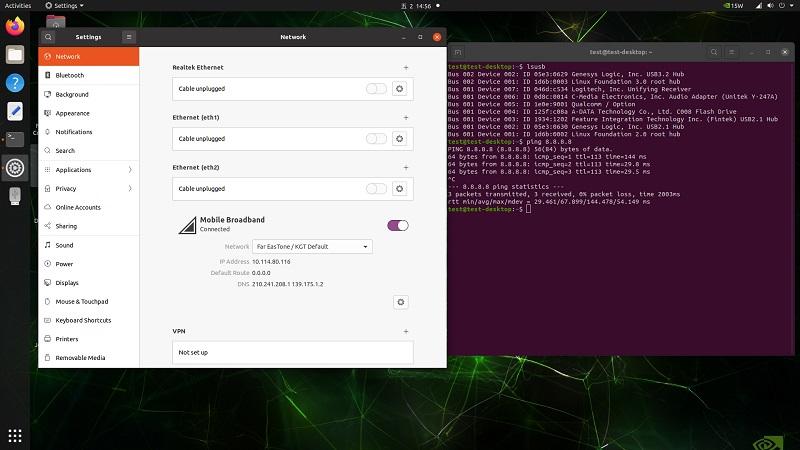
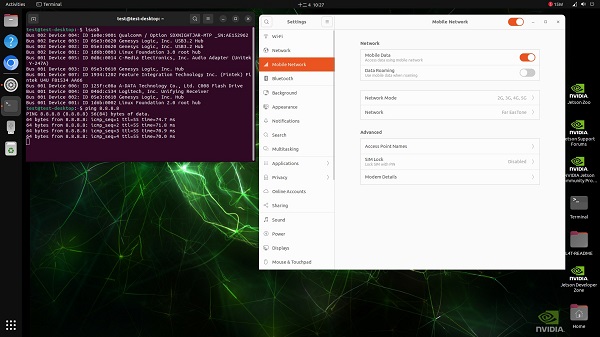
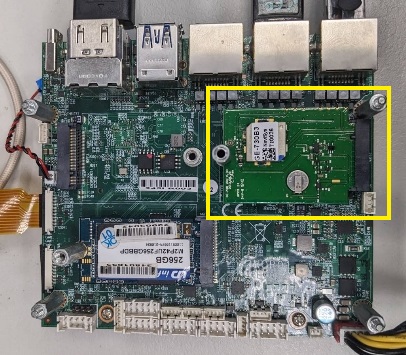
Support 4G/5G LTE Module
Support 4G/5G LTE Module:
1.SIMCOM7600(M.2)
2.SIMCOM8200EA(M.2)
3.SIMCOM7906G(M.2)
NGFF3
JP5.1.2
JP6.1
How to use IMX MIPI Camera (FOR JP5.1.2)
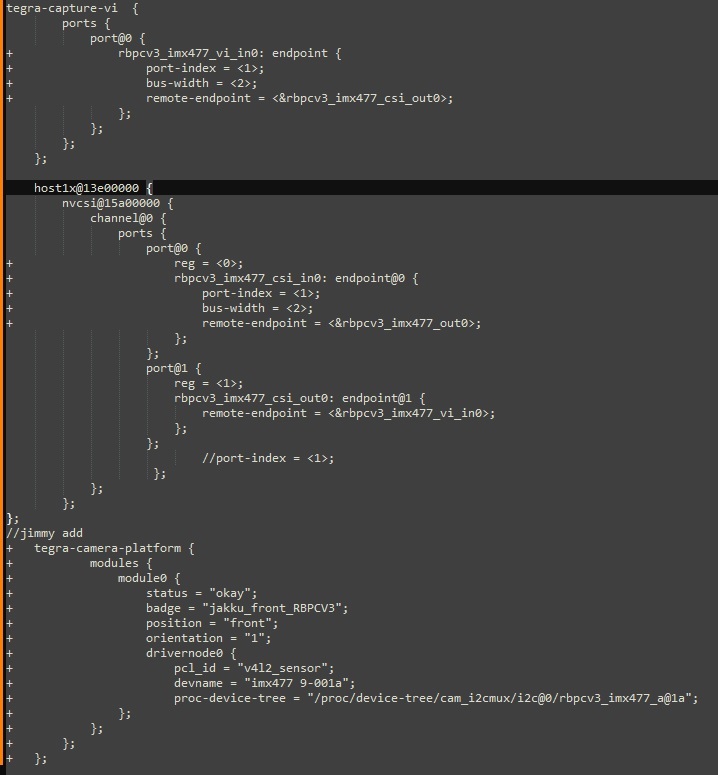
1.dts source setting
USE IMX219 and IMX477,need modify nvidia/nvidia_sdk/JetPack_5.1.2_Linux_JETSON_ORIN_NANO_TARGETS/Linux_for_Tegra/source/hardware/nvidia/platform/t23x/p3768/kernel-dts/cvb/tegra234-p3768-0000-a0.dtsi
example:CAM1-IMX477,CAM2-IMX219
2.build source dtb
How to build compile env(for JetPack5.1.2)
file download:https://drive.google.com/file/d/1bj-TZlXXSc68EoAhCZCzoU6hK6Psz_Y9/view?usp=sharing
3.CAM1 connect IMX477 MIPI,CAM2 connect IMX219 MIPI Camera
4.cam1-imx477,cam2-imx219 dtb download:
nano https://drive.google.com/file/d/1WSQ6V3PuwsEhiWRE74kYvgUJbKvsI88P/view?usp=sharing
nx https://drive.google.com/file/d/1cJspLv7UaFX8GWodilcpoao8HhotZe9_/view?usp=sharing
5.use gst-launch1.0 Command play
play video0 command:
gst-launch-1.0 nvarguscamerasrc sensor-id=0 ! 'video/x-raw(memory:NVMM),width=(int)1280,height=(int)720,format=(string)NV12,framerate=(fraction)30/1' ! nvvidconv ! queue ! xvimagesink
play video1 command:
gst-launch-1.0 nvarguscamerasrc sensor-id=1 ! 'video/x-raw(memory:NVMM),width=(int)1280,height=(int)720,format=(string)NV12,framerate=(fraction)30/1' ! nvvidconv ! queue ! xvimagesink
How to use Innodisk MIPI Camera (FOR JP5.1.2)
It does not support the cross-use of different cameras.
*example 1 :CAM1:EV2M-GOM1 / CAM2:EV2M-GOM1
1.Modify FDT /boot/kernel_tegra234-p3767-0003-p3768-0000-a0-2nor01-nano-ev2mgom1.dtb
2.cp -v Binfile/orin-nano(orin-nx)/*.* /lib/firmware
3.insmod inno_ev2m_gom1.ko
4.innodisk execute play command
*example 2 :CAM1:EV2M-OOM1 / CAM2:EV2M-OOM1
1.Modify FDT /boot/kernel_tegra234-p3767-0003-p3768-0000-a0-2nor01-nano-ev2moom1.dtb
2.cp -v Binfile/orin-nano(orin-nx)/*.* /lib/firmware
3.insmod inno_ev2m_oom1.ko
4.innodisk execute play command
*example 3 :CAM1:EVDM-OOM1 / CAM2:EVDM-OOM1
1.Modify FDT /boot/kernel_tegra234-p3767-0003-p3768-0000-a0-2nor01-nano-evdmoom1.dtb
2.cp -v Binfile/orin-nano/*.* /lib/firmware
3.insmod inno_evdm_oom1.ko
4.innodisk execute play command
- inatall v4l-utils
$ sudo apt-get install v4l-utils
- play vidoe0 command:
$ gst-launch-1.0 v4l2src device=/dev/video0 ! videoconvert ! videoscale ! video/x-raw, width=1920, height=1080 ! fpsdisplaysink
- play video1 command:
$ gst-launch-1.0 v4l2src device=/dev/video1 ! videoconvert ! videoscale ! video/x-raw, width=1920, height=1080 ! fpsdisplaysink
INNODISK MIPI CAMERA(EV2M-GOM1(2 lane)/EV2M-OOM1(2 lane)/EVDM-OOM1(4 lane))
innodisk mipi camera dtb for ORIN NANO/NX dtb download:https://drive.google.com/file/d/1SCG9Z7eMza3Cy_2_bXNUlPghwoy1ZQcL/view?usp=sharing
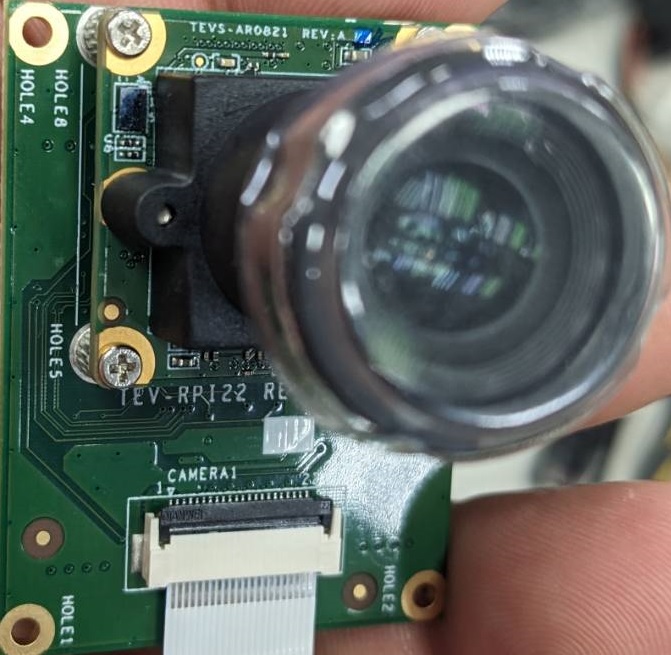
How to use TN MIPI Camera(FOR JP5.1.2)
CAM1:TEVS-AR0821-C / CAM2:TEVS-AR0821-C
For LEX dock board
dtb and tevs driver download:https://drive.google.com/drive/folders/1xGwugJyBPKK_oRCtfrGMSbyrEGyq87Gn?usp=sharing
1.copy kernel_tegra234-p3767-0003-p3768-0000-a0-tn.dtb to 2nor01 boot folder
2.vim /boot/extlinux/extlinux.conf
3. modify FDT /boot/kernel_tegra234-p3767-0003-p3768-0000-a0-tn.dtb
4. insmod tevs.ko
For NVIDIA dock board
How to use TN MIPI Camera:
Reference: https://github.com/TechNexion-Vision/TEV-Jetson_Camera_driver/tree/tn_l4t-r35.3.1.ga_kernel-5.10
How to build TN MIPI Camera:
Reference: https://developer.technexion.com/docs/how-to-build-technexion-camera-drivers-for-nvidia-jetpack5
How to use MIPI Camera(FOR JP6.1)
Example 1:
CAM1:IMX219 / CAM2:IMX219
Example 2:
CAM1:TEVS-AR0821-C / CAM2:TEVS-AR0821-C
1.dtbo file download:https://drive.google.com/drive/folders/1OdP8jL4E9zss8qkpitzohnXUVaNWYx_i?usp=sharing
2.copy dtbo to 2NOR01 boot folder
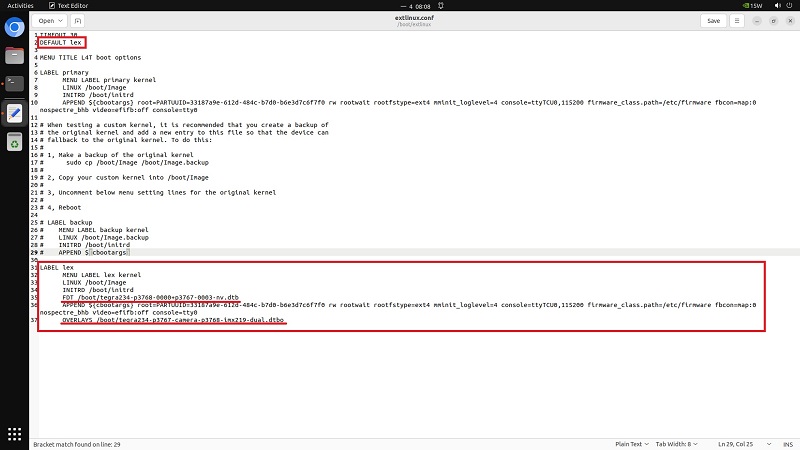
3.modify /boot/extlinu/extlinux.conf
 3-1.Set DEFAULT customer name

 3-2.New add FDT file ex:(FDT /boot/tegra234-p3768-0000-p3767-00003-nv.dtb)

 3-3.New add OVERLAYS file ex:(OVERLAYS /boot/tegra234-p3767-camera-p3768-imx219-dual.dtbo)
WIFI/BT Module (only JP5.1.2 kernel:5.10.120-tegra)
1.ENL-R8852CE
R8852CE File Download:https://drive.google.com/file/d/16cvb22gwc-TUY7JJF4cuBux9x61bl2Bp/view?usp=sharing
How to run WIFI(example R8852CE)
$sudo cp 8852CE.bin /lib/firmware/
$sudo modprobe cfg80211
$sudo insmod 8852ce.ko
$sudo cp 8852ce.ko /lib/modules/5.10.120-tegra/kernel/drivers/net/wireless/
$sudo depmod -a 5.10.120-tegra
$sudo reboot
How to run BT(example R8852CE)
$sudo cp rtkbt firmware/lib/firmware/rtl8852cu_config /lib/firmware
$sudo cp rtkbt firmware/lib/firmware/rt l8852cu_fw /lib/firmware
$sudo rmmod btusb
$sudo mv /lib/modules/5.10.120-tegra/kernel/drivers/bluetooth/btusb.ko ~/btusb_bak
$sudo cp -v rtk_btusb.ko /lib/modules/5.10.120-tegra/kernel/drivers/bluetooth/btusb.ko
$sudo depmod -a 5.10.120 tegra
$sudo reboot
2.ENL-R8852BE
R8852BE File Download:https://drive.google.com/file/d/1w64fl3_VJbq3-SzAWNfTc_pjeY0Ou1bj/view?usp=sharing
How to run WIFI(example R8852BE)
$sudo modprobe cfg80211
$sudo insmod 8852be.ko
$sudo cp 8852be.ko /lib/modules/5.10.120-tegra/kernel/drivers/net/wireless/
$sudo depmod -a 5.10.120-tegra
$sudo reboot
How to run BT(example R8852BE)
$sudo cp rtkbt firmware/lib/firmware/rtl8852bu_config /lib/firmware
$sudo cp rtkbt firmware/lib/firmware/rt l8852bu_fw /lib/firmware
$sudo rmmod btusb
$sudo mv /lib/modules/5.10.120-tegra/kernel/drivers/bluetooth/btusb.ko ~/btusb_bak
$sudo cp -v rtk_btusb.ko /lib/modules/5.10.120-tegra/kernel/drivers/bluetooth/btusb.ko
$sudo depmod -a 5.10.120 tegra
$sudo reboot
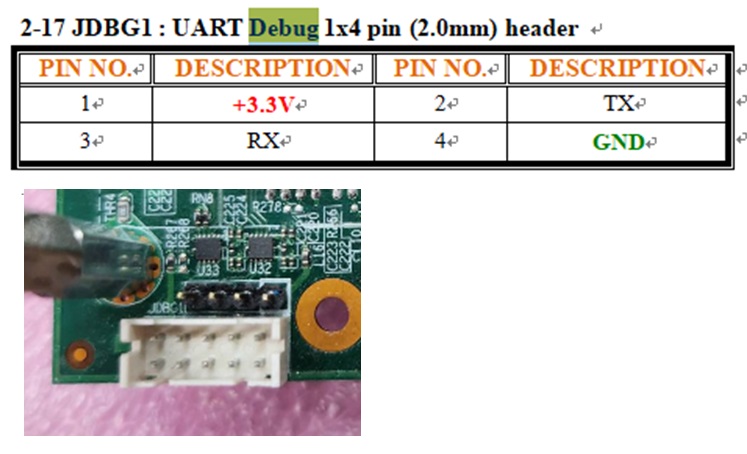
Debug (UART, JDBG1)
Open the terminal window (i.e., Hyper Terminal or Tera Term),choose the COM port number and apply the following configuration.
Baud rate: 115200
Data bit: 8
Parity: None
Stop bits: 1
How to use GPS Module
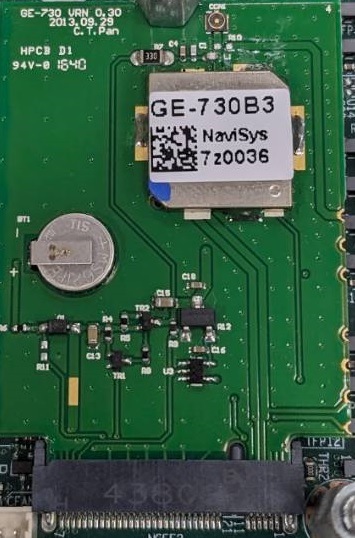
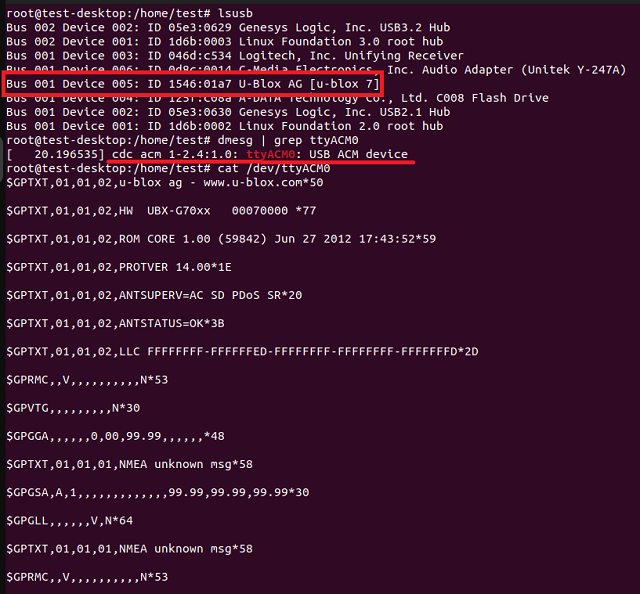
The signal of the GPS module is USB2.0 so can use NGFF2 or NGFF3
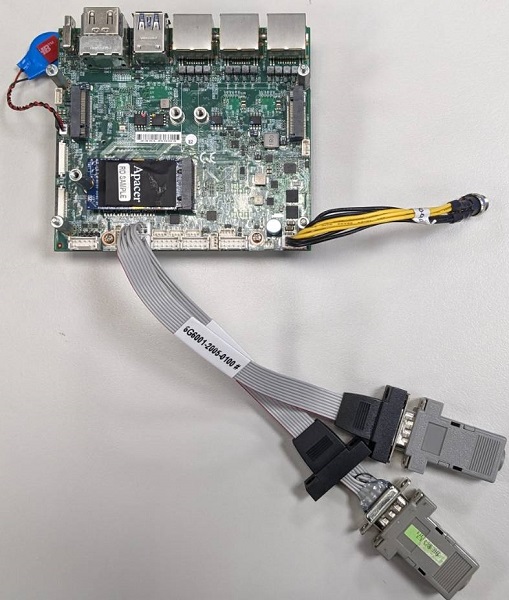
How to test COM1/COM2
JP5.1.2
CC1 => ttyTHS1
CC2 => ttyTHS0
JP6.1
CC1 => ttyTHS0
CC2 => ttyTHS1
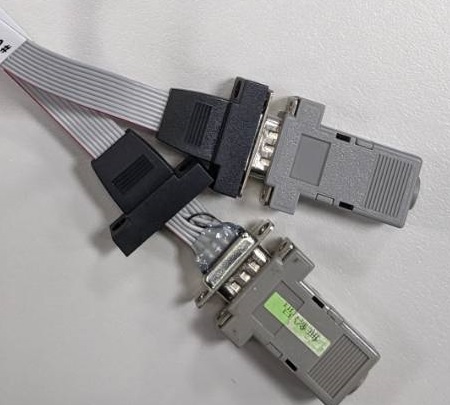
Tool RS232 Loopback
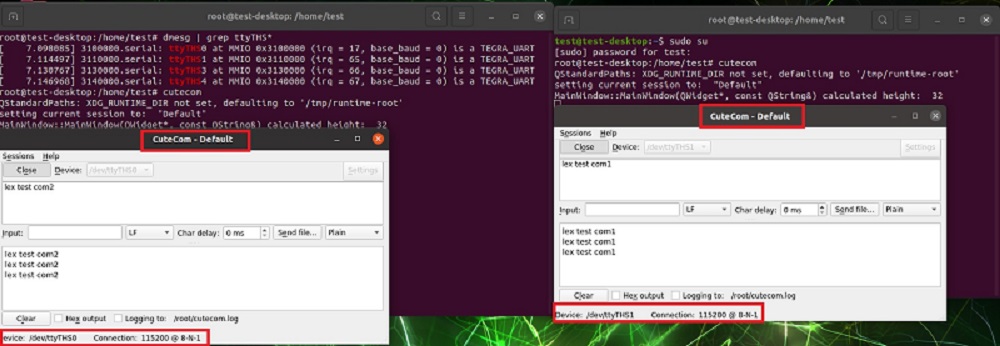
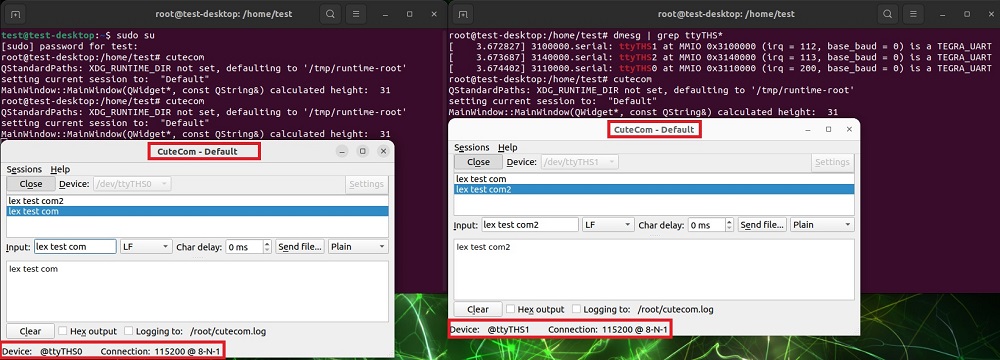
Test software(cutecom)
JP5.1.2
baud rate 115200
JP6.1
baud rate 115200
