請先看『使用說明』
IO Device:852DioNTDriver version
From LEXWiKi
(→The Sample code source you can download from) |
|||
| (24 intermediate revisions not shown.) | |||
| Line 1: | Line 1: | ||
[[Category:AllowPages]] | [[Category:AllowPages]] | ||
| - | == | + | == Why to use NT driver version , not WinIO version == |
| - | + | When using WinIO , only Administrator can read/write port. | |
| - | + | ||
| - | + | ||
| - | + | ||
| - | + | ||
| - | + | But all of the user can read/write port when using the NT driver version. | |
| - | + | ||
| - | + | ||
| - | + | ||
| - | + | Before using AP , please install the driver first. | |
| - | + | ||
| - | + | ||
| - | + | ||
| - | + | ||
| - | === | + | == The Sample code source you can download from == |
| - | + | ||
| - | + | ||
| - | === | + | ===For Looping test=== |
| - | + | <!-- | |
| - | + | <Google Drive> | |
| - | + | ||
| - | = | + | Source file: [https://drive.google.com/file/d/1pT6tgTz8-aOpPpyX6XcVbn7MBQBLUMYu/view?usp=sharing 852Dio_NTdriver_v1.0W_Src] |
| - | [ | + | Binary file: [https://drive.google.com/file/d/1uT407l4X-WPw4_TnAS0HkR1sEfp9MwYa/view?usp=sharing 852Dio_NTdriver_v1.0W_Bin] |
| + | --> | ||
| - | + | <FTP> | |
| - | + | Source file: [ftp://ftp.lex.com.tw/Engineer/SoftSupport/AP_Module/852_DIO_Sample_Windows/852Dio_v1.0w_NTdriver_src.rar 852Dio_NTdriver_v1.0W_Src] | |
| - | + | Binary file: [ftp://ftp.lex.com.tw/Engineer/SoftSupport/AP_Module/852_DIO_Sample_Windows/852Dio_v1.0w_NTdriver_Bin.rar 852Dio_NTdriver_v1.0W_Bin] | |
| - | + | ===For Single pin test=== | |
| + | <!-- | ||
| + | <Google Drive> | ||
| - | + | Source file: [https://drive.google.com/file/d/18baDpQlqNgh1AiZYw8Od_ccTzy8oQZYY/view?usp=sharing 852Dio_single_NTdriver_Src] | |
| - | + | Binary file: [https://drive.google.com/file/d/1xqlBaiyl5ebYOjo2YePIMHEYJkmhHXwr/view?usp=sharing 852Dio_single_NTdriver_Bin] | |
| + | --> | ||
| + | |||
| + | <FTP> | ||
| + | |||
| + | Source file: [ftp://ftp.lex.com.tw/Engineer/SoftSupport/AP_Module/852_DIO_Sample_Windows/852Dio_single_NTdriver_Src.rar 852Dio_single_NTdriver_Src] | ||
| + | |||
| + | Binary file: [ftp://ftp.lex.com.tw/Engineer/SoftSupport/AP_Module/852_DIO_Sample_Windows/852Dio_single_NTdriver_Bin.rar 852Dio_single_NTdriver_Bin] | ||
| + | |||
| + | == How to install the NT driver == | ||
| + | |||
| + | 1. Double click the '''DriverInstaller.exe''' file in 852Dio_v1.0w_NTdriver_Bin folder. | ||
| + | |||
| + | 2. After install the driver , OS will reboot automatically. | ||
| + | |||
| + | 3. After reboot , you can check if the driver install success or not by following steps. | ||
[[Image:dev1.jpg]] | [[Image:dev1.jpg]] | ||
| + | |||
| + | Open Device Manager,choose "show hidden devices" | ||
[[Image:dev2.jpg]] | [[Image:dev2.jpg]] | ||
| + | If there are '''852Dio''' in Non-Plug and Play Drivers , the driver is installed success. | ||
== How to use this Demo Application == | == How to use this Demo Application == | ||
| + | === For Looping test === | ||
1. Press the "Start" button to test DIO function | 1. Press the "Start" button to test DIO function | ||
| Line 58: | Line 66: | ||
[[Image:852_dio_ap.jpg]] | [[Image:852_dio_ap.jpg]] | ||
| + | |||
| + | |||
| + | === For Single pin test === | ||
| + | 1. Connected the DI and DO pin | ||
| + | |||
| + | 2. Before you press the "Write" button, Check the box what you like to send high data first | ||
| + | |||
| + | 3. Press the "Read" button to get data from DO | ||
| + | |||
| + | 4. Press the "Enable" button to test WDT function | ||
| + | |||
| + | 5. Press the "Disable" button when WDT enable to disable WDT | ||
| + | |||
| + | [[Image:singlePin.jpg]] | ||
| + | |||
| + | == Code Introduction == | ||
| + | === Define Port Address === | ||
| + | #define WDT_ENABLE 0x600 | ||
| + | #define WDT_DISABLE 0x604 | ||
| + | #define DO 0x60C | ||
| + | #define DI 0x608 | ||
| + | |||
| + | === Set DO === | ||
| + | DWORD dwOutput; | ||
| + | DWORD DoCheckLowBuffer[2] = { DO , 1 }; | ||
| + | DeviceIoControl( hDevice , WRITE_PORT , DoCheckLowBuffer , | ||
| + | sizeof(DoCheckLowBuffer) , NULL , 0 , &dwOutput , NULL); //write data 1 to DO port | ||
| + | |||
| + | === Read DI/DO === | ||
| + | DWORD DiCheckLowOutBuffer; | ||
| + | DWORD DiCheckLowInBuffer[1] = { DI }; | ||
| + | DeviceIoControl( hDevice , READ_PORT , DiCheckLowInBuffer , sizeof(DiCheckLowInBuffer) , &DiCheckLowOutBuffer , | ||
| + | sizeof(DiCheckLowOutBuffer) , &dwOutput , NULL); //read DI data | ||
| + | printf("%X\n" , DiCheckLowOutBuffer); | ||
| + | |||
| + | === Enable WDT === | ||
| + | DWORD WdtEnableBuffer[2] = { WDT_ENABLE , 5 }; | ||
| + | DeviceIoControl(hDevice, WRITE_PORT, WdtEnableBuffer , | ||
| + | sizeof(WdtEnableBuffer), NULL, 0, &dwOutput, NULL); //set 5 seconds to WDT enable port, system will reboot after 5 seconds | ||
| + | |||
| + | === Disable WDT === | ||
| + | //set 1 sec to WDT disable port , the disable signal will break off WDT enable signle | ||
| + | DWORD WdtDisableBuffer[2] = { WDT_DISABLE , 1 }; | ||
| + | DeviceIoControl(hDevice, WRITE_PORT, WdtDisableBuffer, sizeof(WdtDisableBuffer), NULL, 0, &dwOutput, NULL); | ||
Current revision
Contents |
Why to use NT driver version , not WinIO version
When using WinIO , only Administrator can read/write port.
But all of the user can read/write port when using the NT driver version.
Before using AP , please install the driver first.
The Sample code source you can download from
For Looping test
<FTP>
Source file: 852Dio_NTdriver_v1.0W_Src
Binary file: 852Dio_NTdriver_v1.0W_Bin
For Single pin test
<FTP>
Source file: 852Dio_single_NTdriver_Src
Binary file: 852Dio_single_NTdriver_Bin
How to install the NT driver
1. Double click the DriverInstaller.exe file in 852Dio_v1.0w_NTdriver_Bin folder.
2. After install the driver , OS will reboot automatically.
3. After reboot , you can check if the driver install success or not by following steps.
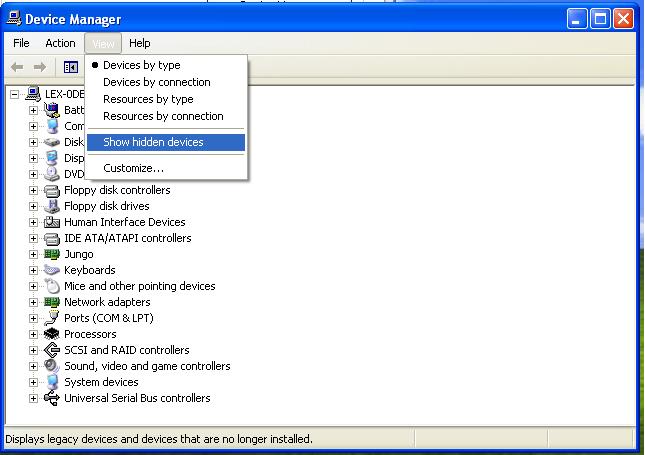
Open Device Manager,choose "show hidden devices"
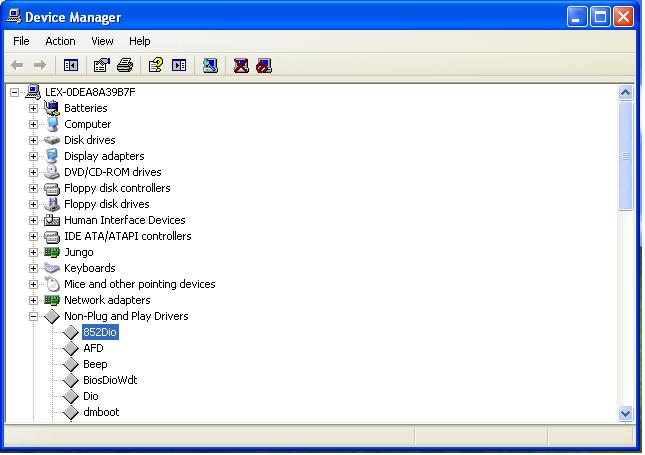
If there are 852Dio in Non-Plug and Play Drivers , the driver is installed success.
How to use this Demo Application
For Looping test
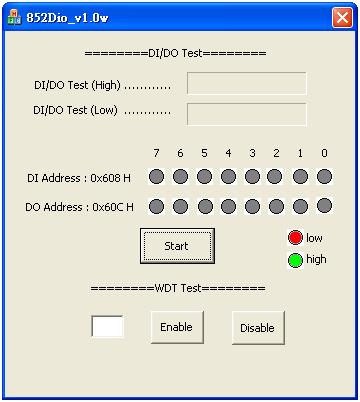
1. Press the "Start" button to test DIO function
2. Press the "Enable" button to test WDT function
3. Press the "Disable" button when WDT enable to disable WDT
For Single pin test
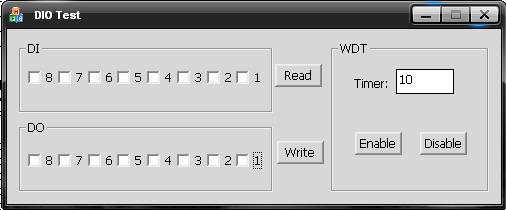
1. Connected the DI and DO pin
2. Before you press the "Write" button, Check the box what you like to send high data first
3. Press the "Read" button to get data from DO
4. Press the "Enable" button to test WDT function
5. Press the "Disable" button when WDT enable to disable WDT
Code Introduction
Define Port Address
   #define WDT_ENABLE 0x600
   #define WDT_DISABLE 0x604
   #define DO 0x60C
   #define DI 0x608
Set DO
   DWORD dwOutput;
   DWORD DoCheckLowBuffer[2] = { DO , 1 };
   DeviceIoControl( hDevice , WRITE_PORT , DoCheckLowBuffer ,
                    sizeof(DoCheckLowBuffer) , NULL , 0 , &dwOutput , NULL);  //write data 1 to DO port
Read DI/DO
   DWORD DiCheckLowOutBuffer;
   DWORD DiCheckLowInBuffer[1] = { DI };
   DeviceIoControl( hDevice , READ_PORT , DiCheckLowInBuffer , sizeof(DiCheckLowInBuffer) , &DiCheckLowOutBuffer ,
                           sizeof(DiCheckLowOutBuffer) , &dwOutput , NULL);  //read DI data
   printf("%X\n" , DiCheckLowOutBuffer);
Enable WDT
   DWORD WdtEnableBuffer[2] = { WDT_ENABLE , 5 };
   DeviceIoControl(hDevice, WRITE_PORT, WdtEnableBuffer ,
             sizeof(WdtEnableBuffer), NULL, 0, &dwOutput, NULL); //set 5 seconds to WDT enable port, system will reboot after 5 seconds
Disable WDT
   //set 1 sec to WDT disable port , the disable signal will break off WDT enable signle
   DWORD WdtDisableBuffer[2] = { WDT_DISABLE , 1 };
   DeviceIoControl(hDevice, WRITE_PORT, WdtDisableBuffer, sizeof(WdtDisableBuffer), NULL, 0, &dwOutput, NULL);


