請先看『使用說明』
IO Device:F75113 SMbus under Linux(64bit)
From LEXWiKi
(→How to use this Demo Application) |
(→The Sample code source you can download from) |
||
| (28 intermediate revisions not shown.) | |||
| Line 1: | Line 1: | ||
[[Category:AllowPages]] | [[Category:AllowPages]] | ||
| + | |||
== The Sample code source you can download from == | == The Sample code source you can download from == | ||
| + | <!-- | ||
| + | <Google Drive> | ||
| - | Source file: [ | + | Source file: [https://drive.google.com/file/d/1ol4bL4QN_HUYJM7C6r0XDI6q62Gp6CP1/view?usp=sharing F75113_SMBUSv1.0.2L_Src] |
| + | Binary file(64 bit): [https://drive.google.com/file/d/1_SZL7CfSacBS6j2GraG4-_CZT2cSJ1Fn/view?usp=sharing F75113_SMBUSv1.0.2L_Bin] | ||
| + | --> | ||
| - | + | <FTP> | |
| + | |||
| + | <!--Source file: [ftp://ftp.lex.com.tw/Engineer/SoftSupport/AP_Module/F75113/Linux/SMBUS/F75113_SMBUSv1.0.2L_src.tar.gz F75113_SMBUSv1.0.2L_Src ]--> | ||
| + | Binary file(64 bit): [ftp://ftp.lex.com.tw/Engineer/SoftSupport/AP_Module/F75113/Linux/SMBUS/F75113_SMBUSv1.0.2L_bin.tar.gz F75113_SMBUSv1.0.2L_Bin ] | ||
| + | |||
| + | We do the demo test with a test tool which DIx connect to DOx with Relay. | ||
| + | |||
| + | |||
| + | libF75113 DLL | ||
| + | <!-- | ||
| + | <Google Drive> | ||
| + | |||
| + | DLL file: [https://drive.google.com/file/d/10a8QkyFd5iBqncqvgEW28uFECsaBZuko/view?usp=sharing libF75113] | ||
| + | --> | ||
| + | |||
| + | <FTP> | ||
| + | |||
| + | DLL file: [ftp://ftp.lex.com.tw/Engineer/SoftSupport/AP_Module/F75113/Linux/SMBUS/libF75113.zip libF75113] | ||
| + | |||
| + | |||
| + | libF75113 DLL Sample Code | ||
| + | <!-- | ||
| + | <Google Drive> Source file: [https://drive.google.com/file/d/1PJdXe3yBiwNry3yJDu53KKzD_K8GlvGn/view?usp=sharing F75113_SAMPLE_CODE] | ||
| + | |||
| + | <Google Drive> Binay file: [https://drive.google.com/file/d/1drzalyNkG1EbeV0Pau5bSID2LWsaURUj/view?usp=sharing F75113_SAMPLE_BIN] | ||
| + | --> | ||
| + | |||
| + | <FTP> | ||
| + | |||
| + | Source file: [ftp://ftp.lex.com.tw/Engineer/SoftSupport/AP_Module/F75113/Linux/SMBUS/F75113_SAMPLE_CODE.zip F75113_SAMPLE_CODE] | ||
| + | |||
| + | Binay file: [ftp://ftp.lex.com.tw/Engineer/SoftSupport/AP_Module/F75113/Linux/SMBUS/F75113_SAMPLE_BIN.zip F75113_SAMPLE_BIN] | ||
| + | |||
| + | == MB Support List == | ||
| + | <!--box uid=f777871962f1c0432784d4e0e73802b8.1588.Y5cca8faf3aa49--> | ||
| + | <!-- | ||
| + | ****************************************************************************************** | ||
| + | * | ||
| + | * ** PLEASE DON'T EDIT THIS TABLE DIRECTLY. Use the edit table link under the table. ** | ||
| + | * | ||
| + | ****************************************************************************************** --> | ||
| + | {|border="2" cellpadding="4" cellspacing="0" style="margin: 1em 1em 1em 0; border: 1px #aaa solid; border-collapse: collapse;" | ||
| + | |- | ||
| + | ! |Cacrd | ||
| + | | | ||
| + | M113A | ||
| + | |} | ||
| + | [{{SERVER}}/lexwiki/index.php?title=Special:TableEdit&id=f777871962f1c0432784d4e0e73802b8.1588.Y5cca8faf3aa49&page=1588&pagename={{FULLPAGENAMEE}} edit table] | ||
| + | <!--box uid=f777871962f1c0432784d4e0e73802b8.1588.Y5cca8faf3aa49--> | ||
| - | We do the demo test with a test tool which DIx connect to DOx with Relay. | ||
== How to use this Demo Application == | == How to use this Demo Application == | ||
| + | |||
| + | Before you use this | ||
| + | |||
| + | please enter F75113set.sh and read the Readme.txt enter command | ||
| + | |||
| + | after all you can open the program | ||
[[Image:SMBUSLinux.JPG]] | [[Image:SMBUSLinux.JPG]] | ||
| Line 19: | Line 77: | ||
4. Press the "C4test" button to test CIO4 function | 4. Press the "C4test" button to test CIO4 function | ||
| - | |||
| - | If the next picture appears | ||
| - | |||
| - | [[Image:t3.jpg]] | ||
| - | |||
| - | MB no SMBus or the drive placement is wrong | ||
== F75113 GPIO Picture == | == F75113 GPIO Picture == | ||
| Line 30: | Line 82: | ||
[[Image:t5.jpg]] | [[Image:t5.jpg]] | ||
| - | == | + | == How to use libF75113 == |
| + | Using (3I640CW + CIO116B) to example how to using "libF75113" to develop your program. | ||
| - | + | [[Image:3I640CW_CIO116.jpg]] | |
| + | [[Image:CIO116_B.jpg]] | ||
| + | [[Image:CIO116_B-1.jpg]] | ||
| + | [[Image:CIO116_B-3.jpg]] | ||
| - | + | == Introduction == | |
| - | + | "libF75113" could helps developer quickly operate F75113 by SMBUS.<br \> | |
| - | + | It include "libF75113.h","libF75113.so","SMBus.h","SMBus.c" and "YjlDef.h". | |
| - | + | ||
| - | + | Attention: "SUDO" permissions must be used during execution. (Ex: sudo ./F75113_SAMPLE_CODE) | |
| - | + | ||
| - | + | ||
| - | + | ||
| - | + | ||
| - | === | + | == Steps to use libF75113 == |
| + | === Step1. Unzip "libF75113.zip" and puts all of files to your project === | ||
| + | Link "libF75113.so" and include "libF75113.h".<br /> | ||
| - | + | === Step2. Call 'SMBUS_Install()' to initial SMBUS resource === | |
| - | + | /* Initial SMBUS resource */ | |
| - | + | if(SMBus_Install() == FALSE) | |
| - | + | ||
| - | + | ||
| - | + | ||
| - | + | ||
| - | if ( | + | |
{ | { | ||
| - | + | printf("Initial SMBUS failed!!! Quit console, Bye bye! \n"); | |
| + | return false; | ||
} | } | ||
| - | } | ||
| - | === | + | === Step3: Call 'F75113_Init()' to initial F75113 device. It default to initial CIO1(4I4O), CIO2(4I4O), CIO3(4I4O) and CIO4(4I4O). === |
| + | /* Initial F75113 CIO1, CIO2, CIO3 and CIO4. Initial F75113 WDT */ | ||
| + | bInitOk = F75113_Init(); | ||
| - | + | if(bInitOk == false) | |
| - | + | printf("F75113 initial failed!!!!\n"); | |
| - | + | else | |
| - | + | printf("F75113 initial success.\n"); | |
| - | + | ||
| - | + | ||
| - | + | ||
| - | + | ||
| - | + | ||
| - | + | ||
| - | + | ||
| - | + | F75113_SetWDT_init(); | |
| - | + | === Step4: Call 'F75113_SetDigital_Low_Output() to use CIO1 and CIO2 DO pin send signal. === | |
| - | + | (Send Value: CIO1-DO1:0x01, CIO1-DO2:0x02, CIO1-DO3:0x04, CIO1-DO4:0x08)<br /> | |
| - | + | (Send Value: CIO2-DO1:0x10, CIO2-DO2:0x20, CIO2-DO3:0x40, CIO2-DO4:0x80)<br /> | |
| - | + | ||
| - | + | /* Ex: Use ((CIO1-DO1(0x01) + CIO2-DO1(0x10) + CIO2-DO4(0x80)) send DO signal. */ | |
| - | + | BYTE byteDoVal = 0x91; | |
| - | + | F75113_SetDigital_Low_Output(byteDoVal); | |
| - | + | ||
| - | + | === Step5: 'F75113_GetDigital_Low_Input() to get CIO1 and CIO2 DI pin recieved signal. === | |
| - | + | (Get Value: CIO1-DI1:0x01, CIO1-DI2:0x02, CIO1-DI3:0x04, CIO1-DI4:0x08)<br /> | |
| - | + | (Get Value: CIO2-DI1:0x10, CIO2-DI2:0x20, CIO2-DI3:0x40, CIO2-DI4:0x80)<br /> | |
| - | + | ||
| - | + | /* Get DI value from CIO1 and CIO2 */ | |
| - | + | BYTE byteDoVal = F75113_GetDigital_Low_Input(); | |
| - | + | ||
| - | + | === Step6: Call 'F75113_SetDigital_High_Output() to use CIO3 and CIO4 DO pin send signal. === | |
| - | === | + | (Send Value: CIO3-DO1:0x01, CIO3-DO2:0x02, CIO3-DO3:0x04, CIO3-DO4:0x08)<br /> |
| + | (Send Value: CIO4-DO1:0x10, CIO4-DO2:0x20, CIO4-DO3:0x40, CIO4-DO4:0x80)<br /> | ||
| + | |||
| + | /* Ex: Use ((CIO3-DO1(0x01) + CIO4-DO1(0x10) + CIO4-DO4(0x80)) send DO signal. */ | ||
| + | BYTE byteDoVal = 0x91; | ||
| + | F75113_SetDigital_High_Output(byteDoVal); | ||
| + | |||
| + | === Step7: 'F75113_GetDigital_High_Input() to get CIO3 and CIO4 DI pin recieved signal. === | ||
| + | (Get Value: CIO3-DI1:0x01, CIO3-DI2:0x02, CIO3-DI3:0x04, CIO3-DI4:0x08)<br /> | ||
| + | (Get Value: CIO4-DI1:0x10, CIO4-DI2:0x20, CIO4-DI3:0x40, CIO4-DI4:0x80)<br /> | ||
| + | |||
| + | /* Get DI value from CIO3 and CIO4 */ | ||
| + | BYTE byteDoVal = F75113_GetDigital_High_Input(); | ||
| + | |||
| + | === Step8: Call 'F75113_SetWDT_Enable() to start WDT. === | ||
| + | (Time seconds value: Seconds from 0 to 255)<br /> | ||
| + | /* Ex: Set WDT enable after 10 seconds. */ | ||
| + | byteWdVal = 10; | ||
| + | F75113_SetWDT_Enable(byteWdVal); | ||
| + | |||
| + | === Step9: Call 'F75113_SetWDT_Disable() to stop WDT. === | ||
| + | /* If WDT already start, stop it.*/ | ||
| + | F75113_SetWDT_Disable(); | ||
| - | + | === Final step: Call 'SMBUS_Uninstall()' to release SMBUS resource if program closed. === | |
| - | + | /* Release SMBUS resource */ | |
| - | + | SMBus_Uninstall(); | |
| - | + | ||
| - | + | ||
| - | + | ||
| - | + | ||
| - | + | ||
| - | + | ||
| - | + | ||
| - | + | ||
| - | + | ||
| - | + | ||
| - | + | ||
Current revision
The Sample code source you can download from
<FTP>
Binary file(64 bit): F75113_SMBUSv1.0.2L_Bin
We do the demo test with a test tool which DIx connect to DOx with Relay.
libF75113 DLL
<FTP>
DLL file: libF75113
libF75113 DLL Sample Code
<FTP>
Source file: F75113_SAMPLE_CODE
Binay file: F75113_SAMPLE_BIN
MB Support List
| Cacrd |
M113A |
|---|
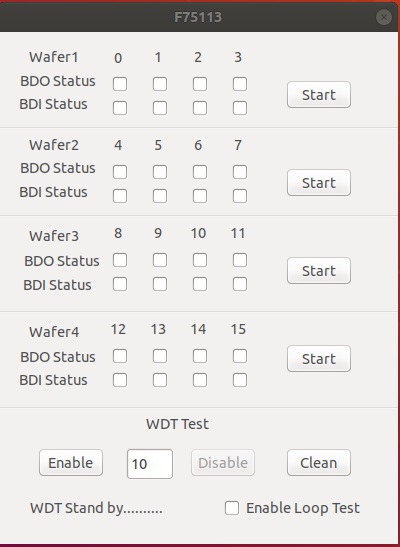
How to use this Demo Application
Before you use this
please enter F75113set.sh and read the Readme.txt enter command
after all you can open the program
1. Press the "Test" button to test CIO1 function
2. Press the "C2test" button to test CIO2 function
3. Press the "C3test" button to test CIO3 function
4. Press the "C4test" button to test CIO4 function
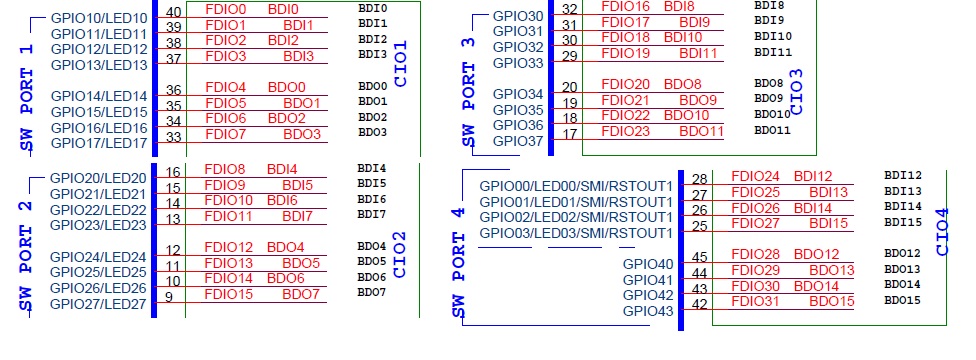
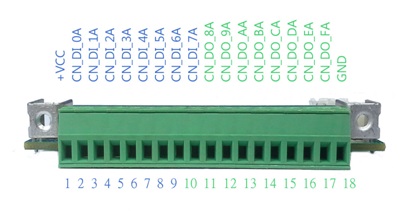
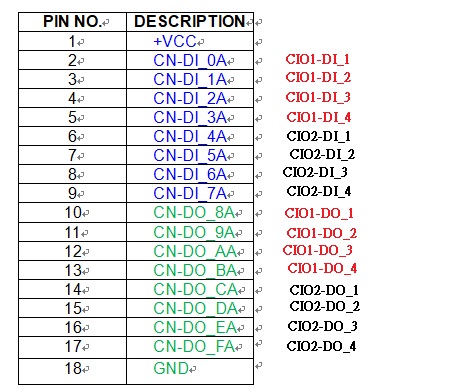
F75113 GPIO Picture
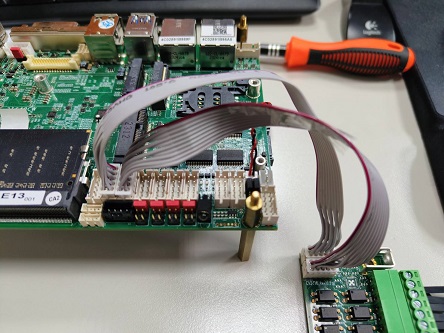
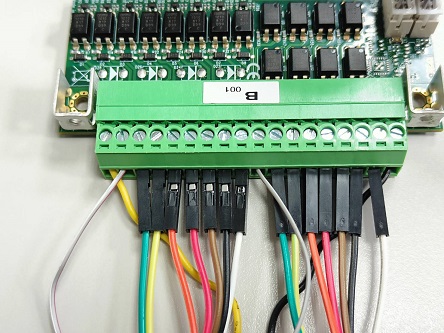
How to use libF75113
Using (3I640CW + CIO116B) to example how to using "libF75113" to develop your program.
Introduction
"libF75113" could helps developer quickly operate F75113 by SMBUS.
It include "libF75113.h","libF75113.so","SMBus.h","SMBus.c" and "YjlDef.h".
Attention: "SUDO" permissions must be used during execution. (Ex: sudo ./F75113_SAMPLE_CODE)
Steps to use libF75113
Step1. Unzip "libF75113.zip" and puts all of files to your project
Link "libF75113.so" and include "libF75113.h".
Step2. Call 'SMBUS_Install()' to initial SMBUS resource
   /* Initial SMBUS resource */
   if(SMBus_Install() == FALSE)
   {
       printf("Initial SMBUS failed!!! Quit console, Bye bye! \n");
       return false;
   }
Step3: Call 'F75113_Init()' to initial F75113 device. It default to initial CIO1(4I4O), CIO2(4I4O), CIO3(4I4O) and CIO4(4I4O).
   /* Initial F75113 CIO1, CIO2, CIO3 and CIO4. Initial F75113 WDT */
   bInitOk = F75113_Init();
   if(bInitOk == false)
       printf("F75113 initial failed!!!!\n");
   else
       printf("F75113 initial success.\n");
F75113_SetWDT_init();
Step4: Call 'F75113_SetDigital_Low_Output() to use CIO1 and CIO2 DO pin send signal.
(Send Value: CIO1-DO1:0x01, CIO1-DO2:0x02, CIO1-DO3:0x04, CIO1-DO4:0x08)
(Send Value: CIO2-DO1:0x10, CIO2-DO2:0x20, CIO2-DO3:0x40, CIO2-DO4:0x80)
   /* Ex: Use ((CIO1-DO1(0x01) + CIO2-DO1(0x10) + CIO2-DO4(0x80)) send DO signal. */
   BYTE byteDoVal = 0x91;
   F75113_SetDigital_Low_Output(byteDoVal);
Step5: 'F75113_GetDigital_Low_Input() to get CIO1 and CIO2 DI pin recieved signal.
(Get Value: CIO1-DI1:0x01, CIO1-DI2:0x02, CIO1-DI3:0x04, CIO1-DI4:0x08)
(Get Value: CIO2-DI1:0x10, CIO2-DI2:0x20, CIO2-DI3:0x40, CIO2-DI4:0x80)
   /* Get DI value from CIO1 and CIO2 */
   BYTE byteDoVal = F75113_GetDigital_Low_Input();
Step6: Call 'F75113_SetDigital_High_Output() to use CIO3 and CIO4 DO pin send signal.
(Send Value: CIO3-DO1:0x01, CIO3-DO2:0x02, CIO3-DO3:0x04, CIO3-DO4:0x08)
(Send Value: CIO4-DO1:0x10, CIO4-DO2:0x20, CIO4-DO3:0x40, CIO4-DO4:0x80)
   /* Ex: Use ((CIO3-DO1(0x01) + CIO4-DO1(0x10) + CIO4-DO4(0x80)) send DO signal. */
   BYTE byteDoVal = 0x91;
   F75113_SetDigital_High_Output(byteDoVal);
Step7: 'F75113_GetDigital_High_Input() to get CIO3 and CIO4 DI pin recieved signal.
(Get Value: CIO3-DI1:0x01, CIO3-DI2:0x02, CIO3-DI3:0x04, CIO3-DI4:0x08)
(Get Value: CIO4-DI1:0x10, CIO4-DI2:0x20, CIO4-DI3:0x40, CIO4-DI4:0x80)
   /* Get DI value from CIO3 and CIO4 */
   BYTE byteDoVal = F75113_GetDigital_High_Input();
Step8: Call 'F75113_SetWDT_Enable() to start WDT.
(Time seconds value: Seconds from 0 to 255)
   /* Ex: Set WDT enable after 10 seconds. */
   byteWdVal = 10;
   F75113_SetWDT_Enable(byteWdVal);
Step9: Call 'F75113_SetWDT_Disable() to stop WDT.
   /* If WDT already start, stop it.*/
   F75113_SetWDT_Disable();
Final step: Call 'SMBUS_Uninstall()' to release SMBUS resource if program closed.
   /* Release SMBUS resource */
   SMBus_Uninstall();
