請先看『使用說明』
DPC Module:DPC Console under Linux
From LEXWiKi
(Difference between revisions)
| Line 40: | Line 40: | ||
#Select light sensor range with command "-lr". Ex: Select range 1000 with command "-lr0". <br />(0 = 1000, 1 = 4000, 2 = 16000, 3 = 64000) <br /> | #Select light sensor range with command "-lr". Ex: Select range 1000 with command "-lr0". <br />(0 = 1000, 1 = 4000, 2 = 16000, 3 = 64000) <br /> | ||
#Turn on/off using custom bounding range with command "-lc". Ex: Turn on custom bounding range with command "-lc1". <br />(0 = Use, 1 = Not use) <br /> | #Turn on/off using custom bounding range with command "-lc". Ex: Turn on custom bounding range with command "-lc1". <br />(0 = Use, 1 = Not use) <br /> | ||
| - | # | + | #Set a custom value for light sensor maximum range with command "-lmax". Ex: Set 100 for maximum range with command "-lmax9". <br />(0 = 10, 1 = 20, 2 = 30, 3 = 40, 4 = 50, 5 = 60, 6 = 70, 7 = 80, 8 = 90, 9 = 100) <br /> |
| - | # | + | #Set a custom value for light sensor median range with command "-lmed". Ex: Set 50 for median range with command "-lmed4". <br />(0 = 10, 1 = 20, 2 = 30, 3 = 40, 4 = 50, 5 = 60, 6 = 70, 7 = 80, 8 = 90, 9 = 100) <br /> |
| - | # | + | #Set a custom value for light sensor minimum range with command "-lmin". Ex: Set 10 for minimum range with command "-lmin0". <br />(0 = 10, 1 = 20, 2 = 30, 3 = 40, 4 = 50, 5 = 60, 6 = 70, 7 = 80, 8 = 90, 9 = 100) <br /> |
== How to use GPIO module == | == How to use GPIO module == | ||
| + | |||
| + | #Print GPIO module help menu with command "-hg". <br /> | ||
| + | #Turn on/off GPIO module to modify duty cycle value. With command "-ga". Ex: Turn off GPIO active with command "-ga0". <br />(0 = Off, 1 = On) <br />Attention: If active GPIO module, light sensor module will be turned off. <br /> | ||
== Sample code Introduction == | == Sample code Introduction == | ||
Revision as of 18:28, 28 May 2020
Contents |
The Sample code source you can download form
Binary file:
???DPCv4.2.2W_bin.zip
???DPC_LightSensor_4.2.2W_bin.zip
How to compile source code
- Compile source code with Code::Blocks.
- Download and install the Code::Block with command "apt-get install codeblocks".
- Open an exist project(DPC_Console.cbp) in Code::Blocks, click the compile button.
- Download and install the Code::Block with command "apt-get install codeblocks".
- Compile source code with "make"
- cd DPC_Console
- key in command "make".
- Select panel what you try to adjust with command "-t". Ex: Select 200 Hz with command "-d0".
- cd DPC_Console
Before you make it, you need to install : "make" "make-guile" "pkg-config" "gcc" "gtk2.0"
How to use the DPC console application
- Install resource before execute application. ".\install.sh"
- Execute the application. ".\DPC_Console".
- Set brightness from 10 to 100 with command "-d". Ex: Set brightness 50 with command "-d50".
- Select panel what you try to adjust with command "-t". Ex: Select 200 Hz with command "-d0".
(0 = 200 Hz, 1 = 275 Hz, 2 = 380 Hz, 3 = 20 Hz, 4 = 25 Hz)
- Select range what you add / subtract brightness with command "-r". Ex: Select 10 Sz with command "-r4".
(0 = 1 Sz, 1 = 2 Sz, 2 = 3 Sz, 3 = 5 Sz, 4 = 10 Sz)
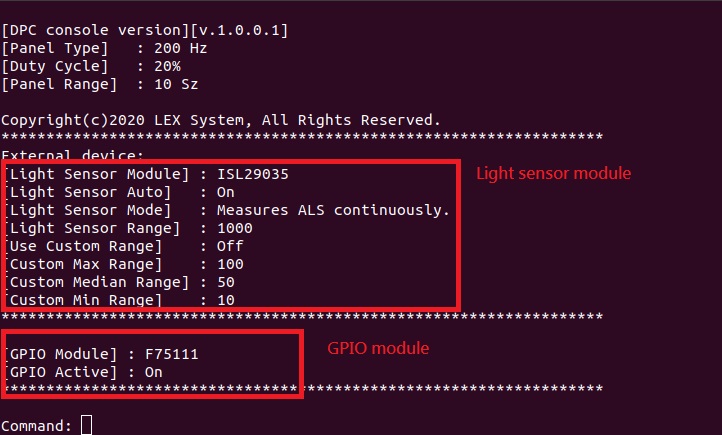
- Dump DPC information with command "-i".
- Print DPC help menu with command "-h".
- Step add / subtract brightness with "Up arrow key" / "Down arrow key".
- Turn off screen backlight with command "-f". Duty cycle value will be modify to 0.
- Default hot key to turn on screen backlight. With hot key "Ctrl + n". Duty cycle value will be modify to 50.
- Quit DPC application with command "Exit".

How to use light sensor module
- Print light sensor help menu with command "-hl".
- Turn on/off light sensor to modify duty cycle value automaticaly. With command "-la". Ex: Turn off light sensor active with command "-la0".
(0 = Off, 1 = On)
Attention: If active light sensor module, GPIO module will be turned off.
- Select light sensor mode with command "-lm". Ex: Select ALS mode with command "-lm0".
(0 = Measures ALS continuously, 1 = Measures IR continuously)
- Select light sensor range with command "-lr". Ex: Select range 1000 with command "-lr0".
(0 = 1000, 1 = 4000, 2 = 16000, 3 = 64000)
- Turn on/off using custom bounding range with command "-lc". Ex: Turn on custom bounding range with command "-lc1".
(0 = Use, 1 = Not use)
- Set a custom value for light sensor maximum range with command "-lmax". Ex: Set 100 for maximum range with command "-lmax9".
(0 = 10, 1 = 20, 2 = 30, 3 = 40, 4 = 50, 5 = 60, 6 = 70, 7 = 80, 8 = 90, 9 = 100)
- Set a custom value for light sensor median range with command "-lmed". Ex: Set 50 for median range with command "-lmed4".
(0 = 10, 1 = 20, 2 = 30, 3 = 40, 4 = 50, 5 = 60, 6 = 70, 7 = 80, 8 = 90, 9 = 100)
- Set a custom value for light sensor minimum range with command "-lmin". Ex: Set 10 for minimum range with command "-lmin0".
(0 = 10, 1 = 20, 2 = 30, 3 = 40, 4 = 50, 5 = 60, 6 = 70, 7 = 80, 8 = 90, 9 = 100)
How to use GPIO module
- Print GPIO module help menu with command "-hg".
- Turn on/off GPIO module to modify duty cycle value. With command "-ga". Ex: Turn off GPIO active with command "-ga0".
(0 = Off, 1 = On)
Attention: If active GPIO module, light sensor module will be turned off.
Sample code Introduction
Define SMBus regester
#define SMBUSPORT		0x0500
#define	HST_STS			SMBUSPORT+0x00
#define	HST_CNT			SMBUSPORT+0x02
#define	HST_CMD			SMBUSPORT+0x03
#define	XMIT_SLVA		SMBUSPORT+0x04
#define	HST_D0			SMBUSPORT+0x05
#define bSize			1
#define SADD			0xb0
#define PWMFeq			0x01
#define PWMDuty			0x02
Set Frequency data
DWORD dwPortVal;
bool bResult;
bResult = InitializeWinIo();

if (bResult){
     SetPortVal(HST_STS, 0xFE, bSize); //start
     Sleep(20);
     SetPortVal(XMIT_SLVA, SADD, bSize); //set
     Sleep(20);
     SetPortVal(HST_CMD, PWMFeq, bSize); //set frequency
     Sleep(20);
     GetPortVal(HST_STS, &dwPortVal, bSize);
     Sleep(20);
     dwPortVal = dwPortVal & 0x01;
     if (dwPortVal == 0){
          SetPortVal(HST_D0, fvalue, bSize); //write data into frequency
          Sleep(20);
          SetPortVal(HST_CNT, 0x48, bSize); //stop
          Sleep(20);
          ShutdownWinIo();
     }
     else
          ShutdownWinIo();
}
ShutdownWinIo();
Set Duty data
UpdateData(TRUE);
DWORD dwPortVal;
bool bResult;
bResult = InitializeWinIo();

if (bResult){
     SetPortVal(HST_STS, 0xFE, bSize); //start
     Sleep(20);
     SetPortVal(XMIT_SLVA, SADD, bSize); //set
     Sleep(20);
     SetPortVal(HST_CMD, PWMDuty, bSize); //set duty
     Sleep(20);
     GetPortVal(HST_STS, &dwPortVal, bSize);
     Sleep(20);
     dwPortVal = dwPortVal & 0x01;
     if (dwPortVal == 0){
          if (inverter == false)
               SetPortVal(HST_D0, dvalue * 10 , bSize); //write data into data
          else if (inverter == true)
               SetPortVal(HST_D0, (10 - dvalue) * 10 , bSize);
          Sleep(20);
   	   SetPortVal(HST_CNT, 0x48, bSize); //stop
          Sleep(20);
          ShutdownWinIo();
     }
     else
          ShutdownWinIo();
}
ShutdownWinIo();
